
The Juiciest Bacon Cheeseburger Bombs Recipe Ever Made
Bursting with savory goodness, these bacon cheeseburger bombs pack an explosion of flavor that’ll make your taste buds dance.
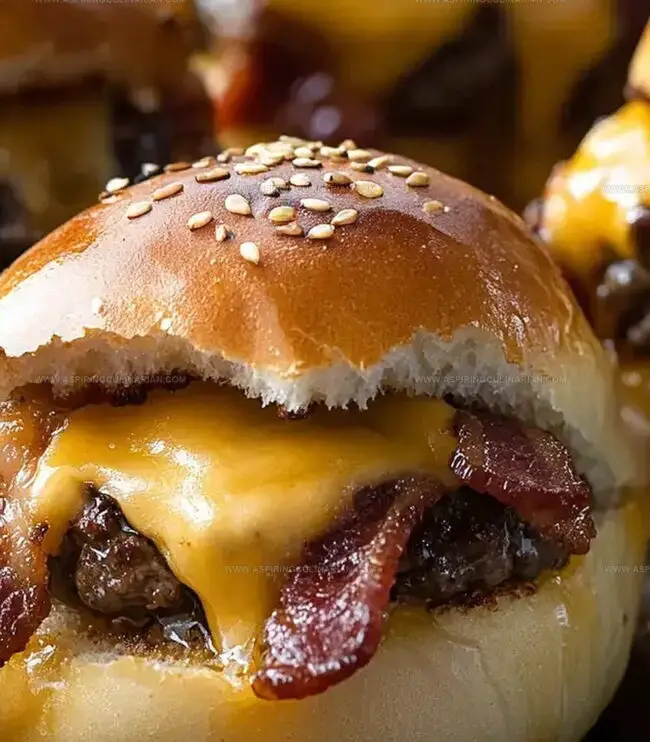
Ground beef sizzles with crispy bacon bits nestled inside a golden, flaky dough pocket.
Each bite delivers a mouthwatering combination of melted cheese and seasoned meat that screams comfort food.
The recipe transforms simple ingredients into an irresistible appetizer perfect for game days or casual gatherings.
Crispy on the outside and molten on the inside, these bombs are a crowd-pleasing sensation.
Cheese oozes from every crevice, creating a delectable experience that beckons you to take another bite.
Prepare to elevate your snack game with this epic handheld delight that promises pure culinary excitement.
Bacon Cheeseburger Bombs Flavor Surprise

Ingredients for Bacon Cheeseburger Bombs
Main Ingredients:Aromatics and Flavor Enhancers:Finishing and Topping Ingredients:Easy Steps for Cheeseburger Bombs

Step 1: Brown Meaty Goodness
Grab a skillet and sizzle ground beef with diced onions until they’re perfectly cooked and the meat turns a rich golden brown.
Carefully drain away any extra grease.
Toss in crispy crumbled bacon and shredded cheese, mixing everything together so the flavors mingle and dance.
Step 2: Wrap and Seal
Take each biscuit dough round and gently press it flat with your fingers.
Scoop a generous spoonful of the meaty filling right into the center.
Carefully fold the edges over, pinching and sealing to create little flavor-packed spheres.
Place these tasty bundles seam-side down on a baking sheet lined with parchment paper.
Step 3: Prep for Baking
Brush the tops of your burger bombs with melted butter for extra golden shine.
If you’re feeling fancy, sprinkle some sesame seeds on top.
Crank up the oven to a toasty 375 degrees Fahrenheit.
Step 4: Transform into Golden Delights
Slide the baking sheet into the oven and bake for 12-15 minutes.
Watch for that perfect golden-brown color that signals crispy, delicious perfection.
Pull them out and let them cool just slightly.
Serve immediately with your favorite condiments like ketchup, mustard, or ranch dressing for dipping.
Pro Tips for Cheeseburger Bombs

Creative Bacon Cheeseburger Bomb Options

Serving Bacon Cheeseburger Bombs
Storage Solutions for Cheeseburger Bombs

FAQs
Ground beef, crispy bacon bits, and melted cheese create a rich, savory filling that packs incredible flavor into each bomb.
Yes, you can prepare the bombs and refrigerate them unbaked for up to 24 hours before baking, making party prep super convenient.
Not at all! These bombs are beginner-friendly and require basic cooking skills like browning meat and folding biscuit dough.
Absolutely! These bacon cheeseburger bombs are perfect for gatherings, game days, and potlucks because they’re easy to make in larger quantities.
Print
Bacon Cheeseburger Bombs Recipe
- Total Time: 30 minutes
- Yield: 4 1x
Description
Flavor-packed bacon cheeseburger bombs deliver explosive comfort in one bite. Crispy exterior gives way to melted cheese and savory ground beef, promising a mouthwatering experience you won’t forget.
Ingredients
Meat and Protein:
- 1 pound (454 grams) ground beef
- 6 slices bacon, cooked and crumbled
- 1 small onion, finely diced
Dairy and Cheese:
- 1 cup (113 grams) cheddar cheese, shredded
- 2 tablespoons (30 milliliters) butter, melted
Additional Ingredients:
- 1 can (16 ounces / 454 grams) refrigerated biscuit dough
- Salt and pepper to taste
- 1 teaspoon (5 milliliters) sesame seeds (optional)
- Pickle slices for serving
- Ketchup for dipping
- Mustard for dipping
Instructions
- Sauté ground beef and diced onions in a skillet over medium-high heat until meat is thoroughly cooked and onions are translucent, approximately 6-8 minutes.
- Drain excess fat from the meat mixture, then fold in crispy crumbled bacon and shredded cheese, mixing until evenly distributed.
- Gently stretch each biscuit dough round into a thin circular shape using fingertips, creating enough surface area to hold the filling.
- Place a generous spoonful of the beef-bacon-cheese mixture in the center of each stretched dough round.
- Carefully gather the edges of the dough, pinching and twisting to completely encase the filling, forming a sealed spherical shape.
- Arrange the formed bombs seam-side down on a parchment-lined baking sheet, ensuring they are not touching each other.
- Generously brush the exterior of each bomb with melted butter and optionally sprinkle with sesame seeds for added texture and flavor.
- Preheat the oven to 375°F and position the rack in the middle position.
- Bake for 12-15 minutes, rotating the pan halfway through, until the bombs are golden brown and sound hollow when tapped.
- Remove from oven and let rest for 2-3 minutes before serving alongside preferred condiments like ketchup or mustard.
Notes
- Drain beef thoroughly to prevent soggy bombs and ensure crispy texture.
- Try different cheese types like sharp cheddar or pepper jack for extra flavor complexity.
- Keep biscuit dough chilled until ready to use, which helps maintain tight seal and prevents filling leakage during baking.
- For gluten-free version, substitute biscuit dough with gluten-free biscuit mix or wrap filling in large lettuce leaves for low-carb option.
- Prep Time: 15 minutes
- Cook Time: 15 minutes
- Category: Lunch, Dinner, Snacks
- Method: Baking
- Cuisine: American
Nutrition
- Serving Size: 4
- Calories: 400
- Sugar: 2 g
- Sodium: 800 mg
- Fat: 25 g
- Saturated Fat: 10 g
- Unsaturated Fat: 12 g
- Trans Fat: 0 g
- Carbohydrates: 30 g
- Fiber: 1 g
- Protein: 20 g
- Cholesterol: 70 mg
Lena Martinez
Contributing Writer & Culinary Educator
Expertise
Southwestern and Latin American cuisines, Vegetarian and plant-based recipe development, Culinary education and community outreach
Education
Santa Fe Community College, Santa Fe, NM
Certificate in Culinary Arts
Emphasized Southwestern cuisine and sustainable cooking practices
Lena grew up surrounded by the colors, spices, and traditions of the Southwest – flavors that sparked her love for bold, honest cooking. After earning her Culinary Arts certificate at Santa Fe Community College, she made it her mission to teach home cooks how to create flavorful, plant-powered meals without the fuss.
Her recipes are packed with vibrant ingredients, simple steps, and the kind of heart that turns a regular meal into something you’ll want to share. Outside the kitchen, Lena spends her time wandering farmers’ markets, trading family recipes, and helping young chefs find their voice through food.