
Dreamy Chocolate Chip Cookie Dough Ice Cream Bars Recipe
Blending creamy chocolate chip cookie dough into a frozen treat creates an irresistible dessert that sparks pure joy.
Nostalgic memories of sneaking spoonfuls of raw dough melt together with cool, smooth ice cream.
Sweet memories dance across taste buds with each decadent bite.
Cool and smooth textures combine in a playful dessert that feels like a childhood dream.
Unexpected layers of comfort emerge from this simple yet indulgent recipe.
Summer afternoons become magical moments when you scoop into these delightful frozen bars.
Chill out and savor every delicious moment of this crowd-pleasing sensation.
Cookie Dough Ice Cream Bars—Classic Dessert Meets Frozen Treat
Gather These Ingredients for Cookie Dough Ice Cream Bars
Cookie Base:Chocolate Components:Ice Cream Layer:Additional Components:Assembling Frozen Chocolate Chip Cookie Dough Bars
Step 1: Whip Up Cookie Dough Base
Grab a mixing bowl and transform softened butter, brown sugar, and granulated sugar into a silky smooth mixture.
Splash in vanilla extract for that irresistible aroma and mix until everything blends beautifully.
Step 2: Blend Dry Ingredients
Gradually introduce flour and salt to your creamy mixture, stirring until perfectly combined.
Gently fold in mini chocolate chips, creating delightful pockets of chocolatey goodness throughout the dough.
Step 3: Craft the Foundation
Line a loaf pan with parchment paper, allowing some overhang for easy removal.
Carefully press half of the cookie dough into an even, smooth layer that covers the entire bottom of the pan.
Step 4: Layer with Creamy Goodness
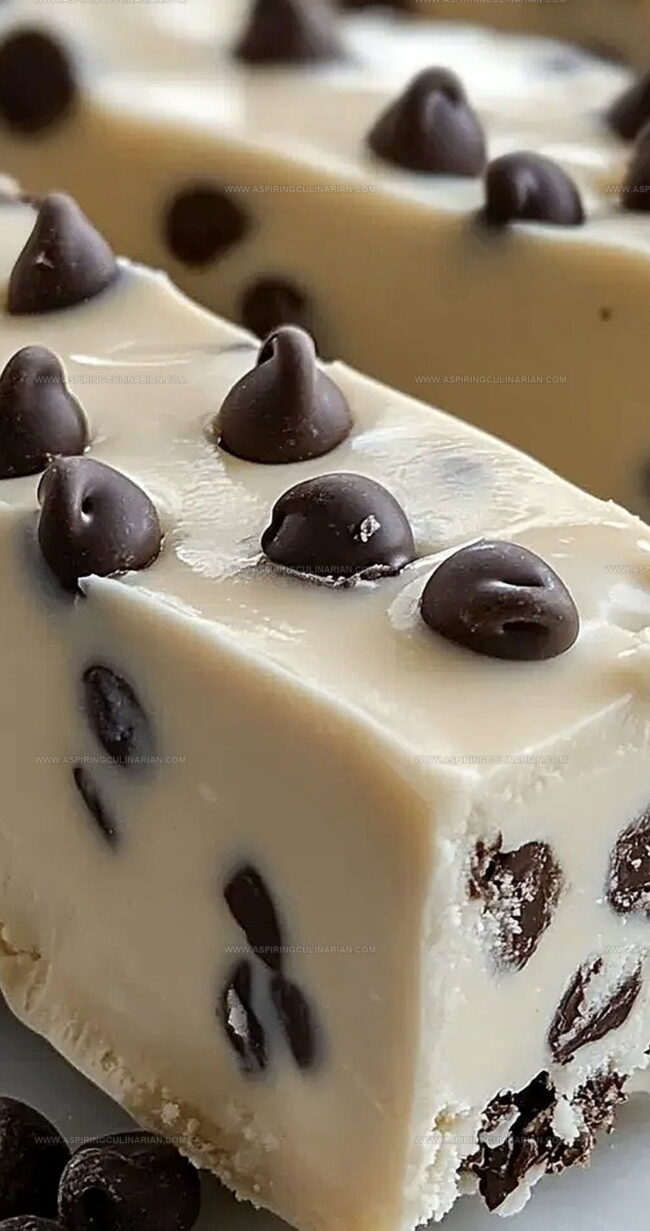
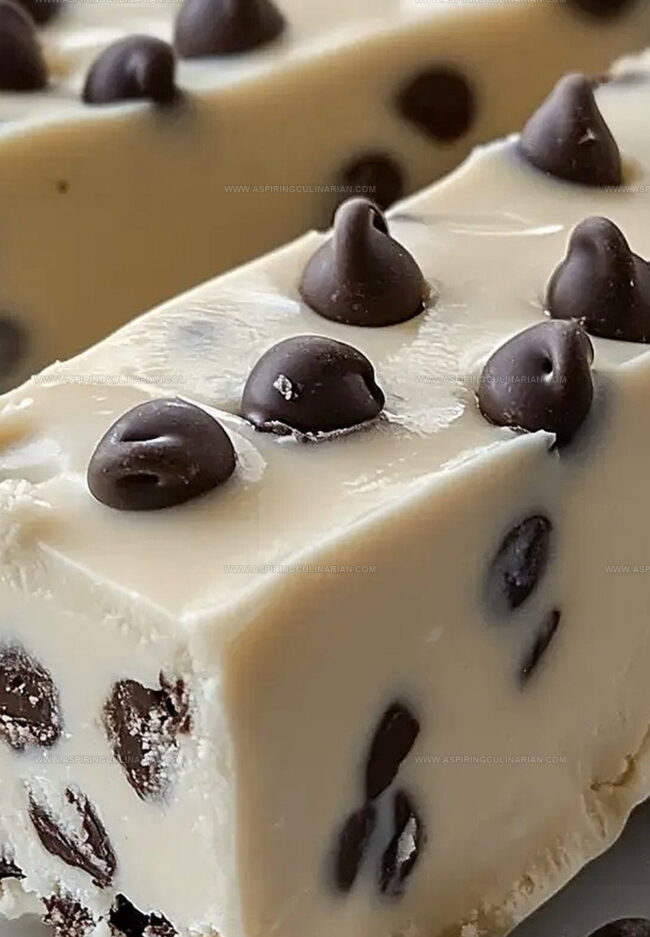
Spread softened vanilla ice cream over the cookie dough base, using a spatula to create a perfectly smooth surface that covers every inch of the first layer.
Step 5: Create the Topping
Take the remaining cookie dough and delicately press it over the ice cream, ensuring complete coverage and a seamless finish.
Step 6: Chill and Set
Place the pan in the freezer and let it transform for at least 2 hours.
The bars need time to become wonderfully firm and fully integrated.
Step 7: Chocolate Dip Extravaganza
Lift the entire creation from the pan using parchment paper.
Slice into individual bars.
Dunk each bar into melted milk chocolate, creating a decadent coating that’ll make mouths water.
Step 8: Final Freeze and Garnish
Sprinkle the remaining mini chocolate chips over the chocolate-coated bars.
Return to the freezer for 15-20 minutes to let the chocolate set into a crisp, glossy shell.
Tips for the Creamiest Cookie Dough Ice Cream Bars
Fun Add-Ins for Your Next Batch of Ice Cream Bars
How to Slice and Serve Ice Cream Bars Like a Pro
Keeping Ice Cream Bars Fresh in the Freezer
FAQs
Yes! Kids can help mix ingredients, press dough into the pan, and sprinkle chocolate chips under adult supervision.
Absolutely! You can use dark, white, or semi-sweet chocolate instead of milk chocolate to customize the flavor.
Let the bars sit at room temperature for 2-3 minutes before cutting, and use a sharp knife wiped clean between each slice for smooth cuts.
You can use an 8×8-inch square baking pan as an alternative. Just adjust the layering and ensure even distribution of ingredients.
Print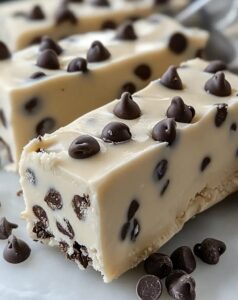
Chocolate Chip Cookie Dough Ice Cream Bars Recipe
- Total Time: 2 hours 50 minutes
- Yield: 12 1x
Description
Indulgent chocolate chip cookie dough ice cream bars blend nostalgic childhood flavors with creamy frozen delight. Cool summer treats combine homemade cookie dough layers with silky vanilla ice cream, promising delicious moments you’ll savor with each refreshing bite.
Ingredients
Chocolate Base:
- 1 cup all-purpose flour
- 1/2 cup unsalted butter, softened
- 1/2 cup packed brown sugar
- 1/4 cup granulated sugar
- 1/2 teaspoon salt
- 1 teaspoon vanilla extract
Chocolate Chips:
- 1 1/2 cups mini chocolate chips, divided
Coating and Ice Cream:
- 1 pint vanilla ice cream, softened
- 10 ounces (283 grams) milk chocolate, melted (for coating)
Instructions
- Prepare the base by thoroughly blending softened butter with brown and granulated sugars until achieving a creamy, uniform texture. Incorporate vanilla extract for enhanced flavor depth.
- Gradually introduce flour and salt into the mixture, stirring until completely integrated. Gently fold mini chocolate chips throughout the dough, ensuring even distribution.
- Create a foundation by carefully lining a loaf pan with parchment paper, allowing slight overhang for easy removal. Evenly compress half of the prepared cookie dough across the pan’s bottom, creating a smooth, compact layer.
- Carefully spread softened vanilla ice cream over the initial cookie dough layer, using a spatula to create an even, consistent surface that covers the entire base completely.
- Delicately place the remaining cookie dough on top of the ice cream, gently pressing to form a complete coverage that seals the ice cream layer.
- Transfer the assembled dessert to the freezer, allowing it to solidify for approximately 2 hours or until the entire bar becomes completely firm and set.
- Extract the frozen creation from the pan using parchment paper edges. Slice into individual bars with a sharp knife, then carefully immerse each bar into melted milk chocolate for a decadent coating.
- Immediately sprinkle the remaining mini chocolate chips over the chocolate-coated bars. Return to the freezer for an additional 15-20 minutes to ensure the chocolate coating sets completely and becomes crisp.
Notes
- Use room temperature butter for smoother mixing and better texture, ensuring your cookie dough base blends perfectly without lumps.
- Gently fold chocolate chips to prevent overmixing, keeping the dough light and preventing tough cookie layers.
- Ensure complete freezing between layers to maintain clean, distinct layers and prevent mixing of cookie dough and ice cream.
- Dip bars quickly in melted chocolate and tap off excess to create an even, thin chocolate shell that snaps when bitten.
- Prep Time: 30 minutes
- Cook Time: 2 hours 20 minutes
- Category: Desserts, Snacks
- Method: Freezing
- Cuisine: American
Nutrition
- Serving Size: 12
- Calories: 291 kcal
- Sugar: 22 g
- Sodium: 101 mg
- Fat: 17 g
- Saturated Fat: 10 g
- Unsaturated Fat: 6 g
- Trans Fat: 0.2 g
- Carbohydrates: 29 g
- Fiber: 1 g
- Protein: 3 g
- Cholesterol: 40 mg
Nathaniel Brooks
Founder & Recipe Developer
Expertise
Farm-to-table cuisine, Seasonal recipe development, Culinary storytelling
Education
Ivy Tech Community College – Indianapolis, IN
Culinary Arts / Hospitality Administration & Events
Focused on hands-on training in classical and modern culinary techniques.
Nathaniel’s story starts in the foothills of the Appalachian Mountains, where farm stands, backyard gardens, and old family recipes shaped his love for real food. After graduating from Ivy Tech Community College in Indianapolis, he spent years working in farm-to-table kitchens, learning how to turn local, seasonal ingredients into something memorable.
Today, Nathaniel pours that same spirit into every single recipe on Aspiring Culinarian – recipes that feel real, comforting, and connected to the land. When he’s not in the kitchen, you’ll find him foraging wild herbs, chasing sunsets with his camera, or writing about the flavors that shaped his roots.