
The Best Chocolate Peanut Butter Brownie Pizza Recipe Ever Made
Indulgence takes a delightful turn with this chocolate peanut butter brownie pizza.
The decadent dessert blends rich chocolate and creamy peanut butter into a mouthwatering treat that defies traditional expectations.
Layers of fudgy brownie form a perfect base for a sweet canvas.
Drizzles of melted chocolate and swirls of peanut butter create a stunning visual and flavor experience.
Each slice promises a symphony of textures and tastes that dance across your palate.
chocolate and peanut butter lovers will find themselves falling head over heels for this irresistible dessert.
Prepare to savor every single bite of this extraordinary culinary creation.
Chocolate Peanut Butter Brownie Pizza Crowd Pleaser Revealed
Gather Brownie Pizza Ingredients With Ease
Main Ingredients:Baking Essentials:Topping Ingredients:Brownie Pizza Baking Guide Anyone Can Use
Step 1: Whip Up the Batter
Grab a mixing bowl and combine the REESE Spreads peanut butter chocolate with eggs.
Whisk energetically until the mixture becomes silky smooth.
Gently fold in flour and salt, stirring just enough to blend without overmixing.
Step 2: Bake the Delicious Base
Grease an 8-inch springform pan or cake pan.
Pour the prepared batter into the pan, spreading it evenly.
Slide the pan into a preheated oven at 350°F/180°C.
Bake until a toothpick inserted in the center comes out clean, typically around 15 minutes.
Step 3: Let the Brownie Cool Down
Carefully remove the pan from the oven.
Allow the brownie to rest and cool completely inside the pan.
This helps set the texture and makes it easier to add toppings.
Step 4: Spread the Creamy Layer
Once cooled, generously spread REESE Spreads peanut butter chocolate across the entire surface of the brownie base.
Aim for an even, luscious coating that covers every inch.
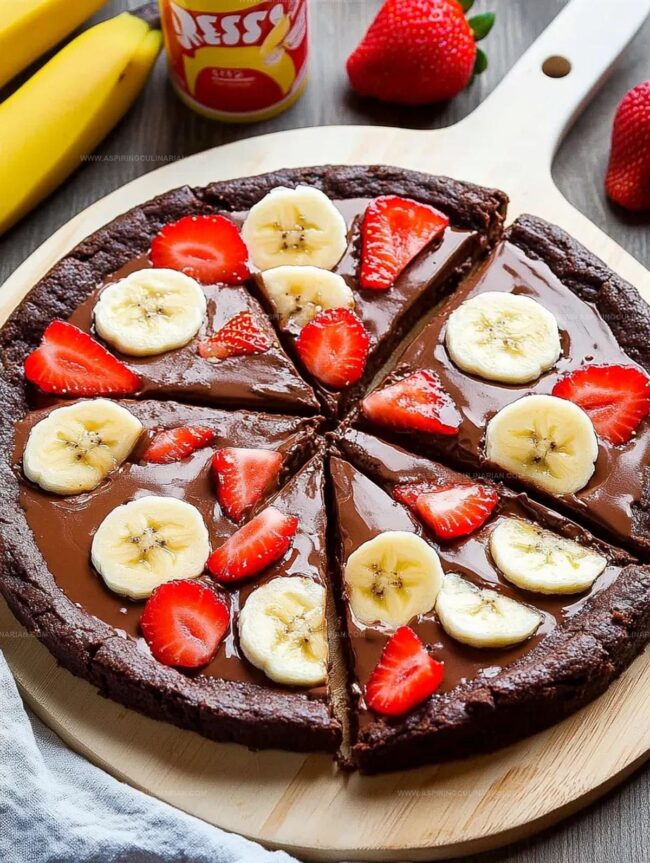
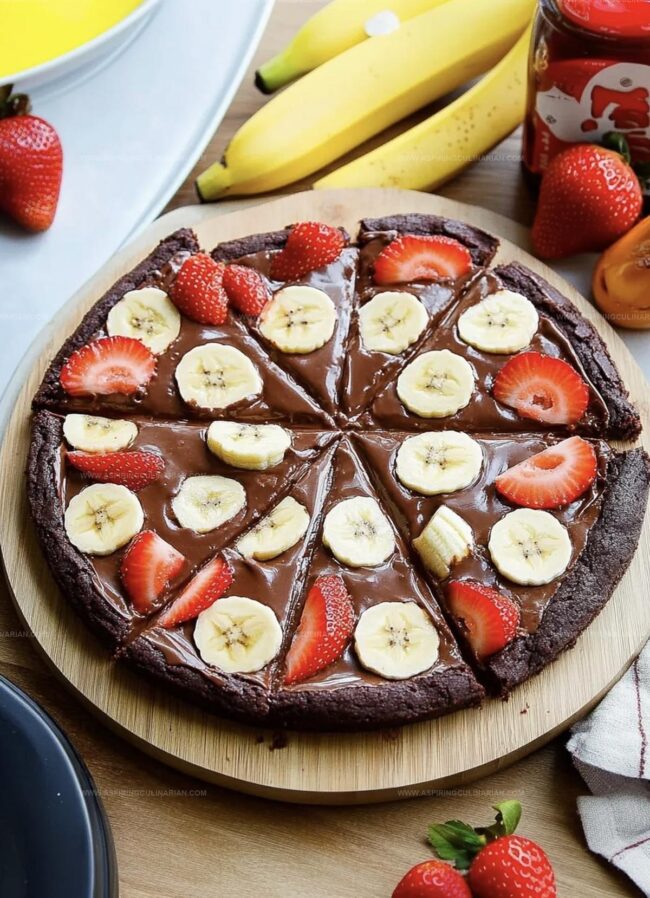
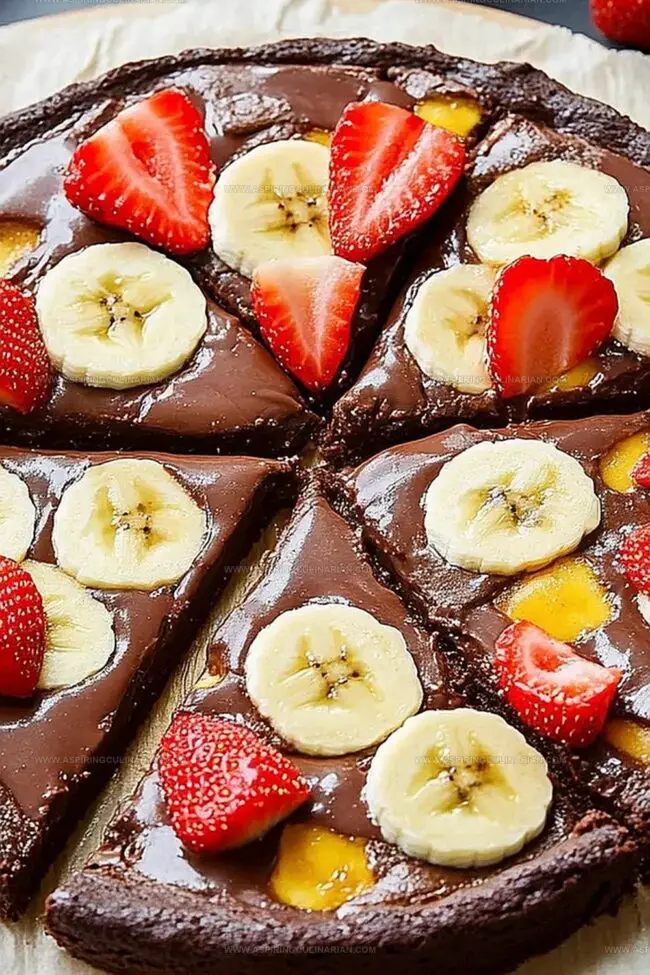
Step 5: Create a Fruity Masterpiece
Artfully arrange sliced bananas and strawberries on top of the chocolate layer.
Create a visually appealing pattern that makes the dessert look as delightful as it tastes.
Slice into wedges and serve your spectacular chocolate peanut butter brownie pizza.
Chocolate Peanut Butter Brownie Pizza Smart Tips
Brownie Pizza Tasty Flavors To Explore Next

Share Chocolate Peanut Butter Brownie Pizza Today
Store Brownie Pizza For Sweet Cravings
FAQs
Yes, you can substitute with other chocolate spreads or melted chocolate, but REESE Spreads provides the best flavor and texture for this recipe.
No, the recipe uses regular flour. To make it gluten-free, you’ll need to use a gluten-free flour alternative like almond or coconut flour.
Insert a toothpick into the center – if it comes out clean or with just a few moist crumbs, the brownie is done. Avoid overbaking to keep it moist.
Absolutely! Kids can help mix ingredients, arrange fruit toppings, and slice the brownie pizza under adult supervision.
Print
Chocolate Peanut Butter Brownie Pizza Recipe
- Total Time: 35 minutes
- Yield: 8 1x
Description
Chocolate lovers unite with this mouthwatering Chocolate Peanut Butter Brownie Pizza, a delightful dessert blending rich cocoa and creamy peanut butter. Sweet indulgence meets playful presentation, inviting you to savor each delectable slice of this irresistible treat.
Ingredients
Main Ingredients:
- 1 1/4 cups (296 ml) REESE Spreads peanut butter chocolate
- 2 eggs
- 1/2 cup (120 ml) all-purpose flour
Binding and Seasoning Ingredients:
- 1/2 teaspoon salt
Toppings:
- 1/3 cup (79 ml) REESE Spreads peanut butter chocolate
- 1 banana, sliced
- 4 strawberries, sliced
Instructions
- Whisk REESE Spreads peanut butter chocolate with eggs in a mixing bowl until achieving a uniform, silky consistency.
- Gently incorporate flour and salt into the mixture, stirring until ingredients are just combined without overmixing.
- Thoroughly grease an 8-inch springform pan, ensuring complete coverage to prevent sticking.
- Transfer brownie batter into prepared pan, spreading evenly with a spatula for uniform thickness.
- Place pan in preheated 350°F oven and bake for approximately 15 minutes, checking doneness by inserting a toothpick near the center.
- Once baked, remove from oven and allow brownie base to cool completely within the pan, preventing cracking or breaking.
- After cooling, spread an even layer of REESE Spreads peanut butter chocolate across the entire surface of the brownie.
- Artfully arrange sliced bananas and strawberries on top, creating an attractive circular pattern.
- Slice the brownie pizza into wedge-shaped portions, resembling a traditional pizza presentation.
- Serve immediately to enjoy optimal texture and flavor combination.
Notes
- Customize the Batter Choose high-quality cocoa powder or melted dark chocolate for deeper flavor complexity and richer brownie texture.
- Prevent Sticking Ensure springform pan is well-greased with butter or parchment paper for easy removal and perfect brownie edges.
- Temperature Control Watch baking time carefully since ovens vary; check doneness at 12 minutes to avoid dry or overcooked brownies.
- Dietary Adaptations Swap regular flour with gluten-free alternatives like almond or coconut flour for celiac or gluten-sensitive individuals.
- Prep Time: 20 minutes
- Cook Time: 15 minutes
- Category: Desserts, Snacks
- Method: Baking
- Cuisine: American
Nutrition
- Serving Size: 8
- Calories: 350
- Sugar: 18g
- Sodium: 180mg
- Fat: 22g
- Saturated Fat: 8g
- Unsaturated Fat: 12g
- Trans Fat: 0g
- Carbohydrates: 30g
- Fiber: 3g
- Protein: 8g
- Cholesterol: 50mg
Lena Martinez
Contributing Writer & Culinary Educator
Expertise
Southwestern and Latin American cuisines, Vegetarian and plant-based recipe development, Culinary education and community outreach
Education
Santa Fe Community College, Santa Fe, NM
Certificate in Culinary Arts
Emphasized Southwestern cuisine and sustainable cooking practices
Lena grew up surrounded by the colors, spices, and traditions of the Southwest – flavors that sparked her love for bold, honest cooking. After earning her Culinary Arts certificate at Santa Fe Community College, she made it her mission to teach home cooks how to create flavorful, plant-powered meals without the fuss.
Her recipes are packed with vibrant ingredients, simple steps, and the kind of heart that turns a regular meal into something you’ll want to share. Outside the kitchen, Lena spends her time wandering farmers’ markets, trading family recipes, and helping young chefs find their voice through food.