
Jolly Christmas Santa Suit Sugar Cookies Recipe for Holiday Joy
Santa festive Christmas sugar cookies bring magic right to your kitchen counter.
Colorful sprinkles and sweet frosting make these treats impossible to resist.
Crafting delightful Santa suit designs requires minimal baking skills and maximum creativity.
Soft, buttery dough becomes the perfect canvas for adorable holiday characters.
Red and white icing transforms simple sugar cookies into charming Santa figures.
Kids and adults alike will squeal with delight when decorating these whimsical treats.
Gather your baking buddies and unleash your inner pastry artist for an unforgettable Christmas adventure.
Santa Suit Sugar Cookie Cutouts for Festive Bakes
Ingredient Checklist for Santa Suit Cookie Dough
Main Ingredients:
Butter Ingredients:Liquid Ingredients:Dry Ingredients:Decorating Ingredients:Decorative Toppings:Rolling and Cutting Santa Suit Sugar Cookies
Step 1: Whip Butter And Sugar
Grab your mixing bowl and beat butter and sugar until they transform into a cloud-like, fluffy mixture.
This process creates the perfect base for your holiday treats.
Step 2: Incorporate Wet Ingredients
Gently fold in the egg along with vanilla and almond extracts.
Stir until everything blends smoothly and looks wonderfully combined.
Step 3: Blend Dry Components
In a separate bowl, whisk flour, baking powder, and salt until perfectly mixed.
Slowly incorporate these dry ingredients into your butter mixture, stirring until a soft dough forms.
Step 4: Chill Cookie Dough
Split the dough into two portions, wrap each in plastic wrap, and refrigerate for at least one hour.
This helps the dough become firm and easier to handle.
Step 5: Prepare Baking Station
Heat the oven to 350°F.
Line baking sheets with parchment paper to prevent sticking and ensure easy cookie removal.
Step 6: Shape Festive Cookies
Dust your work surface with flour.
Roll out the chilled dough to a quarter-inch thickness.
Use Santa-themed or round cookie cutters to create adorable shapes.
Step 7: Bake To Golden Perfection
Place cookie shapes on prepared baking sheets.
Bake for 8-10 minutes until edges turn a light golden color.
Transfer to a wire rack for cooling.
Step 8: Craft Royal Icing
Combine powdered sugar, meringue powder, and water.
Mix until silky smooth.
Divide icing and tint one portion vibrant red for Santa’s signature look.
Step 9: Design Santa Hat
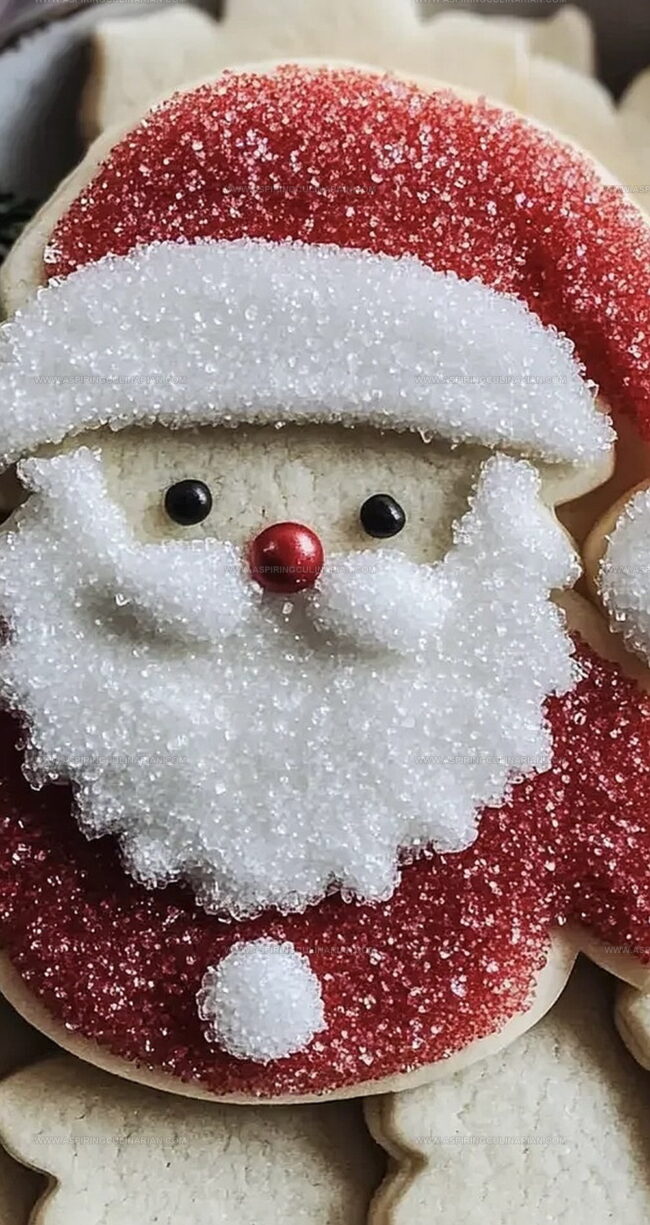
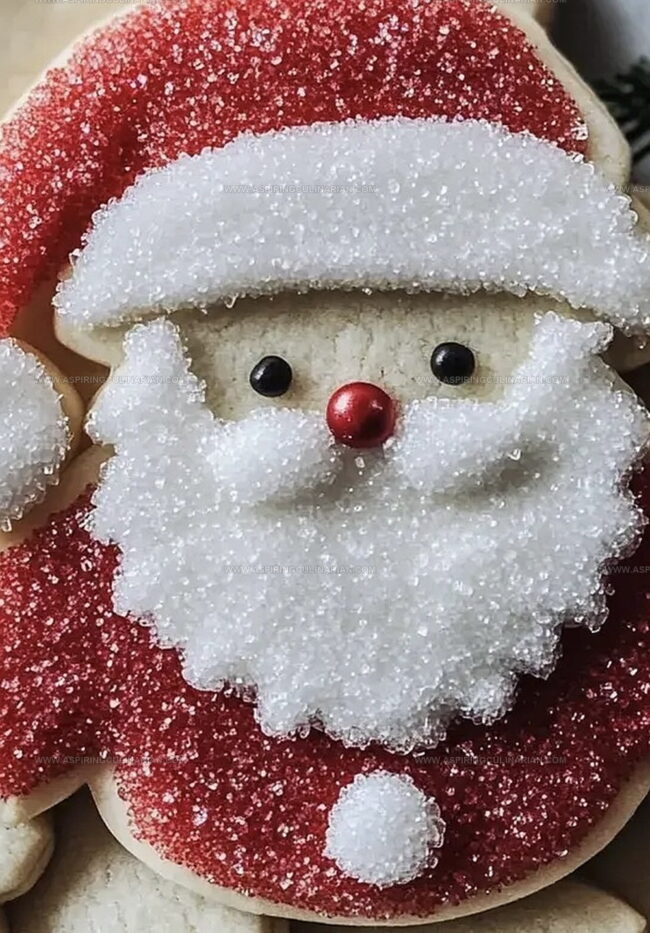
Use red icing to outline and fill the top portion of each cookie, representing Santa’s iconic hat.
Sprinkle red sanding sugar for extra sparkle.
Step 10: Add Snowy Details
Apply white icing to create fluffy beard and hat trim.
Dust with white sanding sugar for a magical winter effect.
Step 11: Bring Santa To Life
Create Santa’s face using pink and black nonpareils for cheeks and eyes.
Add a tiny red candy or mini M&M as his adorable nose.
Optional: draw a cheerful smile with white icing.
Step 12: Final Finishing
Allow all icing to dry completely.
This ensures your cookies look pristine and are ready for holiday celebrations or gift-giving.
Tips for Icing and Decorating Santa Suit Cookies
Santa Cookie Variations for Holiday Fun
How to Arrange Santa Cookies for Dessert Tables
Storage for Decorated Sugar Cookie Cutouts
FAQs
The recipe uses butter, flour, egg, vanilla, and optional almond extract for a classic sugar cookie base with traditional holiday flavors.
You’ll need mixing bowls, electric mixer, rolling pin, cookie cutters (Santa or round), baking sheets, parchment paper, and piping bags for decorating.
Roll dough to 1/4-inch thickness on a floured surface and use sharp, clean cookie cutters. Dip cutters in flour between cuts to prevent sticking.
Absolutely! Kids can help sprinkle sanding sugar, place nonpareils for eyes and cheeks, and add the small red nose, making it a fun family activity.
Print
Christmas Santa Suit Sugar Cookies Recipe
- Total Time: 1 hour 25 minutes
- Yield: 24 1x
Description
Festive Christmas Santa Suit Sugar Cookies bring holiday cheer to your cookie plate with playful red and white decorations. Sweet sugar cookie base becomes a delightful canvas for jolly santa outfit designs that capture winter magic.
Ingredients
Main Ingredients:
- 3 cups all-purpose flour
- 1 cup unsalted butter, room temperature
- 1 cup granulated sugar
- 1 large egg
- 1/2 tsp baking powder
- 1/4 tsp salt
Flavor Enhancers:
- 1 teaspoon vanilla extract
- 1/2 teaspoon almond extract (optional)
Decorating Ingredients:
- 3 cups powdered sugar (for Royal Icing)
- 2–3 tablespoons meringue powder
- 4–5 tablespoons water (adjust as needed)
- Red gel food coloring
- Red sanding sugar
- White sanding sugar
- Pink & black nonpareils (for cheeks & eyes)
- Small red candies or mini M&Ms (Santa’s nose)
- Piping bags with small round tips
Instructions
- Whip softened butter and granulated sugar in a large mixing bowl until the mixture becomes airy and pale, approximately 2-3 minutes using an electric mixer.
- Incorporate the egg, along with vanilla and almond extracts, blending until thoroughly integrated.
- In a separate bowl, sift together flour, baking powder, and salt, creating a uniform dry mixture.
- Gradually fold the dry ingredients into the butter mixture, mixing until a cohesive dough forms without overmixing.
- Divide the dough into two equal portions, wrap each tightly in plastic film, and refrigerate for a minimum of 60 minutes to firm up.
- Heat the oven to 350°F and prepare baking sheets with parchment paper for easy cookie removal.
- On a lightly floured surface, roll out the chilled dough to a quarter-inch thickness, ensuring even distribution.
- Use Santa-themed cookie cutters to shape the dough, transferring delicate cutouts carefully onto prepared baking sheets.
- Bake for 8-10 minutes until cookie edges develop a subtle golden hue, watching carefully to prevent over-browning.
- Transfer cookies to a wire cooling rack, allowing them to reach room temperature completely.
- Prepare royal icing by whisking powdered sugar, meringue powder, and water until achieving a smooth, spreadable consistency.
- Separate icing into portions and tint one section vibrant red for Santa’s hat decoration.
- Fill piping bags with colored icings, preparing for precise cookie embellishment.
- Outline and fill Santa’s hat area with red icing, immediately sprinkling with red sanding sugar for textural effect.
- Create beard and hat trim using white icing, enhancing with white sanding sugar for dimension.
- Strategically place pink and black nonpareils to represent cheeks and eyes, adding a small red candy as Santa’s nose.
- Optional: Add a delicate white icing smile to complete the festive character.
- Allow decorated cookies to dry completely at room temperature, ensuring icing sets firmly before storing or serving.
Notes
- Chill Dough Thoroughly to prevent spreading and maintain crisp cookie shapes during baking.
- Use Precise Measurements for consistent texture, especially when working with delicate sugar cookie cutouts.
- Rotate Baking Sheets halfway through cooking to ensure even golden edges and prevent uneven browning.
- Adapt Decorating Techniques by using different piping tips for more intricate Santa facial details and smoother icing application.
- Prep Time: 1 hour 15 minutes
- Cook Time: 10 minutes
- Category: Desserts, Snacks
- Method: Baking
- Cuisine: American
Nutrition
- Serving Size: 24
- Calories: 150 kcal
- Sugar: 14 g
- Sodium: 45 mg
- Fat: 8 g
- Saturated Fat: 5 g
- Unsaturated Fat: 3 g
- Trans Fat: 0.2 g
- Carbohydrates: 20 g
- Fiber: 0.4 g
- Protein: 1.5 g
- Cholesterol: 20 mg
Nathaniel Brooks
Founder & Recipe Developer
Expertise
Farm-to-table cuisine, Seasonal recipe development, Culinary storytelling
Education
Ivy Tech Community College – Indianapolis, IN
Culinary Arts / Hospitality Administration & Events
Focused on hands-on training in classical and modern culinary techniques.
Nathaniel’s story starts in the foothills of the Appalachian Mountains, where farm stands, backyard gardens, and old family recipes shaped his love for real food. After graduating from Ivy Tech Community College in Indianapolis, he spent years working in farm-to-table kitchens, learning how to turn local, seasonal ingredients into something memorable.
Today, Nathaniel pours that same spirit into every single recipe on Aspiring Culinarian – recipes that feel real, comforting, and connected to the land. When he’s not in the kitchen, you’ll find him foraging wild herbs, chasing sunsets with his camera, or writing about the flavors that shaped his roots.