
Dreamy Coconut Cream Balls Recipe: Bite-sized Sweet Treats
Have you ever dreamed of creating delectable coconut cream balls that melt in your mouth?
sweet treats like these bring pure joy to any gathering.
Creamy coconut provides a luxurious texture that delights every palate.
Simple ingredients combine to craft something magical in your kitchen.
Each bite promises a burst of tropical flavor that feels indulgent yet light.
Soft and delicate, these little confections will surprise everyone with their incredible taste.
You’ll find yourself falling in love with this easy dessert that comes together in minutes.
Whip up a batch and watch smiles spread across the faces of those you love.
What’s So Addictive About Sweet Coconut Truffles

The Key Ingredients for Perfect Sweet Coconut Truffles
Base Ingredients:Optional Add-Ins:Coating Ingredient:How to Make Sweet Coconut Truffles – Step by Step
Step 1: Combine Creamy Mixture
In a large mixing bowl, blend shredded coconut, sweetened condensed milk, pure vanilla extract, powdered sugar, and optional chopped nuts.
Stir ingredients thoroughly until a cohesive, slightly sticky dough forms that holds together easily when pressed.
Step 2: Shape Delightful Spheres
Using clean hands, roll the mixture into small, uniform bite-sized balls.
Gently place each truffle on a parchment-lined baking sheet.
Transfer the baking sheet to the freezer and chill the truffles for about 30 minutes to help them firm up and maintain their shape.
Step 3: Prepare Chocolate Coating
Select your preferred chocolate – dark, milk, or white.
Break or chop the chocolate into small, even pieces.
Place in a microwave-safe bowl.
Heat in 30-second intervals, stirring between each interval, until the chocolate is completely smooth and glossy with no remaining solid chunks.
Step 4: Enrobe Truffles
Remove the chilled truffles from the freezer.
Using a fork or toothpick, carefully lower each truffle into the melted chocolate.
Gently twirl to ensure complete and even coverage.
Tap the utensil on the bowl’s edge to remove excess chocolate.
Step 5: Allow Chocolate to Solidify
Place the chocolate-coated truffles back on the parchment-lined sheet.
Let them sit at room temperature or transfer to the refrigerator to help the chocolate set quickly.
Once the chocolate has hardened completely, the truffles are ready to serve and enjoy.
Truffle Tips for a Smooth, Creamy Coconut Center

Different Coconut Truffle Flavors to Try Next Time
Presenting Sweet Coconut Truffles Like a Pro
Coconut Truffle Storage – How to Keep Them Just Right
FAQs
Both work well, but desiccated coconut will create a slightly denser truffle texture. Shredded coconut provides a more traditional, looser consistency.
No, any good quality chocolate like semisweet, dark, or milk chocolate will work perfectly. Just ensure it melts smoothly and has a nice flavor.
Keep truffles frozen when dipping and work quickly. If chocolate starts hardening, briefly reheat. Let excess chocolate drip off before placing on parchment paper.
Absolutely! The nuts are optional. You can skip them entirely or replace with different add-ins like crushed graham crackers or toasted coconut flakes.
Print
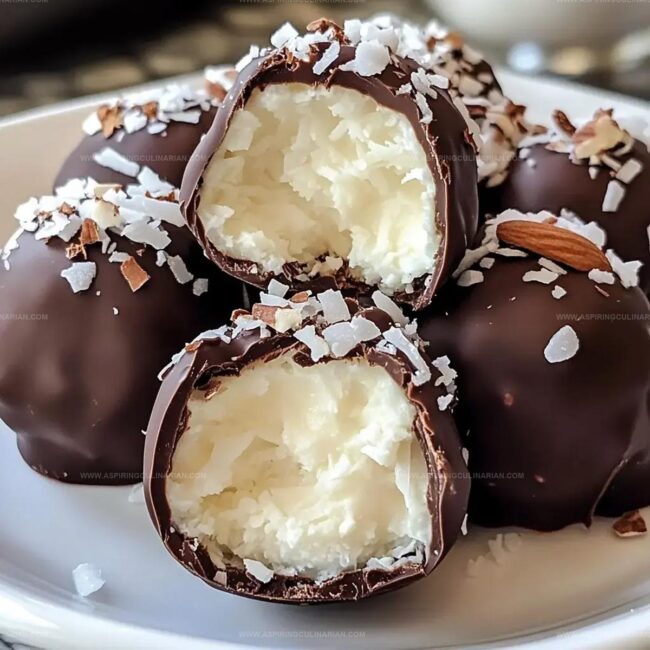
Coconut Cream Balls Recipe
- Total Time: 50 minutes
- Yield: 24 1x
Description
Irresistible Coconut Cream Balls deliver a creamy tropical sensation that dances across palates with delicate sweetness. Rich Brazilian-inspired treats combine silky coconut and condensed milk, promising pure indulgence in each delightful bite you’ll savor.
Ingredients
Main Ingredients:
- 2 1/2 cups (600 ml) shredded coconut
- 1 cup (240 ml) sweetened condensed milk
- 8 ounces (226 grams) white or semi-sweet chocolate, melted
Sweet Enhancers:
- 1 cup (240 ml) powdered sugar
- 1/2 teaspoon (2.5 ml) vanilla extract
Optional Texture Addition:
- 1/2 cup (120 ml) chopped nuts
Instructions
- In a spacious mixing bowl, combine shredded coconut, sweetened condensed milk, pure vanilla extract, powdered sugar, and chopped nuts to create a cohesive, slightly tacky mixture.
- Using clean hands, gently shape the mixture into uniform small spheres, placing each delicate truffle on a parchment-lined baking tray.
- Transfer the tray to the freezer and chill truffles for approximately 30 minutes, allowing them to firm up and maintain their perfect round shape.
- Prepare the chocolate coating by carefully melting chocolate in a microwave-safe bowl, heating in short 30-second bursts and stirring between intervals until achieving a smooth, glossy consistency.
- Remove truffles from freezer and carefully submerge each one into the melted chocolate, using a fork or toothpick to ensure complete and even coverage.
- Allow chocolate-coated truffles to set at room temperature or expedite the process by placing them in the refrigerator until the chocolate hardens completely.
Notes
- Customize Texture Add more powdered sugar for firmer truffles or less for a softer, creamier bite.
- Nut-Free Alternative Skip nuts or replace with seeds like sunflower or pumpkin for allergy-friendly version.
- Chocolate Variation Use white, dark, or milk chocolate for different flavor profiles and visual appeal.
- Storage Hack Keep truffles in airtight container in refrigerator for up to one week, maintaining their delightful texture and taste.
- Prep Time: 20 minutes
- Cook Time: 30 minutes
- Category: Snacks, Desserts
- Method: Rolling
- Cuisine: Southeast Asian
Nutrition
- Serving Size: 24
- Calories: 163 kcal
- Sugar: 14 g
- Sodium: 15 mg
- Fat: 10 g
- Saturated Fat: 8 g
- Unsaturated Fat: 2 g
- Trans Fat: 0 g
- Carbohydrates: 18 g
- Fiber: 2 g
- Protein: 2 g
- Cholesterol: 5 mg
Nathaniel Brooks
Founder & Recipe Developer
Expertise
Farm-to-table cuisine, Seasonal recipe development, Culinary storytelling
Education
Ivy Tech Community College – Indianapolis, IN
Culinary Arts / Hospitality Administration & Events
Focused on hands-on training in classical and modern culinary techniques.
Nathaniel’s story starts in the foothills of the Appalachian Mountains, where farm stands, backyard gardens, and old family recipes shaped his love for real food. After graduating from Ivy Tech Community College in Indianapolis, he spent years working in farm-to-table kitchens, learning how to turn local, seasonal ingredients into something memorable.
Today, Nathaniel pours that same spirit into every single recipe on Aspiring Culinarian – recipes that feel real, comforting, and connected to the land. When he’s not in the kitchen, you’ll find him foraging wild herbs, chasing sunsets with his camera, or writing about the flavors that shaped his roots.