
Irresistible Crispy Broccoli Cheese Balls Recipe for Game Day
Melted cheese and crispy broccoli cheese balls create a magical snack that transforms ordinary appetizers into extraordinary bites.
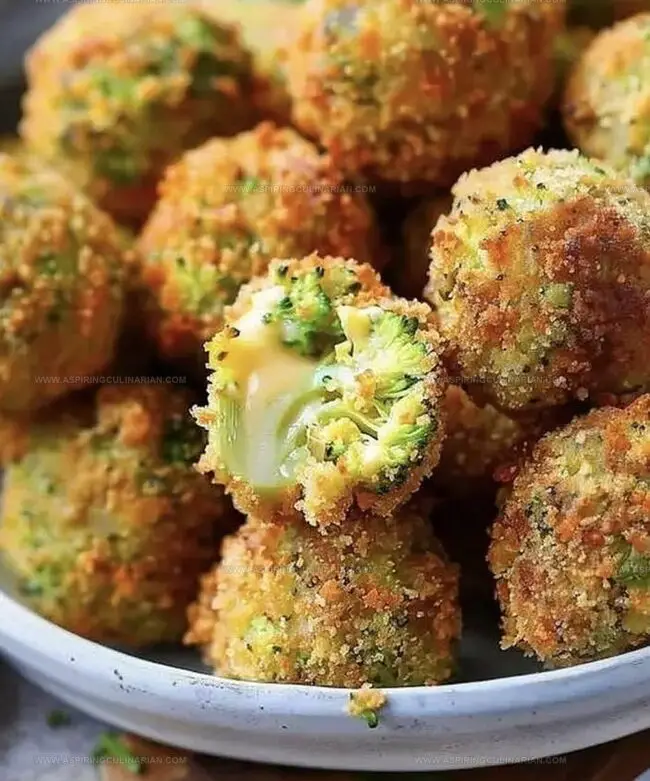
These golden-brown spheres pack incredible flavor and texture in every mouthful.
broccoli adds a nutritious punch to this irresistible treat that makes everyone crave more.
Crunchy on the outside and creamy inside, these cheese balls satisfy hunger with remarkable ease.
Each bite delivers a perfect balance of sharp cheese and tender broccoli.
The recipe comes together quickly, requiring minimal preparation and maximum deliciousness.
You’ll want to make these again and again for every gathering or casual snack moment.
Why Crispy Broccoli Cheese Balls Are So Snackable

Broccoli Cheese Ball Ingredients for a Tasty Bite
Main Protein and Dairy:Vegetable Base:Breading and Seasoning:Tools for Easy Cheese Ball Preparation
How to Make Crispy Broccoli Cheese Balls
Step 1: Steam The Green Veggie
Grab your broccoli florets and steam them until they’re just tender.
Let them cool down completely so they’re easy to handle.
Step 2: Chop With Precision
Finely dice the cooled broccoli into tiny pieces, making sure they’re super small.
Transfer the chopped broccoli to a spacious mixing bowl.
Step 3: Create The Flavor Base
Combine these delicious ingredients in the bowl:Mix everything together until well blended.
Step 4: Shape Into Bite-Sized Treats
Use your hands to roll the mixture into small, uniform balls.
Aim for about 12-14 poppers.
Place them on a plate and chill in the refrigerator for half an hour to help them set.
Step 5: Set Up The Coating Station
Prepare three separate bowls:Step 6: Heat The Cooking Oil
Pour vegetable or canola oil into a deep pot, reaching about 2 inches deep.
Heat the oil to 375°F, using a cooking thermometer to check the temperature.
Step 7: Coat The Poppers
Take the chilled balls and roll them through each station:Step 8: Fry To Golden Perfection
Carefully drop 4 poppers at a time into the hot oil.
Fry until they turn a beautiful golden brown, which takes about 3-4 minutes per batch.
Step 9: Finish And Serve
Scoop out the poppers with a slotted spoon and let them drain on paper towels.
Serve these crispy, cheesy bites while they’re piping hot and irresistibly crunchy.
Tips for Gooey, Crunchy Cheese Balls
Flavorful Broccoli Cheese Ball Variations
Serving Suggestions for Cheesy Broccoli Balls
Storing Cheese Balls for Anytime Snacks
FAQs
While delicious, they are a fried appetizer with cheese and breading, so they’re more of an occasional treat than a health food. They do contain vegetables and protein from the broccoli and cheese.
Yes, you can prepare the balls and keep them refrigerated for up to 24 hours before breading and frying. This makes party prep easier and allows the flavors to meld.
Colby, cheddar, and Velveeta create a great melty, flavorful combination. You can substitute similar melting cheeses like monterey jack or mild white cheese if needed.
Print
Crispy Broccoli Cheese Balls Recipe
- Total Time: 1 hour
- Yield: 12 1x
Description
Crispy broccoli cheese balls deliver a delightful appetizer perfect for gatherings. Sharp cheddar and tender broccoli combine into golden-brown bite-sized treats that satisfy cheese and vegetable cravings in one satisfying morsel.
Ingredients
Main Ingredients (Cheese and Vegetables):
- 1 1/2 cups fresh broccoli florets
- 1 cup shredded Colby cheese
- 1 cup shredded cheddar cheese
- 4 ounces Velveeta, cut into small chunks
Binding and Coating Ingredients:
- 2 eggs, lightly beaten
- 1/2 cup all-purpose flour
- 2 1/4 cups Panko crumbs, divided
- 1/2 teaspoon crushed red pepper flakes
Cooking Ingredient:
- Vegetable or canola oil (for frying)
Instructions
- Prepare broccoli by steaming florets until tender, then cool completely to room temperature.
- Mince cooled broccoli into fine, uniform pieces approximately 1/4-inch or smaller.
- Combine broccoli with cheeses, red pepper flakes, initial portion of Panko crumbs, and egg in a large mixing bowl, blending thoroughly until ingredients are evenly distributed.
- Craft uniform spherical portions using approximately one rounded tablespoon of mixture, creating 12-14 consistent balls.
- Chill formed balls in refrigerator for minimum 30 minutes to ensure structural integrity.
- Create three separate breading stations: one with flour, second with whisked eggs and water, third with remaining Panko crumbs.
- Heat vegetable oil in Dutch oven to precise 375°F, monitoring temperature with cooking thermometer.
- Roll each chilled ball sequentially through flour, egg wash, and Panko coating, ensuring complete coverage.
- Carefully lower breaded balls into hot oil, frying 4 at a time until achieving rich golden-brown exterior, approximately 3-4 minutes per batch.
- Transfer fried broccoli cheese balls onto paper towel-lined plate to absorb excess oil, then serve immediately while crisp and warm.
Notes
- Customize Cheese Selection Experiment with different cheese combinations like Gruyère, Parmesan, or goat cheese to create unique flavor profiles and accommodate various taste preferences.
- Reduce Oil Content Bake the broccoli cheese balls at 425°F for 20-25 minutes instead of frying, which cuts down on calories and provides a healthier alternative with similar crispy texture.
- Gluten-Free Adaptation Replace wheat flour and Panko crumbs with gluten-free alternatives like almond flour or gluten-free breadcrumbs to make the recipe suitable for those with gluten sensitivities.
- Vegetable Variation Swap broccoli with cauliflower or zucchini for a different vegetable base, maintaining the cheesy, crispy characteristics while offering nutritional variety.
- Prep Time: 45 minutes
- Cook Time: 15 minutes
- Category: Appetizer, Snacks
- Method: Frying
- Cuisine: American
Nutrition
- Serving Size: 12
- Calories: 180
- Sugar: 1 g
- Sodium: 350 mg
- Fat: 9 g
- Saturated Fat: 4 g
- Unsaturated Fat: 3 g
- Trans Fat: 0 g
- Carbohydrates: 20 g
- Fiber: 1 g
- Protein: 8 g
- Cholesterol: 50 mg
Lena Martinez
Contributing Writer & Culinary Educator
Expertise
Southwestern and Latin American cuisines, Vegetarian and plant-based recipe development, Culinary education and community outreach
Education
Santa Fe Community College, Santa Fe, NM
Certificate in Culinary Arts
Emphasized Southwestern cuisine and sustainable cooking practices
Lena grew up surrounded by the colors, spices, and traditions of the Southwest – flavors that sparked her love for bold, honest cooking. After earning her Culinary Arts certificate at Santa Fe Community College, she made it her mission to teach home cooks how to create flavorful, plant-powered meals without the fuss.
Her recipes are packed with vibrant ingredients, simple steps, and the kind of heart that turns a regular meal into something you’ll want to share. Outside the kitchen, Lena spends her time wandering farmers’ markets, trading family recipes, and helping young chefs find their voice through food.