
The Happiest Easter Jello Pie Recipe for Spring Celebrations
Creamy, vibrant, and utterly delightful, this Easter jell-o pie recipe brings a burst of springtime cheer to any dessert table.
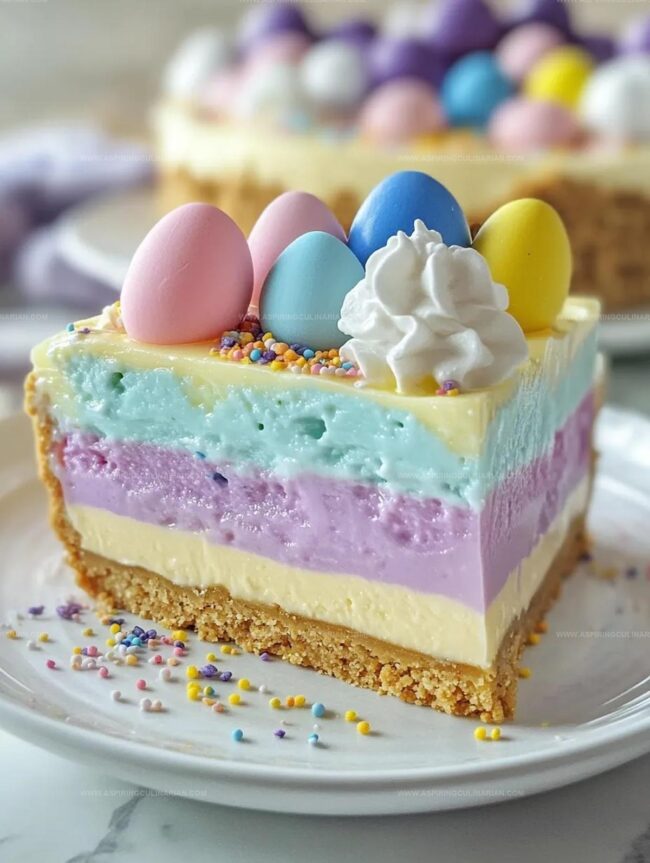
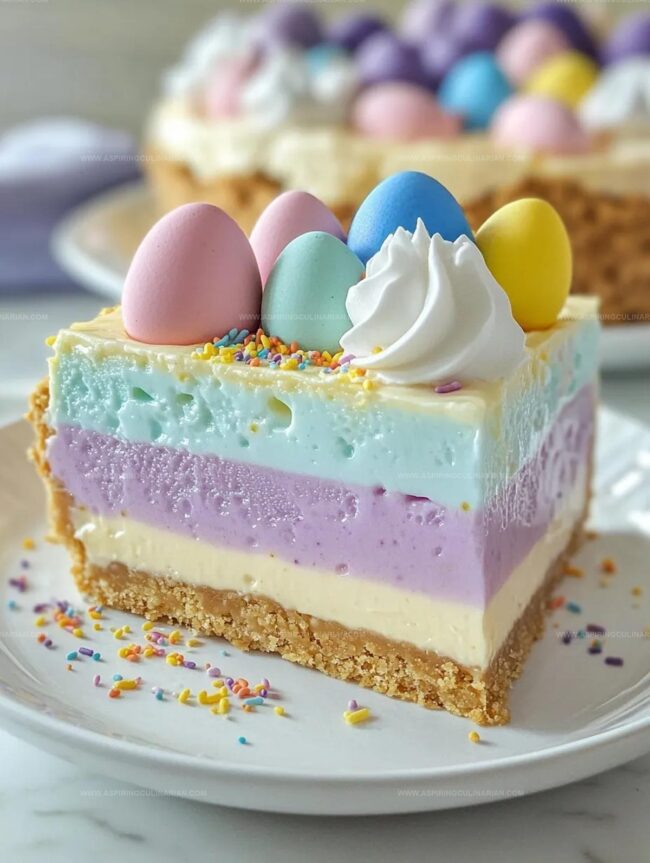
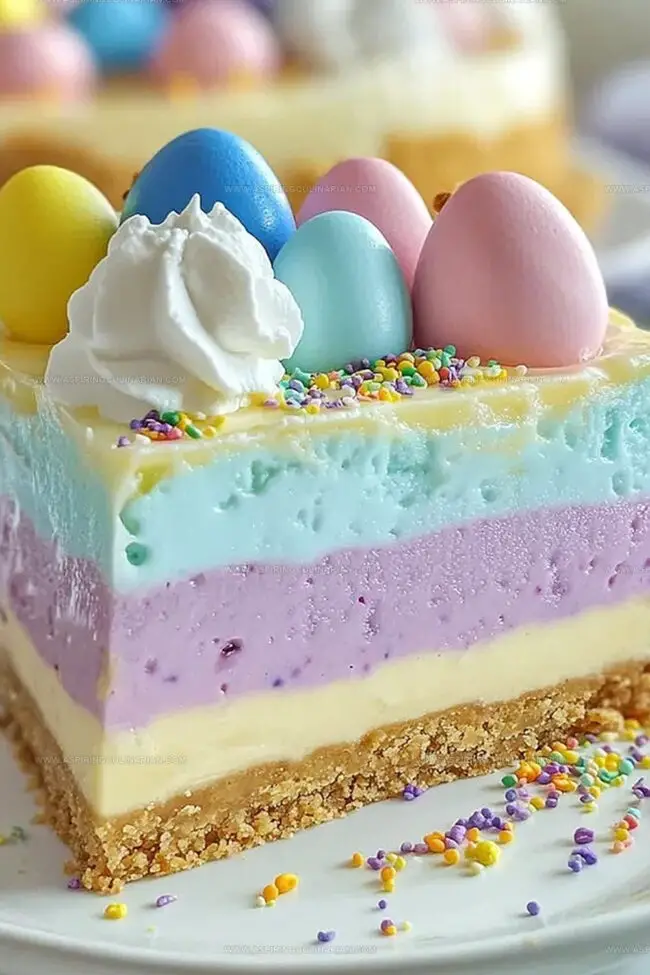
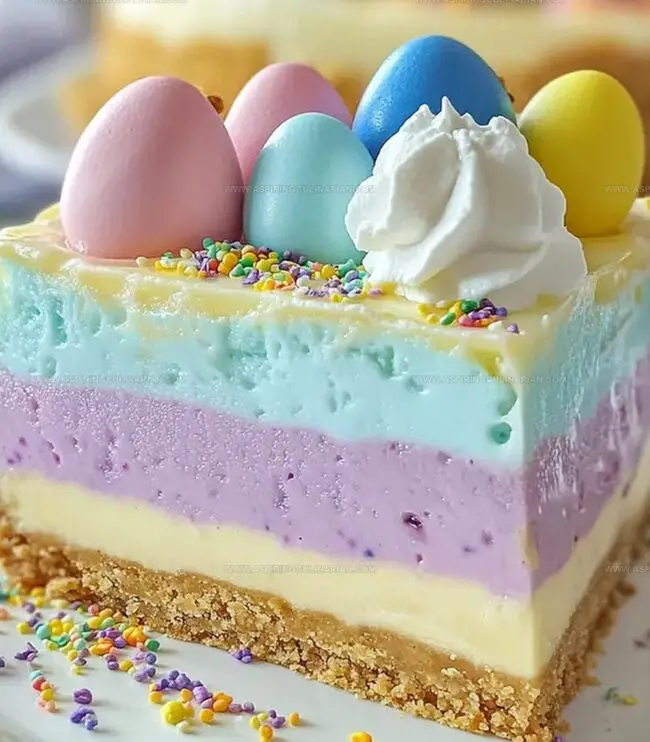
Pastel colors dance across a silky smooth surface, promising a treat that’s both nostalgic and exciting.
Gelatin layers shimmer with delicate hues that capture the essence of spring celebrations.
Each slice tells a story of sweet memories and cheerful gatherings.
Guests will marvel at the stunning presentation that’s surprisingly simple to create.
The combination of cool, light textures and bright flavors makes this dessert a true showstopper.
Prepare to dazzle your loved ones with this crowd-pleasing Easter classic that’s sure to become a new tradition.
Easter Jell-O Pie Fun For All Ages
What Goes Into Easter Jell-O Pie
Crust Base:Jell-O Layers:Creamy Ingredients:Liquid Ingredients:Decorative Toppings:Making Easter Jell-O Pie With Ease
Step 1: Whip Up Lemon Base
Boil water and dissolve lemon Jell-O completely.
Mix in cold water and let cool slightly.
The mixture should look clear and smooth.
Step 2: Blend Creamy Lemon Layer
Beat cream cheese until silky.
Slowly incorporate Jell-O mixture while beating.
Gently fold in whipped topping until color is uniform.
Step 3: Create First Colorful Foundation
Pour lemon cream mixture into graham cracker crust.
Spread evenly across bottom.
Refrigerate until partially set, about 30 minutes.
Step 4: Craft Blue Jell-O Layer
Dissolve blue Jell-O in boiling water.
Add cold water and cool.
Beat cream cheese until fluffy.
Gradually mix blue Jell-O into cream cheese.
Fold in whipped topping.
Step 5: Layer Blue Carefully
Use back of spoon to gently pour blue mixture over lemon layer.
This prevents layers from mixing.
Refrigerate 30 minutes until partially set.
Step 6: Develop Grape Layer
Dissolve grape Jell-O in boiling water.
Cool mixture.
Beat remaining cream cheese.
Mix in grape Jell-O.
Incorporate whipped topping.
Step 7: Complete Final Layer
Carefully pour grape mixture over blue layer using spoon technique.
Ensure mixture is completely cooled to maintain layer integrity.
Step 8: Chill and Set
Refrigerate pie for minimum 4 hours or overnight.
Layers should be firm and distinct.
Step 9: Decorate Festively
Just before serving, add decorative touches:Step 10: Serve with Style
Cut pie using knife dipped in hot water for clean, beautiful slices.
Serve chilled and enjoy the colorful Easter treat.
Easter Jell-O Pie Kitchen Tips To Know
Easter Jell-O Pie Try Fresh Flavors Next
Easter Jell-O Pie Ways To Make It Festive
Easter Jell-O Pie Stays Perfectly Chilled
FAQs
You’ll need graham cracker crust, lemon, berry blue, and grape Jell-O, cream cheese, whipped topping, boiling and cold water, pastel sprinkles, and candy eggs.
Yes, you can experiment with other colors and flavors that complement each other, like strawberry, lime, or orange Jell-O.
Pouring over a spoon helps distribute the Jell-O mixture gently, preventing the new layer from breaking through the previous partially set layer, maintaining clean and distinct color layers.
Print
Easter Jello Pie Recipe
- Total Time: 5 hours 20 minutes
- Yield: 8 1x
Description
Silky smooth Easter Jello Pie delights with its pastel-colored layers and creamy texture, promising a festive dessert that celebrates spring’s sweet charm. Guests will savor each refreshing bite of this playful, eye-catching treat that brings joy to holiday gatherings.
Ingredients
Main Ingredients:
- 1 (3 ounces/85 grams) box lemon Jell-O
- 1 (3 ounces/85 grams) box berry blue Jell-O
- 1 (3 ounces/85 grams) box grape Jell-O
- 8 ounces/226 grams cream cheese, softened
- 1 1/2 cups whipped topping, thawed
Liquid Ingredients:
- 3 cups boiling water
- 3 cups cold water
Crust and Decoration:
- 1 pre-made graham cracker crust (9-inch/23 centimeters)
- Extra whipped cream or whipped topping
- Pastel sprinkles
- Small candy eggs
Instructions
- Prepare the lemon Jell-O by dissolving it in boiling water for 2 minutes, stirring constantly. Mix in cold water and allow to cool for 5 minutes.
- Whip one-third of the cream cheese until smooth, then gradually incorporate the slightly cooled lemon Jell-O mixture. Gently fold in half of the whipped topping until fully integrated.
- Pour the lemon cream mixture into the graham cracker crust, ensuring an even distribution. Refrigerate for 30 minutes until the layer is partially set and firm.
- Create the blue layer by dissolving berry blue Jell-O in boiling water. Add cold water and let cool slightly. Beat another portion of cream cheese until creamy, then blend in the blue Jell-O mixture.
- Fold in remaining whipped topping to the blue layer. Carefully pour over the lemon layer using the back of a spoon to prevent layer disruption. Refrigerate for 30 minutes.
- Prepare the grape layer following the same method: dissolve grape Jell-O in boiling water, cool, and mix with remaining cream cheese. Incorporate the last of the whipped topping.
- Gently pour the grape mixture over the blue layer, ensuring the mixture is completely cooled to maintain layer integrity. Use the back-of-spoon technique for smooth application.
- Chill the pie in the refrigerator for a minimum of 4 hours or overnight until all layers are completely firm and set.
- Before serving, garnish with additional whipped cream, pastel sprinkles, and decorative candy eggs for a festive Easter presentation.
- Slice the pie using a sharp knife dipped in hot water and wiped dry to ensure clean, precise cuts. Serve chilled and enjoy the vibrant, layered dessert.
Notes
- Use room temperature cream cheese to ensure smooth blending without lumps, creating a silky texture in each layer.
- Chill each layer briefly before adding the next to prevent color bleeding and maintain distinct, crisp layer definitions.
- Opt for low-fat cream cheese and sugar-free Jell-O for a lighter, diet-friendly version that doesn’t compromise on festive appeal.
- When pouring layers, use the back of a spoon technique to maintain layer integrity and prevent unwanted mixing of colors.
- Prep Time: 20 minutes
- Cook Time: 5 hours
- Category: Desserts, Snacks
- Method: Chilling
- Cuisine: American
Nutrition
- Serving Size: 8
- Calories: 150
- Sugar: 18 g
- Sodium: 200 mg
- Fat: 7 g
- Saturated Fat: 4 g
- Unsaturated Fat: 2 g
- Trans Fat: 0 g
- Carbohydrates: 20 g
- Fiber: 0 g
- Protein: 2 g
- Cholesterol: 25 mg
Lena Martinez
Contributing Writer & Culinary Educator
Expertise
Southwestern and Latin American cuisines, Vegetarian and plant-based recipe development, Culinary education and community outreach
Education
Santa Fe Community College, Santa Fe, NM
Certificate in Culinary Arts
Emphasized Southwestern cuisine and sustainable cooking practices
Lena grew up surrounded by the colors, spices, and traditions of the Southwest – flavors that sparked her love for bold, honest cooking. After earning her Culinary Arts certificate at Santa Fe Community College, she made it her mission to teach home cooks how to create flavorful, plant-powered meals without the fuss.
Her recipes are packed with vibrant ingredients, simple steps, and the kind of heart that turns a regular meal into something you’ll want to share. Outside the kitchen, Lena spends her time wandering farmers’ markets, trading family recipes, and helping young chefs find their voice through food.