
Fresh Cherry Turnovers Recipe: Sweet Morning Bliss
Sweet, flaky pastries bursting with vibrant cherry filling await you in this delightful easy cherry turnovers recipe that promises pure indulgence.
Buttery layers of golden-brown dough encase a luscious fruity center, creating a dessert that’s both elegant and comforting.
Each turnover delivers a perfect balance of crisp pastry and juicy cherries that melt in your mouth.
The simple preparation makes these treats accessible to bakers of all skill levels.
Minimal ingredients and straightforward steps ensure you can whip up these delectable pastries in no time.
Warm, freshly baked cherry turnovers are guaranteed to spark joy and tempt everyone at the table.
Grab a fork and savor the irresistible combination of sweet cherries and delicate, crisp pastry.
Easy Cherry Turnovers Taste Like Pure Homemade Bliss
Ingredient Rundown For Easy Cherry Turnovers Pastries
Main Ingredients:
Pastry Base:Filling:Additional Ingredients:
Egg Wash:Glaze:Preparation Ingredients:
Baking Preparation:Quick Guide For Baking Easy Cherry Turnovers Successfully
Step 1: Warm Up the Oven
Fire up your oven to 400F (200C).
Cover a baking sheet with parchment paper or a silicone mat to prevent sticking.
Step 2: Flatten Pastry Sheets
Dust your work surface with flour.
Gently unfold the puff pastry sheets.
Smooth out any cracks by pressing them together.
Roll the sheets lightly to remove creases if needed.
Step 3: Create Pastry Squares
Grab a sharp knife or pizza cutter.
Slice each pastry sheet into 4 equal squares.
You’ll end up with 8 beautiful squares ready for filling.
Step 4: Add Cherry Magic
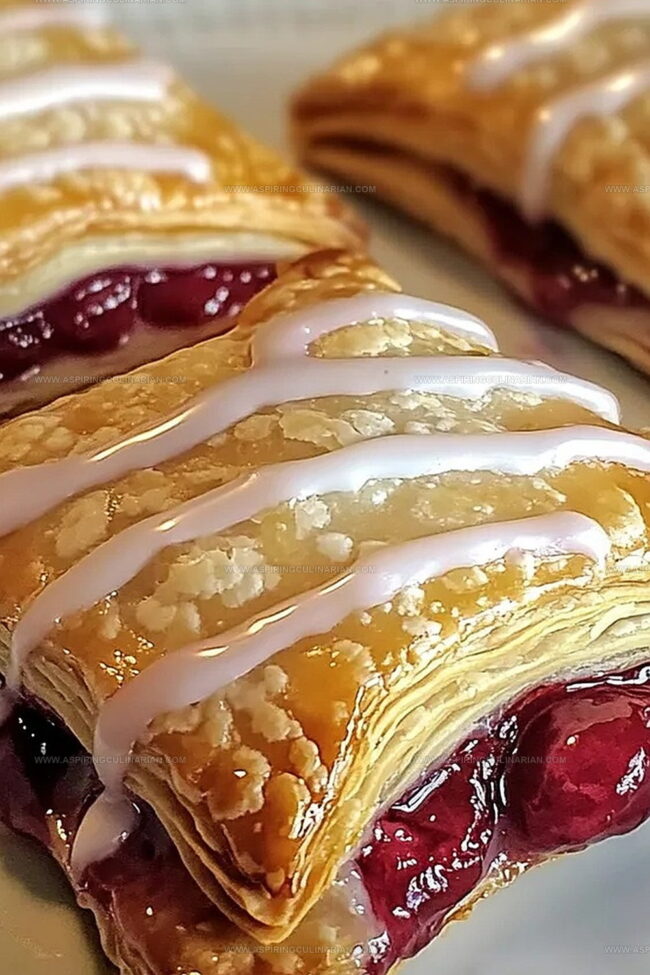
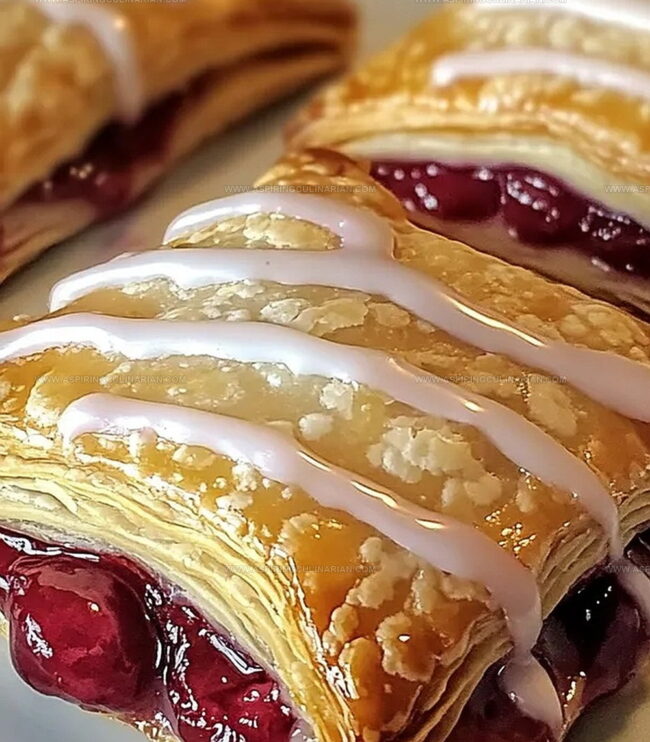
Spoon cherry pie filling onto one half of each square.
Keep the filling diagonal and leave a small border around the edges.
Don’t go overboard – too much filling means messy leaks!
Step 5: Fold and Crimp
Fold each square diagonally over the filling, creating perfect triangles.
Press edges firmly.
Use a fork to crimp and seal the edges completely.
Step 6: Whip Up Egg Shine
In a small bowl, whisk an egg with a splash of milk.
This will create a golden, glossy finish for your turnovers.
Step 7: Brush and Prepare
Paint the tops of your turnovers with the egg wash.
For extra steam release, cut a tiny slit on top of each turnover.
Step 8: Bake to Perfection
Slide the turnovers onto the prepared baking sheet.
Space them about 2 inches apart.
Bake for 15-20 minutes until they puff up and turn a gorgeous golden brown.
Step 9: Cool Down
Let the turnovers rest on the baking sheet for 5-10 minutes.
Transfer to a wire rack to continue cooling.
Step 10: Create Drizzle Glaze
Whisk together:Adjust milk to get the perfect drizzling consistency.
Step 11: Add Sweet Finish
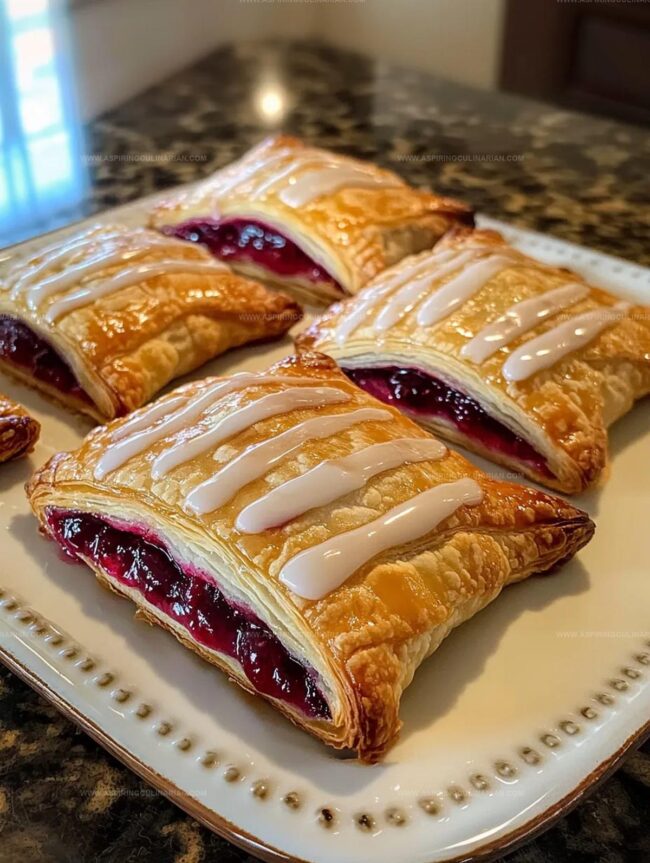
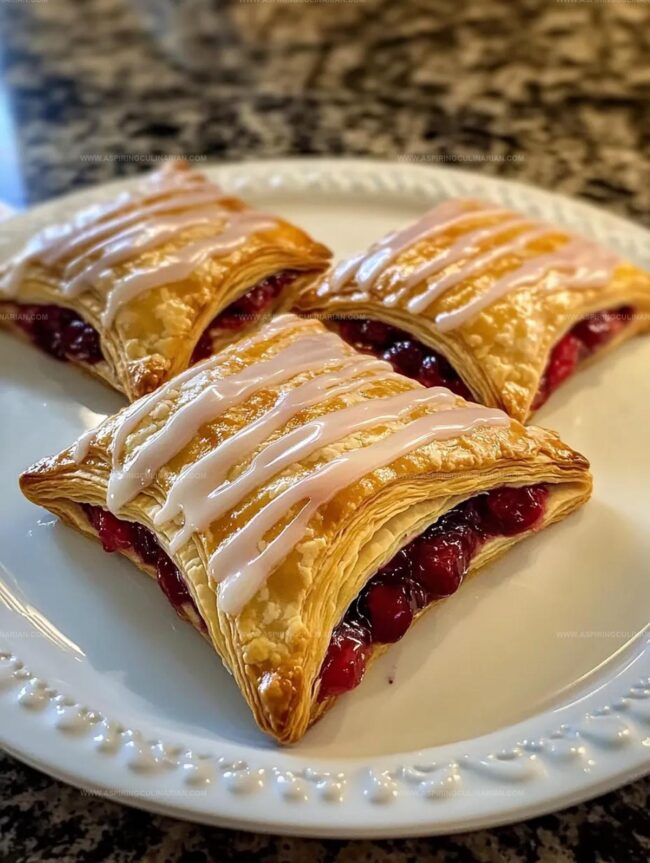
Drizzle the glaze over slightly cooled turnovers.
Use a spoon or create a makeshift piping bag with a ziplock bag by snipping a tiny corner.
Step 12: Serve and Enjoy
Let the glaze set for a few minutes.
Serve turnovers warm or at room temperature.
For an extra touch, dust with a light sprinkle of powdered sugar.
Best Baker Tips For Easy Cherry Turnovers Every Time
Ways To Add Flair To Easy Cherry Turnovers
Serving Up Easy Cherry Turnovers Warm Or Cold
Cherry Turnovers Storage Tips
FAQs
Yes, you can substitute cherry pie filling with other fruit fillings like apple, blueberry, or raspberry for variety.
No, you only need basic kitchen tools like a baking sheet, parchment paper, fork, and small bowls for mixing.
These turnovers are best enjoyed within 1-2 days and can be stored at room temperature in an airtight container.
You can prepare the turnovers and refrigerate them unbaked for a few hours before baking, which is great for advance preparation.
Print
Easy Cherry Turnovers Recipe
- Total Time: 40 minutes
- Yield: 4 1x
Description
Sweet pastry magic blooms with these cherry turnovers, bringing classic French-inspired elegance to your dessert table. Buttery, flaky layers embrace luscious cherry filling, inviting you to savor each delightful bite of pure comfort and indulgence.
Ingredients
Pastry Ingredients:
- 1 package puff pastry (2 sheets), thawed
- 1 cup (240 milliliters) cherry pie filling (fresh or canned)
Egg Wash Ingredients:
- 1 large egg
- 1 tablespoon (15 milliliters) milk
Glaze and Garnish Ingredients:
- 1 cup (120 grams) powdered sugar
- 1 teaspoon (5 milliliters) vanilla extract
- 2–3 tablespoons (30–45 milliliters) milk
- Additional powdered sugar for dusting
Instructions
- Warm the oven to 400F (200C) and cover a baking sheet with parchment paper.
- Gently unfold the thawed puff pastry, smoothing out any creases or cracks on a lightly floured surface.
- Slice each pastry sheet into four equal triangular segments, creating eight total pastry pieces.
- Position cherry pie filling diagonally on one half of each pastry square, maintaining a small border around the edges to prevent leakage.
- Carefully fold pastry squares diagonally, forming triangular shapes and pressing edges firmly to seal the filling inside.
- Crimp turnover edges using a fork, ensuring a tight seal to prevent filling from escaping during baking.
- Whisk egg with milk to create a golden wash, then generously brush over each turnover’s surface.
- Make a small steam vent on top of each turnover to release pressure during cooking.
- Arrange turnovers on prepared baking sheet, spacing them approximately two inches apart.
- Bake for 15-20 minutes until pastries achieve a rich, golden-brown coloration and appear puffy.
- Allow turnovers to rest on baking sheet for 5-10 minutes before transferring to a cooling rack.
- Combine powdered sugar, vanilla, and milk to create a smooth glaze with drizzling consistency.
- Decorate turnovers with glaze using a spoon or piped technique, allowing it to set briefly.
- Serve warm or at room temperature, optionally dusting with additional powdered sugar for presentation.
Notes
- Customize Filling Experiment with different fruit preserves or fresh fruit compotes to create unique flavor variations like blueberry, apple, or mixed berry turnovers.
- Prevent Soggy Bottoms Ensure your puff pastry stays crisp by not overloading with filling and allowing the turnovers to cool slightly on the baking sheet before transferring.
- Make Ahead Friendly Prepare the turnovers up to the egg wash stage, then refrigerate for a few hours or freeze unbaked for later baking, perfect for advance meal planning.
- Dietary Adaptations Use gluten-free puff pastry for a celiac-friendly version, or swap cherry filling with sugar-free alternatives for a lower-sugar option.
- Prep Time: 20 minutes
- Cook Time: 20 minutes
- Category: Desserts, Snacks
- Method: Baking
- Cuisine: American
Nutrition
- Serving Size: 4
- Calories: 330
- Sugar: 18g
- Sodium: 180mg
- Fat: 20g
- Saturated Fat: 8g
- Unsaturated Fat: 12g
- Trans Fat: 0g
- Carbohydrates: 36g
- Fiber: 1g
- Protein: 4g
- Cholesterol: 40mg
Lena Martinez
Contributing Writer & Culinary Educator
Expertise
Southwestern and Latin American cuisines, Vegetarian and plant-based recipe development, Culinary education and community outreach
Education
Santa Fe Community College, Santa Fe, NM
Certificate in Culinary Arts
Emphasized Southwestern cuisine and sustainable cooking practices
Lena grew up surrounded by the colors, spices, and traditions of the Southwest – flavors that sparked her love for bold, honest cooking. After earning her Culinary Arts certificate at Santa Fe Community College, she made it her mission to teach home cooks how to create flavorful, plant-powered meals without the fuss.
Her recipes are packed with vibrant ingredients, simple steps, and the kind of heart that turns a regular meal into something you’ll want to share. Outside the kitchen, Lena spends her time wandering farmers’ markets, trading family recipes, and helping young chefs find their voice through food.