
Easy Golden Chicken Crescents Recipe: A Family Favorite
Crafting delightful chicken crescents brings comfort straight to your dinner table.
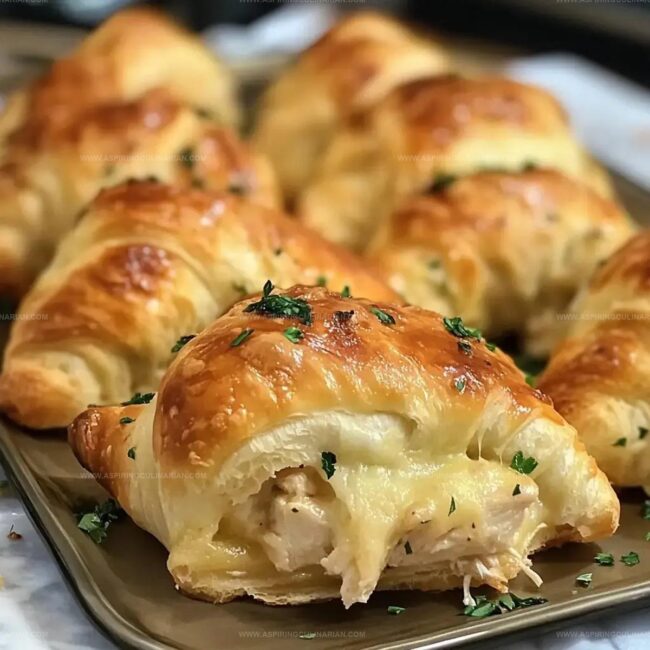
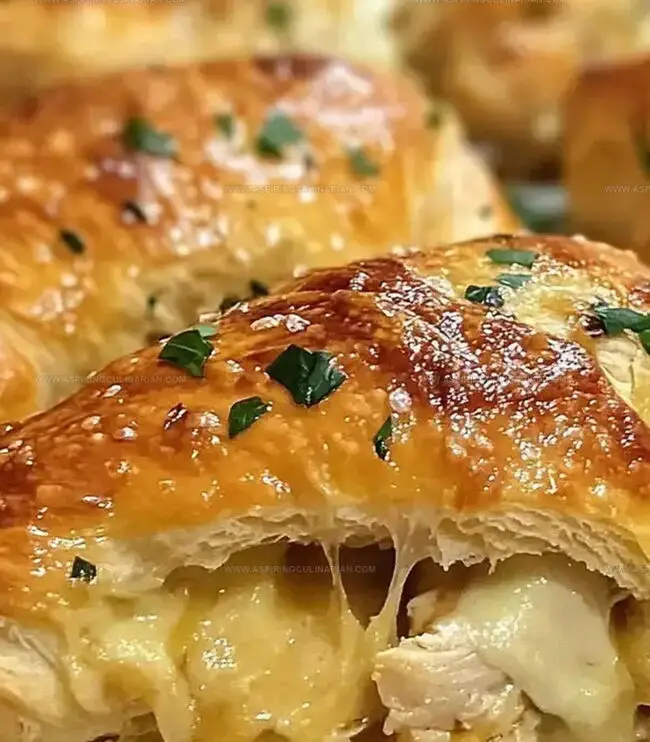
Layers of tender meat blend seamlessly with creamy cheese inside flaky pastry pockets.
Weeknight meals rarely feel this satisfying and simple.
Comfort food enthusiasts will adore how quickly these come together.
Crisp edges and golden-brown surfaces promise a mouthwatering experience for everyone around the table.
Minimal ingredients and straightforward preparation mean you can whip up this crowd-pleaser in less than thirty minutes.
Get ready to become the hero of your kitchen with these irresistible chicken crescents.
Cheesy Chicken Roll Ups: What Makes Them So Good

Pantry Picks for Cheesy Chicken Roll Ups
Main Ingredients:Seasoning and Flavor Enhancers:Topping and Garnish:Rolling Up Cheesy Chicken: The Easy Way
Step 1: Preheat Cooking Station
Get your oven warmed up to a toasty 375F (190C).
This will ensure your chicken roll-ups cook evenly and get that perfect golden crispiness.
Step 2: Prep Your Workspace
Grab a baking sheet and line it with parchment paper.
This will prevent sticking and make cleanup a breeze.
Step 3: Create Flavor Explosion
In a mixing bowl, combine your ingredients:Mix everything until well blended, creating a mouthwatering filling.
Step 4: Unroll Dough Magic
Take your crescent roll dough and gently separate it into individual triangles.
Each triangle will become a delicious roll-up.
Step 5: Fill And Transform
Spoon your chicken mixture onto the wide end of each dough triangle.
Start rolling from the wide end, tucking in the sides to keep the filling secure.
Step 6: Arrange On Baking Surface
Carefully place each rolled-up creation onto your prepared baking sheet, leaving a little space between them.
Step 7: Sprinkle Cheese Charm
Dust the tops with grated Parmesan cheese for an extra layer of flavor and golden-brown goodness.
Step 8: Bake To Perfection
Slide the baking sheet into the oven and bake for 12-15 minutes.
Watch for a beautiful golden color that signals they’re ready.
Step 9: Final Touch
If you want, sprinkle some fresh chopped parsley on top for a pop of color and fresh herb flavor.
Serve hot and enjoy!
Tactics for Cheesy Chicken Roll Up Perfection
Twists to Try on Classic Chicken Rolls
How to Serve Cheesy Chicken Roll Ups Right
The Art of Keeping Chicken Roll Ups Fresh
FAQs
Yes, you can substitute cheddar with mozzarella, Swiss, or pepper jack for varied flavors.
No, the crescent dough contains wheat. You’ll need gluten-free crescent roll alternatives to make it gluten-free.
The rolls should reach an internal temperature of 165°F (74°C). Golden brown color and clear juices are good indicators.
Yes, you can assemble the roll-ups and refrigerate them for up to 24 hours before baking. Just add a few extra minutes to the cooking time.
Print
Easy Chicken Crescents Recipe
- Total Time: 30 minutes
- Yield: 8 1x
Description
Creamy chicken crescents deliver comfort wrapped in golden, flaky pastry. Savory filling nestled inside buttery layers promises a delightful meal you’ll crave again and again.
Ingredients
Main Protein:
- 2 cups cooked chicken, shredded
- 1 cup shredded cheddar cheese
- 1/4 cup grated Parmesan cheese
Binding and Flavoring Ingredients:
- 1/2 cup mayonnaise
- 1/4 cup green onions, chopped
- 1/4 teaspoon garlic powder
- 1/4 teaspoon black pepper
- 1 tablespoon fresh parsley, chopped (optional)
Dough:
- 1 package crescent roll dough
Instructions
- Preheat the oven to 375°F (190°C) for optimal cooking temperature.
- Cover a baking sheet with parchment paper to prevent sticking and ensure easy cleanup.
- Create a savory filling by combining shredded chicken, sharp cheddar, creamy mayonnaise, diced onions, aromatic garlic powder, and a dash of black pepper.
- Carefully separate the crescent dough into individual triangular sections.
- Distribute the chicken mixture generously along the wider portion of each dough triangle.
- Skillfully roll each triangle from the wide end, encasing the flavorful filling inside.
- Arrange the rolled-up crescents evenly on the prepared baking sheet.
- Sprinkle a layer of grated Parmesan cheese over the top for an extra crispy and cheesy finish.
- Bake in the preheated oven for 12-15 minutes until the crescents turn a beautiful golden brown.
- Optional: Garnish with fresh chopped parsley for added color and a hint of herbal freshness before serving.
Notes
- Swap crescent dough with gluten-free alternatives for celiac or wheat-sensitive diets.
- Use Greek yogurt instead of mayo to reduce fat and boost protein content.
- Try different cheese combinations like mozzarella or pepper jack for varied flavor profiles.
- Prepare filling ahead of time and refrigerate to enhance ingredient melding and save cooking time.
- Prep Time: 15 minutes
- Cook Time: 15 minutes
- Category: Lunch, Dinner, Appetizer, Snacks
- Method: Baking
- Cuisine: American
Nutrition
- Serving Size: 8
- Calories: 320
- Sugar: 2 g
- Sodium: 560 mg
- Fat: 22 g
- Saturated Fat: 8 g
- Unsaturated Fat: 12 g
- Trans Fat: 0.5 g
- Carbohydrates: 12 g
- Fiber: 1 g
- Protein: 20 g
- Cholesterol: 70 mg
Nathaniel Brooks
Founder & Recipe Developer
Expertise
Farm-to-table cuisine, Seasonal recipe development, Culinary storytelling
Education
Ivy Tech Community College – Indianapolis, IN
Culinary Arts / Hospitality Administration & Events
Focused on hands-on training in classical and modern culinary techniques.
Nathaniel’s story starts in the foothills of the Appalachian Mountains, where farm stands, backyard gardens, and old family recipes shaped his love for real food. After graduating from Ivy Tech Community College in Indianapolis, he spent years working in farm-to-table kitchens, learning how to turn local, seasonal ingredients into something memorable.
Today, Nathaniel pours that same spirit into every single recipe on Aspiring Culinarian – recipes that feel real, comforting, and connected to the land. When he’s not in the kitchen, you’ll find him foraging wild herbs, chasing sunsets with his camera, or writing about the flavors that shaped his roots.