Easy Fried Ice Cream: A Sweet & Crispy Dessert Recipe
Crafting delightful fried ice cream feels like unlocking a magical culinary secret waiting to surprise you.
Sweet dreams of crispy golden exteriors holding creamy cold centers start dancing in your mind.
Chefs around the world have perfected this incredible dessert technique that seems almost impossible.
Mexican restaurants popularized this incredible treat, making it a global sensation.
Contrasting temperatures create an unexpected texture adventure that challenges traditional dessert expectations.
Delicate ice cream balls coated in crunchy, warm shells promise a sensational experience.
You can absolutely master this impressive dessert with just a few simple ingredients and techniques.
One bite will convince you that kitchen magic is real and deliciously within reach.
Fried Ice Cream Standout Reasons
Fried Ice Cream Must-Have Ingredients
Coating Ingredients:Ice Cream Base:Frying and Finishing Ingredients:Fried Ice Cream Directions to Follow

Step 1: Whip Up Crunchy Coating
Create a delectable coating by thoroughly mixing together in a wide bowl:Blend ingredients until well combined and texture is consistent.
Step 2: Shape Frozen Flavor Bombs
Scoop vanilla bean ice cream and form into perfect round balls.
Gently roll each ball completely in the corn flake mixture.
Place coated spheres on a freezer-safe tray and freeze for 1-2 hours until solid.
Step 3: Double-Dip Technique
Pull frozen ice cream balls from freezer.
Dunk each ball into beaten eggs, then roll again in corn flake mixture.
This double coating ensures a super crispy exterior.
Return coated balls to freezer for minimum 3 hours or overnight.
Step 4: Sizzling Transformation
Heat peanut oil in deep fryer or heavy pot until temperature reaches 375°F.
Carefully lower one ice cream ball at a time into hot oil.
Fry quickly for 10-15 seconds until golden brown.
Work swiftly to prevent melting.
Remove immediately and place on paper towel.
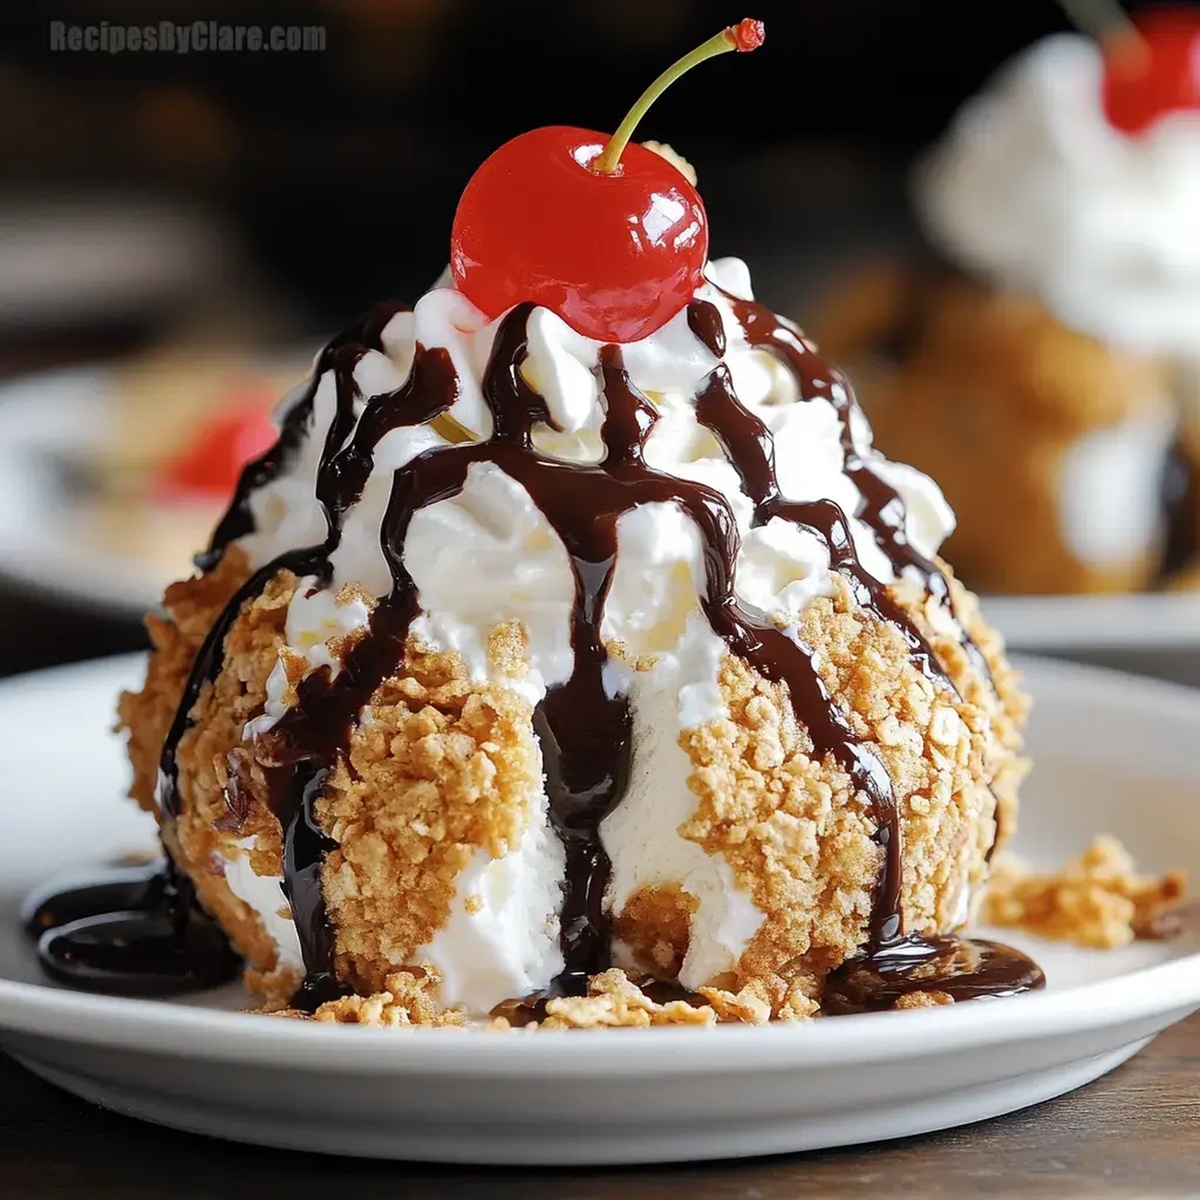
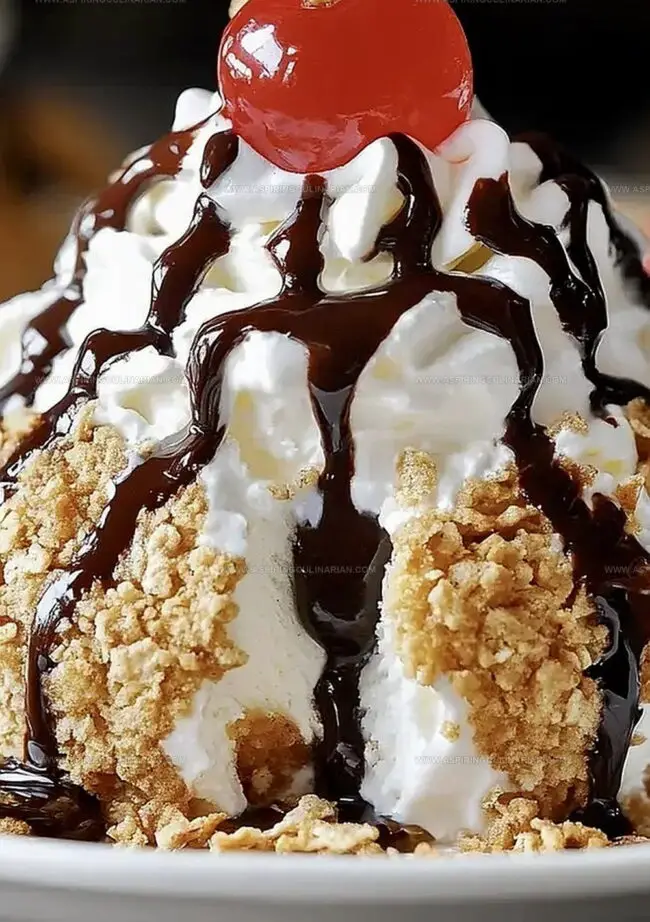
Step 5: Decadent Finishing Touches
Plate each crispy ice cream ball.
Drizzle with rich chocolate sauce.
Add a dollop of fluffy whipped cream.
Crown with a bright maraschino cherry for ultimate dessert drama.
Fried Ice Cream Cooking Tips
Fried Ice Cream Variations to Explore
Fried Ice Cream Ways to Serve
Fried Ice Cream Storage Instructions
FAQs
The mixture creates a crispy, crunchy exterior that adds texture and flavor to the ice cream. The crushed cookies and corn flakes provide a golden-brown crunch when fried.
Peanut oil works best due to its high smoke point and neutral flavor. However, you can substitute with vegetable or canola oil if needed. Just ensure the oil is heated to the correct temperature.
Keep the ice cream balls frozen solid before frying. Work quickly and fry each ball for only 10-15 seconds. The goal is to create a crispy exterior while keeping the inside cold and intact.
Print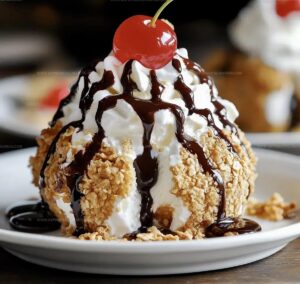
Fried Ice Cream Crispy Dessert Recipe
- Total Time: 30 minutes
- Yield: 8 1x
Description
Crispy fried ice cream brings Mexican restaurant magic straight to home kitchens, promising a delightful dance of hot and cold. Crunchy cornflake coating and cool vanilla ice cream create an irresistible contrast you’ll crave again and again.
Ingredients
Main Ingredients:
- 1.5 quarts vanilla bean ice cream
- 4 eggs, beaten until foamy
- 2 cups crushed corn flakes, measured after crushing
- 2 cups crushed vanilla wafers, measured after crushing
Seasoning:
- 2 teaspoons ground cinnamon
Toppings and Frying:
- 10 tablespoons chocolate sauce
- 10 tablespoons whipped cream
- 10 maraschino cherries
- Peanut oil, for frying
Instructions
- Craft a delectable coating by pulverizing corn flakes, vanilla wafers, and cinnamon into a fine, fragrant mixture in a mixing bowl.
- Using an ice cream scoop, create perfectly rounded vanilla bean spheres. Meticulously enrobe each ball with the prepared crumb blend, ensuring comprehensive coverage. Transfer the coated orbs to the freezer for 1-2 hours to solidify.
- Extract the chilled ice cream spheres from the freezer. Gently submerge each ball into whisked eggs, then re-roll in the crispy crumb mixture, guaranteeing total encapsulation. Return to the freezer for a minimum of 3 hours or preferably overnight.
- Preheat peanut oil to a precise 375°F in a deep fryer or heavy-bottomed pot. Strategically fry individual ice cream spheres for 10-15 seconds, achieving a golden, crisp exterior. Work swiftly to prevent melting, removing each orb immediately after reaching the desired color.
- Elevate the dessert by cascading rich chocolate sauce over the fried ice cream. Crown with a billowing dollop of whipped cream and punctuate with a vibrant maraschino cherry.
Notes
- Freeze the ice cream balls thoroughly to prevent rapid melting during frying, ensuring a crispy exterior and cold interior.
- Use extremely cold ice cream and work quickly when coating and frying to maintain the perfect texture and prevent unwanted melting.
- For a gluten-free version, swap corn flakes and vanilla wafers with gluten-free alternatives like crushed rice cereal or almond flour-based cookies.
- Try different ice cream flavors like chocolate, strawberry, or cookies and cream to create unique variations of this classic dessert.
- Prep Time: 30 minutes
- Cook Time: 15 seconds
- Category: Desserts, Snacks
- Method: Frying
- Cuisine: Mexican
Nutrition
- Serving Size: 8
- Calories: 467
- Sugar: 38 g
- Sodium: 154 mg
- Fat: 22 g
- Saturated Fat: 12 g
- Unsaturated Fat: 8 g
- Trans Fat: 0.5 g
- Carbohydrates: 59 g
- Fiber: 1.5 g
- Protein: 6 g
- Cholesterol: 105 mg
Nathaniel Brooks
Founder & Recipe Developer
Expertise
Farm-to-table cuisine, Seasonal recipe development, Culinary storytelling
Education
Ivy Tech Community College – Indianapolis, IN
Culinary Arts / Hospitality Administration & Events
Focused on hands-on training in classical and modern culinary techniques.
Nathaniel’s story starts in the foothills of the Appalachian Mountains, where farm stands, backyard gardens, and old family recipes shaped his love for real food. After graduating from Ivy Tech Community College in Indianapolis, he spent years working in farm-to-table kitchens, learning how to turn local, seasonal ingredients into something memorable.
Today, Nathaniel pours that same spirit into every single recipe on Aspiring Culinarian – recipes that feel real, comforting, and connected to the land. When he’s not in the kitchen, you’ll find him foraging wild herbs, chasing sunsets with his camera, or writing about the flavors that shaped his roots.