
The Best Gooey Mozzarella Biscuit Bombs Recipe You’ll Ever Try
Bursting with cheesy goodness, these mozzarella biscuit bombs deliver an explosion of flavor that will tantalize your taste buds.
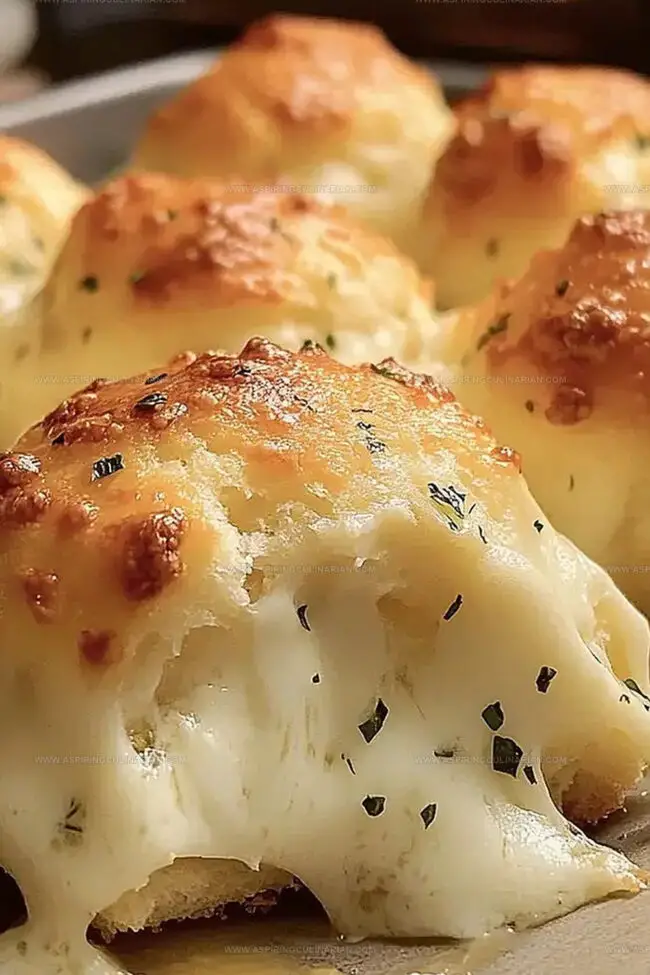
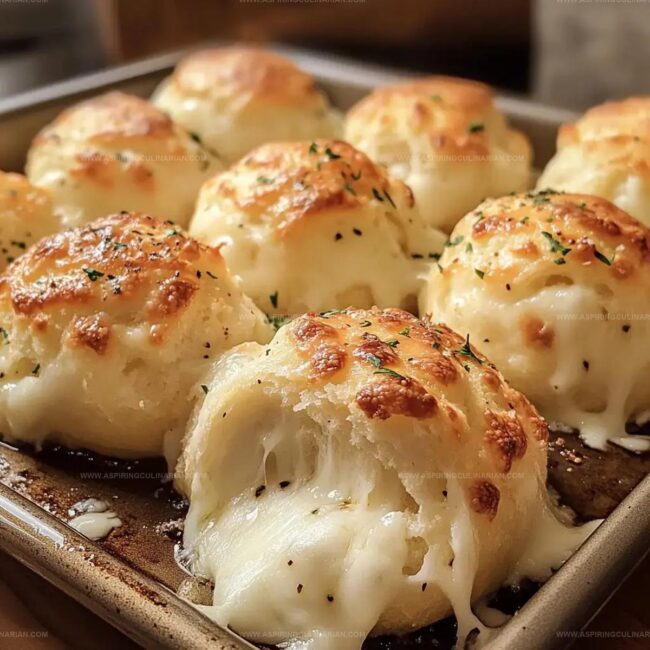
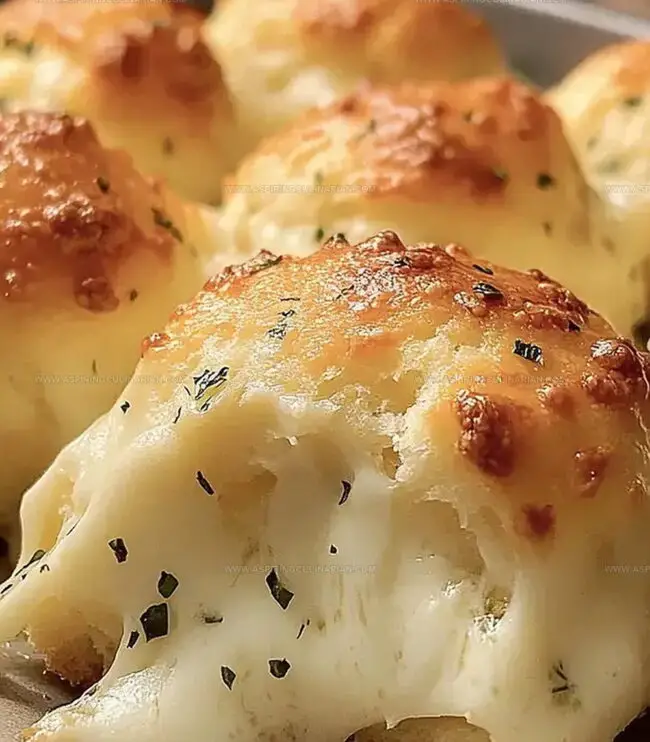
Soft, pillowy biscuits cradle melted mozzarella in a delightful surprise that promises pure comfort.
Each bite promises a warm, gooey center that stretches and delights with every mouthful.
The golden-brown exterior gives way to a molten cheese center that makes these biscuit bombs irresistible.
Simple ingredients come together to create a seriously addictive appetizer or side dish that steals the show at any gathering.
These savory treats are quick to prepare and guaranteed to disappear faster than you can say “cheese.” Prepare to become the culinary hero of your next meal with this mouthwatering recipe that transforms ordinary biscuits into extraordinary bites.
Cheesy Garlic Biscuit Bites: Why They’re Addictive
Cheesy Garlic Biscuit Bite Ingredients
Main Ingredients:Flavor Enhancers:Garnish:Simple Steps for Garlic Biscuit Bites
Step 1: Fire Up the Oven
Crank the oven to 375F (190C) and grab a baking sheet.
Line it with parchment paper for easy cleanup and perfect baking.
Step 2: Prep the Biscuit Bases
Pop open the biscuit container and gently separate each biscuit.
Use your fingers or a rolling pin to flatten each one into a thin, round disc about the size of your palm.
Step 3: Create Cheesy Centers
Place a cube of mozzarella right in the middle of each biscuit disc.
This will be the gooey surprise inside your bite-sized treats.
Step 4: Wrap and Seal the Treasure
Carefully fold the edges of the biscuit disc around the cheese cube.
Pinch and seal the edges completely, then roll between your palms to create a smooth, perfect ball.
Make sure no cheese is peeking out!
Step 5: Whip Up Flavor-Packed Butter
In a small bowl, combine:Stir until all ingredients are well mixed and fragrant.
Step 6: Butter Bath
Using a pastry brush, generously coat each biscuit ball with the garlic butter mixture.
Make sure every inch gets some love.
Step 7: Sprinkle Cheese Magic
Dust the top of each buttered ball with a generous sprinkle of Parmesan cheese.
This will create a crispy, golden exterior.
Step 8: Bake to Perfection
Place the baking sheet in the preheated oven.
Bake for 12-15 minutes, watching for a beautiful golden-brown color that signals crispy, cheesy deliciousness.
Step 9: Final Touch and Serve
Remove from the oven and let cool for a few minutes.
Sprinkle fresh chopped parsley on top for a pop of color and freshness.
Serve warm and watch them disappear!
Garlic Biscuit Bite Tips from the Kitchen
Garlic Biscuit Bite Variations for Fun
Ways to Serve Cheesy Garlic Biscuit Bites
Storage Suggestions for Biscuit Bites
FAQs
Yes, you can substitute mozzarella with cheddar, pepper jack, or provolone for different flavor profiles.
Refrigerated canned biscuit dough works best for this recipe, ensuring consistent texture and easy preparation.
Ensure edges are completely sealed by pinching and rolling the dough thoroughly around the cheese cube.
You can assemble the bites and refrigerate for up to 2 hours before baking, making them perfect for advance party planning.
Print
Gooey Mozzarella Biscuit Bombs Recipe
- Total Time: 30 minutes
- Yield: 8 1x
Description
Mozzarella biscuit bombs deliver irresistible cheesy comfort straight from Southern kitchens. Warm, golden parcels oozing with melted cheese promise a delightful culinary experience you cannot resist.
Ingredients
Cheese:
- 16 cubes mozzarella cheese (1 inch each)
- 2 tablespoons Parmesan cheese, grated
Dough and Seasoning:
- 1 can refrigerated biscuit dough
- 1 teaspoon garlic powder
- 1 teaspoon Italian seasoning
Liquid and Garnish:
- 4 tablespoons (60 milliliters) butter, melted
- Fresh parsley, chopped (for garnish)
Instructions
- Preheat the oven to 375°F (190°C) and prepare a baking sheet with parchment paper for optimal non-stick baking.
- Gently separate each biscuit from the package and delicately flatten into thin, uniform discs using light pressure.
- Position a single mozzarella cube precisely in the center of each biscuit disc, ensuring even placement.
- Carefully encase the cheese cube by folding the dough edges inward, meticulously sealing to prevent cheese leakage, then roll into smooth, compact spheres.
- Create a fragrant garlic butter mixture by whisking melted butter with garlic powder and Italian seasoning until thoroughly combined.
- Using a culinary brush, generously coat each dough ball with the aromatic garlic butter mixture, ensuring complete coverage.
- Liberally sprinkle grated Parmesan cheese over the butter-coated bites, creating a savory, crispy exterior.
- Transfer the prepared bites to the preheated oven and bake for 12-15 minutes, watching for a golden-brown transformation.
- Allow bites to rest briefly after removing from oven, then garnish with fresh chopped parsley and serve while warm for maximum flavor and texture.
Notes
- Customize cheese selection by using different melting cheeses like cheddar or pepper jack for varied flavor profiles.
- Prevent cheese leakage by ensuring dough completely seals around cheese cube with no exposed edges.
- Make gluten-free by substituting regular biscuit dough with gluten-free biscuit mix or almond flour-based dough.
- Reduce sodium by using low-fat cheese, unsalted butter, and reduced-sodium seasonings for health-conscious variations.
- Prep Time: 15 minutes
- Cook Time: 15 minutes
- Category: Appetizer, Snacks
- Method: Baking
- Cuisine: Italian
Nutrition
- Serving Size: 8
- Calories: 180
- Sugar: 1g
- Sodium: 450mg
- Fat: 10g
- Saturated Fat: 5g
- Unsaturated Fat: 4g
- Trans Fat: 0g
- Carbohydrates: 19g
- Fiber: 0g
- Protein: 4g
- Cholesterol: 20mg
Nathaniel Brooks
Founder & Recipe Developer
Expertise
Farm-to-table cuisine, Seasonal recipe development, Culinary storytelling
Education
Ivy Tech Community College – Indianapolis, IN
Culinary Arts / Hospitality Administration & Events
Focused on hands-on training in classical and modern culinary techniques.
Nathaniel’s story starts in the foothills of the Appalachian Mountains, where farm stands, backyard gardens, and old family recipes shaped his love for real food. After graduating from Ivy Tech Community College in Indianapolis, he spent years working in farm-to-table kitchens, learning how to turn local, seasonal ingredients into something memorable.
Today, Nathaniel pours that same spirit into every single recipe on Aspiring Culinarian – recipes that feel real, comforting, and connected to the land. When he’s not in the kitchen, you’ll find him foraging wild herbs, chasing sunsets with his camera, or writing about the flavors that shaped his roots.