Spooky Halloween Whoopie Pies: Dreamy Creamy Filling Recipe
Sweet and spooky Halloween whoopie pies always bring unexpected delight to seasonal celebrations.
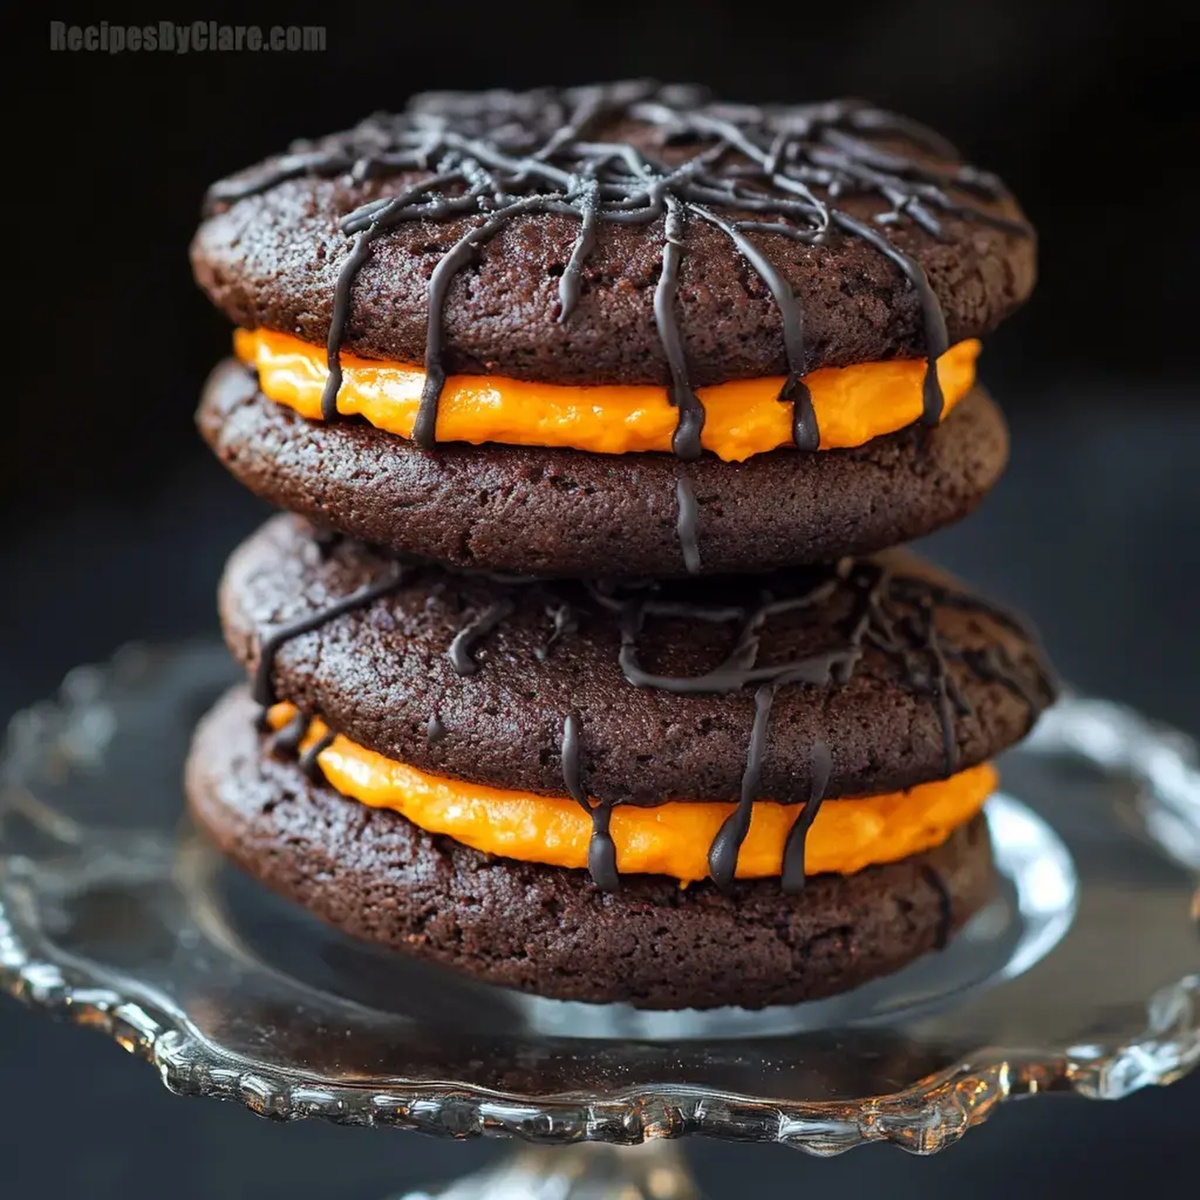
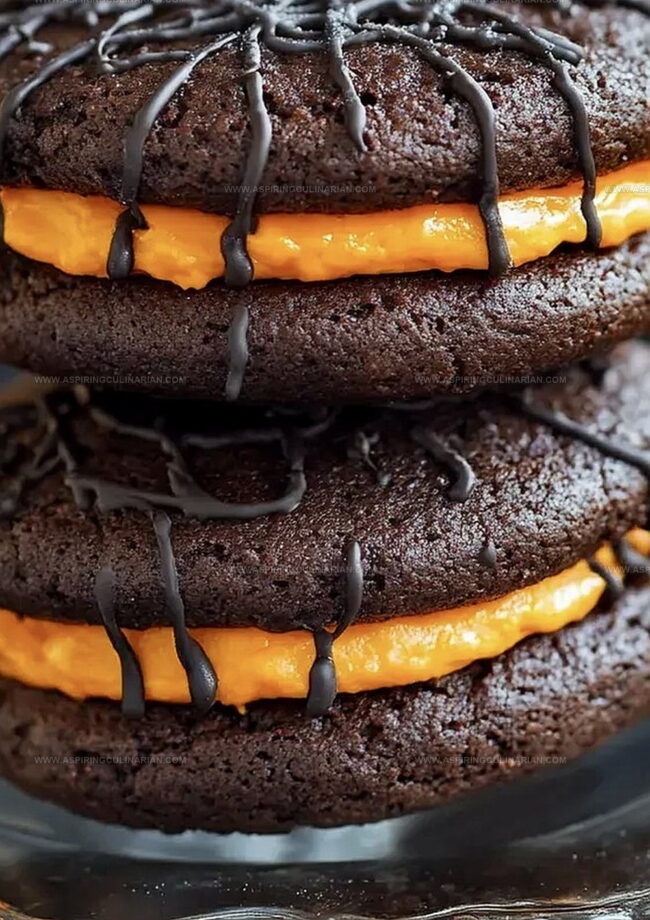
Chocolate cake-like cookies sandwich a luscious marshmallow cream that melts in your mouth.
Dark cocoa shells create a perfect contrast against the fluffy white filling.
Nostalgic memories of childhood parties dance through each bite-sized treat.
Marshmallow cream adds a cloud-like softness that makes these desserts irresistible.
Crafting these classic confections feels like magic brewing in your kitchen.
Let’s whip up something wickedly delicious that will make everyone howl with happiness.
Halloween Whoopie Pies: Creamy Monster Bites
Everything for Whoopie Pie Fun
Dry Ingredients:Wet Ingredients:Filling Ingredients:Make Halloween Whoopie Pies at Home

Step 1: Warm Up the Oven
Crank your oven to a toasty 350F and grab two baking sheets.
Line them with parchment paper for easy cleanup.
Step 2: Mix Dry Powerhouses
Grab a mixing bowl and whisk together:Blend these ingredients until they’re perfectly combined.
Step 3: Whip Butter and Sugar
In a separate large bowl, cream butter and sugar until they transform into a fluffy, light mixture that looks like clouds.
Step 4: Introduce Egg and Flavor
Crack an egg into the butter mixture and splash in vanilla extract.
Beat everything together until it’s smooth and well-blended.
Step 5: Create Chocolate Batter
Alternate adding dry ingredients and milk to your butter mixture.
Start with dry, end with dry.
Mix until the batter looks silky and uniform.
Step 6: Form Chocolate Rounds
Drop spoonfuls of batter onto prepared baking sheets.
Leave some breathing room between each cookie blob.
Step 7: Bake to Perfection
Slide sheets into the oven and bake for 10-12 minutes.
Cookies should look set and slightly firm.
Let them cool completely on a wire rack.
Step 8: Whip Up Creamy Filling
Beat together in a bowl:Blend until fluffy.
Add orange food coloring to create a Halloween-worthy hue.
Step 9: Construct Whoopie Pies
Spread or pipe filling onto one cookie’s flat side.
Sandwich with another cookie, creating a delightful treat that screams Halloween spirit.
Pro Whoopie Pie Tips & Tricks
Whoopie Pie Variations for Halloween
Serving Up Spooky Whoopie Pies
Storage for Creamy Whoopie Pies
FAQs
Yes, you can prepare the cookies and filling a day in advance. Store the cookies and filling separately in airtight containers, then assemble just before serving to keep them fresh and prevent sogginess.
The cookies are ready when the edges are set and slightly firm to the touch. They should look slightly puffy and not wet in the center. A light touch with your finger should leave a minimal indentation.
If the filling is too thick, add a little more cream. If it’s too thin, gradually mix in more powdered sugar until you reach the desired consistency. The filling should be smooth and spreadable but not runny.
Print
Halloween Whoopie Pies Creamy Filling Recipe
- Total Time: 37 minutes
- Yield: 12 1x
Description
Spooky Halloween Whoopie Pies deliver delightful chocolate sandwich cookies with marshmallow cream nestled between rich cake-like rounds. Ghoulish guests will devour these playful treats that blend nostalgic baking charm with seasonal festivity.
Ingredients
Main Ingredients:
- 2 cups (480 milliliters) all-purpose flour
- 1/2 cup (50 grams) cocoa powder
- 1 cup (200 grams) granulated sugar
- 1 cup (240 milliliters) whole milk
- 1 large egg
Leavening and Seasoning Ingredients:
- 1 1/4 teaspoons baking soda
- 1/2 teaspoon baking powder
- 1/4 teaspoon salt
- 1 teaspoon vanilla extract
Filling and Butter Ingredients:
- 1/2 cup (113 grams) unsalted butter, softened
- 1/2 cup (113 grams) unsalted butter, softened (for filling)
- 1 1/2 cups (180 grams) powdered sugar (for filling)
- 1 teaspoon vanilla extract (for filling)
- 2–3 tablespoons (30–45 milliliters) heavy cream (for filling)
- Orange food coloring (for filling)
Instructions
- Preheat the oven to 350°F (175°C) and arrange parchment paper on two baking sheets to prevent sticking.
- Sift together flour, cocoa powder, baking soda, baking powder, and salt in a medium mixing bowl to eliminate potential lumps.
- Using an electric mixer, cream butter and sugar until the mixture transforms into a pale, airy consistency with soft peaks.
- Incorporate egg and vanilla extract into the butter mixture, blending thoroughly until the ingredients are fully integrated.
- Gradually fold dry ingredients and milk into the wet mixture, alternating between the two. Mix until a smooth, uniform batter forms without overmixing.
- Carefully drop uniform spoonfuls of batter onto prepared baking sheets, maintaining consistent spacing to allow proper spreading during baking.
- Bake for 10-12 minutes at 350°F, monitoring until cookies develop a set texture and slightly crisp edges. Transfer to a wire rack for complete cooling.
- Prepare the filling by whipping butter, powdered sugar, vanilla extract, and heavy cream until achieving a light, velvety texture. Incorporate orange food coloring to create a festive Halloween hue.
- Construct whoopie pies by generously spreading filling onto the flat side of half the cooled cookies, then gently sandwiching with remaining cookies to complete the treat.
Notes
- Ingredient Swap Create gluten-free versions by substituting all-purpose flour with almond or gluten-free blend for those with dietary restrictions.
- Color Customization Experiment with different food coloring shades to match seasonal themes or personal preferences beyond traditional Halloween orange.
- Texture Enhancement Chill the cookie batter for 30 minutes before baking to prevent spreading and achieve more uniform, rounded whoopie pie shapes.
- Storage Solution Store assembled whoopie pies in an airtight container between parchment layers to maintain freshness and prevent filling from smearing.
- Prep Time: 25 minutes
- Cook Time: 12 minutes
- Category: Desserts, Snacks
- Method: Baking
- Cuisine: American
Nutrition
- Serving Size: 12
- Calories: 276 kcal
- Sugar: 26 g
- Sodium: 124 mg
- Fat: 14 g
- Saturated Fat: 8 g
- Unsaturated Fat: 5 g
- Trans Fat: 0.3 g
- Carbohydrates: 35 g
- Fiber: 2 g
- Protein: 3 g
- Cholesterol: 38 mg
Nathaniel Brooks
Founder & Recipe Developer
Expertise
Farm-to-table cuisine, Seasonal recipe development, Culinary storytelling
Education
Ivy Tech Community College – Indianapolis, IN
Culinary Arts / Hospitality Administration & Events
Focused on hands-on training in classical and modern culinary techniques.
Nathaniel’s story starts in the foothills of the Appalachian Mountains, where farm stands, backyard gardens, and old family recipes shaped his love for real food. After graduating from Ivy Tech Community College in Indianapolis, he spent years working in farm-to-table kitchens, learning how to turn local, seasonal ingredients into something memorable.
Today, Nathaniel pours that same spirit into every single recipe on Aspiring Culinarian – recipes that feel real, comforting, and connected to the land. When he’s not in the kitchen, you’ll find him foraging wild herbs, chasing sunsets with his camera, or writing about the flavors that shaped his roots.