
Sweet & Fluffy Kings Hawaiian Cheesecake Danish Recipe
Sweet mornings become magical with King’s Hawaiian cheesecake danish, a delightful twist on classic breakfast pastries.
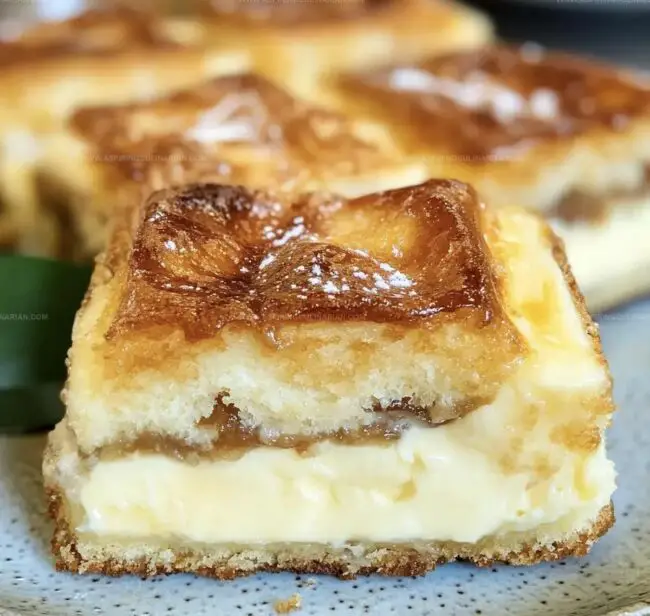
Soft, pillowy bread provides the perfect canvas for creamy cheesecake filling.
Layers of rich, tangy cream cheese melt seamlessly into golden-brown dough.
Buttery textures and subtle vanilla notes dance across your palate with each bite.
Unexpected combinations create a symphony of flavors that surprise and comfort.
Simple ingredients transform into an extraordinary treat that feels both familiar and exciting.
You’ll want to savor every delectable moment of this irresistible morning indulgence.
King’s Hawaiian Cheesecake Danish – A Sweet Bakery Treat
Ingredients for King’s Hawaiian Cheesecake Danish Magic
Base Ingredients:Sweetening Ingredients:Flavoring and Binding Ingredients:Preparing King’s Hawaiian Cheesecake Danish at Home
Step 1: Warm Up The Oven
Crank the oven to a toasty 375F (190C).
Grab a 9×13-inch baking dish and brush it with melted butter, making sure every corner gets some love.
Step 2: Prepare The Rolls
Nestle the Hawaiian rolls into the buttery baking dish.
Take a sharp knife and gently slice an ‘X’ into the top of each roll, cutting about two-thirds of the way down.
Be careful not to slice through the bottom – we want these rolls to stay together!
Step 3: Whip Up A Delicious Glaze
In a bowl, combine:Stir these ingredients until they become best friends.
Pour the glaze evenly over the rolls, making sure each one gets a generous coating.
Step 4: Create The Creamy Filling
In another bowl, blend together:Whisk until the mixture becomes silky smooth.
Transfer this dreamy filling into a piping bag or a zip-top bag with a corner snipped off.
Step 5: Fill Those Rolls
Carefully pipe the cream cheese mixture into the ‘X’ cut on each roll.
Don’t be shy – fill them up generously!
Step 6: Bake To Perfection
Slide the baking dish into the preheated oven.
Bake uncovered for 12-15 minutes.
You’re looking for a beautiful golden-brown color and a cream cheese filling that reaches 145F.
Step 7: Serve And Enjoy
Let the rolls cool down just a bit.
Serve them warm for an absolutely mind-blowing flavor and texture that’ll make everyone at the table swoon.
Cheesecake Danish Tips for Perfect Flaky Layers
Unique Spins for King’s Hawaiian Cheesecake Danish
Ways to Serve King’s Hawaiian Cheesecake Danish Warm
Storage for Freshness – King’s Hawaiian Cheesecake Danish
FAQs
King’s Hawaiian rolls are soft, slightly sweet bread rolls originating from Hawaii. They have a unique texture and subtle sweetness that makes them perfect for both sweet and savory recipes.
While the recipe is specifically designed for King’s Hawaiian rolls, you could potentially substitute with similar soft, slightly sweet dinner rolls. However, the unique flavor might be slightly different.
Yes, this recipe is relatively simple and straightforward. It requires basic mixing and piping skills, making it accessible for home cooks with minimal baking experience.
Print
Kings Hawaiian Cheesecake Danish Recipe
- Total Time: 30 minutes
- Yield: 12 1x
Description
Sweet Hawaiian paradise meets creamy cheesecake danish in this irresistible fusion of tropical flavors and classic pastry. Kings Hawaiian bread creates a pillowy base that melts with rich cream cheese filling, promising a delightful breakfast or dessert you won’t forget.
Ingredients
Main Ingredients:
- 12 King’s Hawaiian Sweet Rolls
- 8 ounces (226 grams) Cream Cheese, room temperature
- 1 Large Egg, beaten
Filling and Seasoning:
- 3 tablespoons Granulated Sugar
- 2 tablespoons Brown Sugar
- 1/2 tablespoon Ground Cinnamon
- 1/8 teaspoon Freshly Grated Nutmeg
Binding Ingredients:
- 1/3 cup (80 milliliters) Butter, melted
Instructions
- Preheat the oven to 375°F (190°C) and coat a 9×13-inch baking dish with melted butter, ensuring complete coverage.
- Arrange Hawaiian rolls in the prepared dish and carefully create a deep ‘X’ cut on top of each roll, stopping two-thirds of the way down without piercing the base.
- Combine melted butter, brown sugar, cinnamon, and nutmeg in a small bowl to craft a fragrant glaze. Drizzle the mixture uniformly over the rolls.
- Whisk cream cheese, granulated sugar, and beaten egg until achieving a silky, uniform consistency. Transfer the mixture to a piping bag or zip-top bag with a trimmed corner.
- Carefully pipe the cream cheese blend into the center of each roll’s ‘X’ cut, ensuring even distribution.
- Place the dish in the preheated oven and bake uncovered for 12-15 minutes, monitoring until rolls turn golden and the filling reaches 145°F.
- Allow the danish to rest briefly after removing from the oven, then serve warm to maximize flavor and enjoy the delectable texture.
Notes
- Butter Brush Technique Use softened butter for an even, smooth coating that prevents sticking and adds rich flavor to the baking dish.
- Cutting Precision Make shallow, precise ‘X’ cuts to create perfect pockets for the creamy filling without compromising the roll’s structure.
- Filling Control Pipe the cream cheese mixture slowly and steadily to ensure even distribution and prevent overflow during baking.
- Temperature Watch Monitor the internal temperature of the cream cheese filling carefully to achieve food safety and optimal texture.
- Prep Time: 15 minutes
- Cook Time: 15 minutes
- Category: Desserts, Snacks
- Method: Baking
- Cuisine: Hawaiian
Nutrition
- Serving Size: 12
- Calories: 308 kcal
- Sugar: 17 g
- Sodium: 230 mg
- Fat: 18 g
- Saturated Fat: 10 g
- Unsaturated Fat: 6 g
- Trans Fat: 0.3 g
- Carbohydrates: 27 g
- Fiber: 1 g
- Protein: 5 g
- Cholesterol: 50 mg
Nathaniel Brooks
Founder & Recipe Developer
Expertise
Farm-to-table cuisine, Seasonal recipe development, Culinary storytelling
Education
Ivy Tech Community College – Indianapolis, IN
Culinary Arts / Hospitality Administration & Events
Focused on hands-on training in classical and modern culinary techniques.
Nathaniel’s story starts in the foothills of the Appalachian Mountains, where farm stands, backyard gardens, and old family recipes shaped his love for real food. After graduating from Ivy Tech Community College in Indianapolis, he spent years working in farm-to-table kitchens, learning how to turn local, seasonal ingredients into something memorable.
Today, Nathaniel pours that same spirit into every single recipe on Aspiring Culinarian – recipes that feel real, comforting, and connected to the land. When he’s not in the kitchen, you’ll find him foraging wild herbs, chasing sunsets with his camera, or writing about the flavors that shaped his roots.