Irresistible Martha Washington Candy Recipe for Sweet Treats
Sweet tooth enthusiasts adore Martha Washington candy as a delightful confectionery treat that melts hearts.
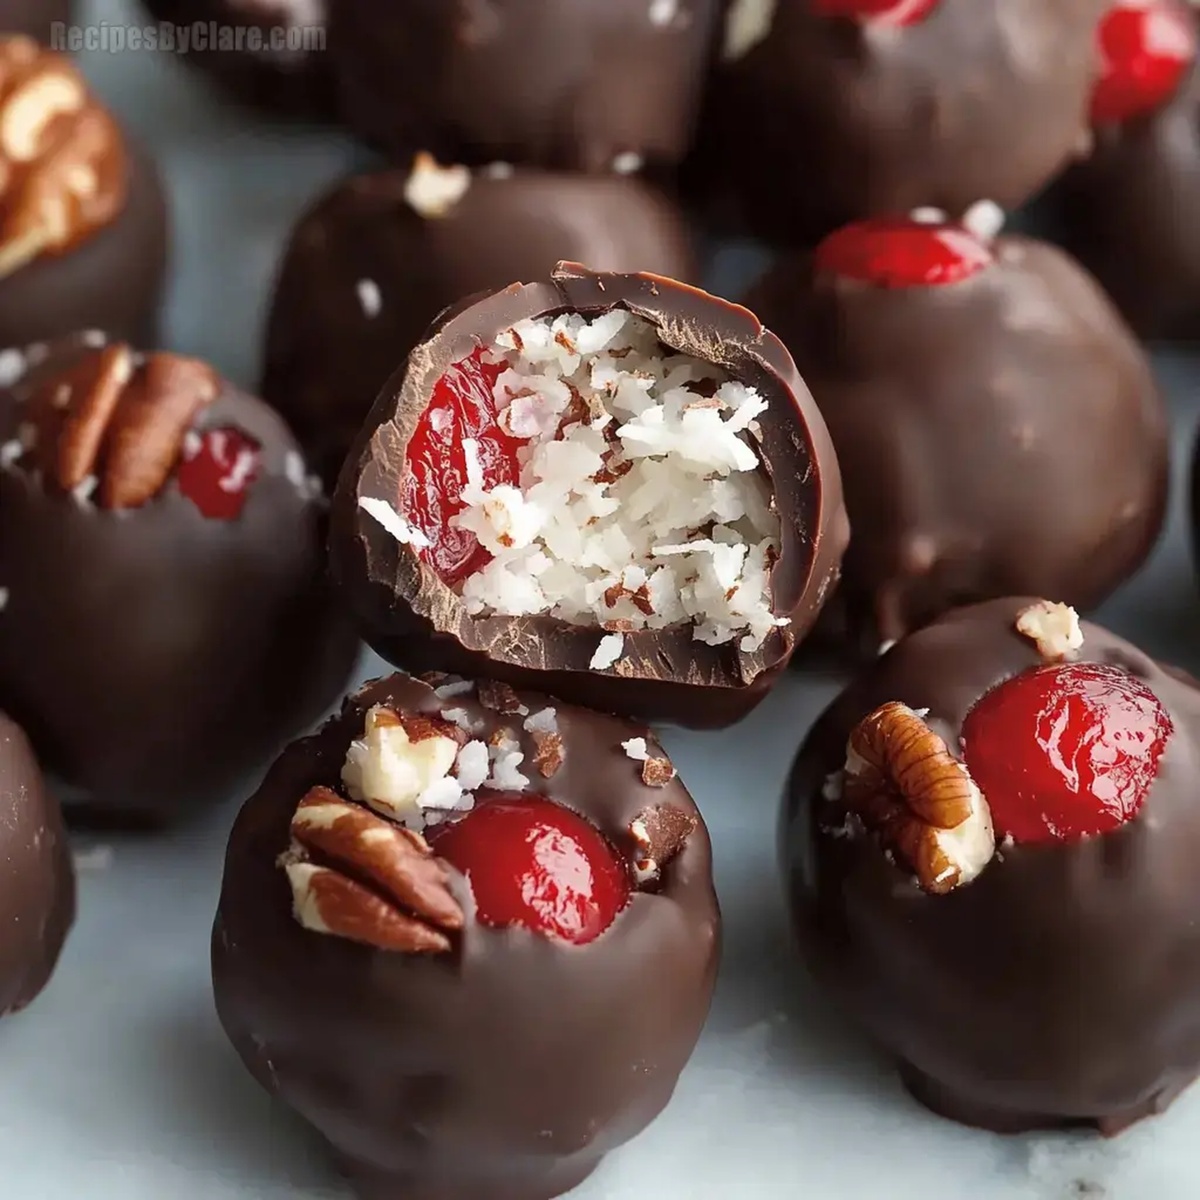
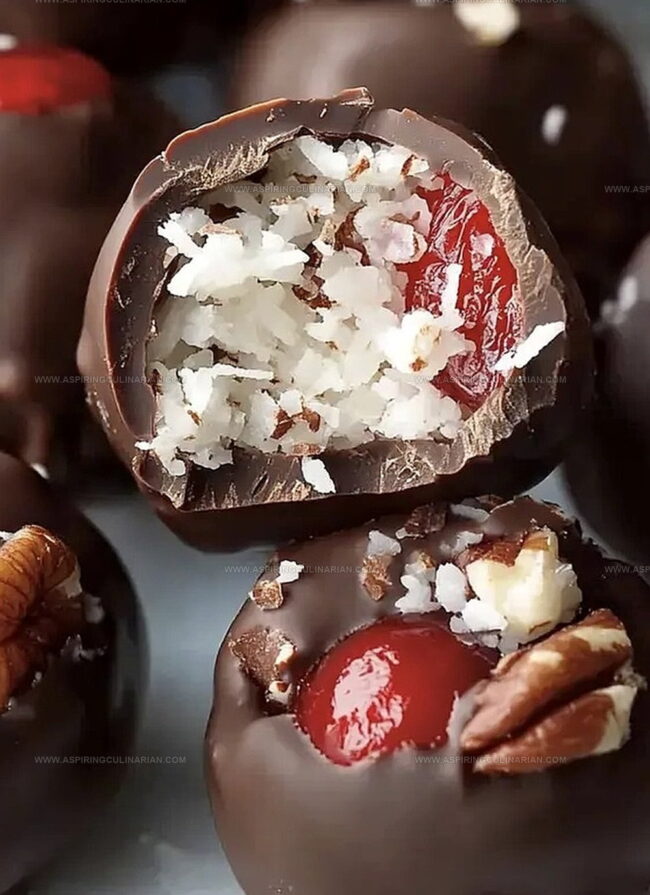
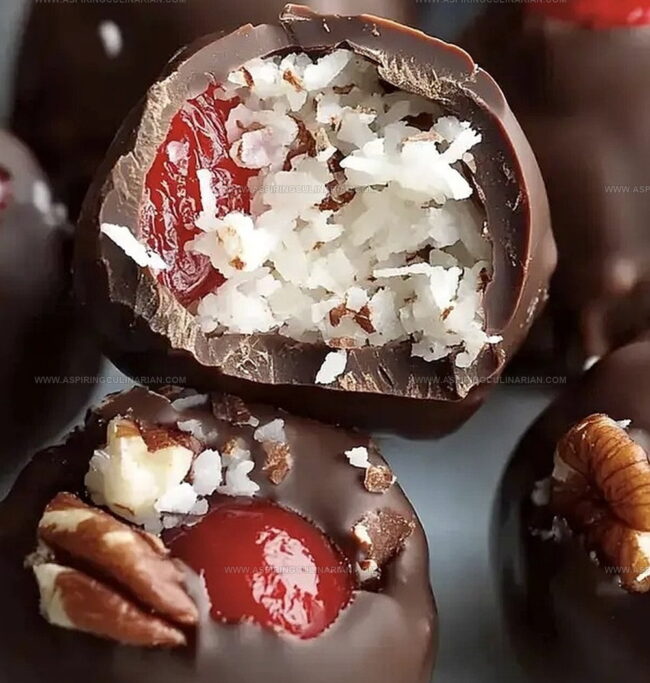
Clusters of coconut, condensed milk, and powdered sugar create a dreamy texture.
Chocolate coating adds richness to every single bite.
Memories of holiday gatherings dance through this nostalgic dessert.
Homemade treats always spark joy and connection.
Craft these delectable morsels and watch smiles bloom around your kitchen.
You’ll become the dessert hero everyone celebrates.
Martha Washington Candy: Southern Sweetness
What You’ll Need for Martha Washington Candy
Base Ingredients:Mix-In Ingredients:Coating Ingredients:Make Martha Washington Candy Step-by-Step
Step 1: Create Creamy Base
Grab a mixing bowl and combine softened butter, vanilla extract, and sweetened condensed milk.
Whip these ingredients together until they transform into a smooth, luxurious mixture that looks incredibly silky and inviting.
Step 2: Add Delightful Ingredients
Gradually fold in powdered sugar, creating a thick and consistent texture.
Then gently mix in these delectable ingredients:Stir everything until perfectly blended and distributed evenly.
Step 3: Shape And Chill Treats
Place the mixture into the refrigerator for 1-2 hours.
This helps the candy become firm and easier to handle.
Once chilled, roll the mixture into small, bite-sized spheres using your hands.
Make them uniform in size for consistent coating.
Step 4: Prepare Chocolate Coating
Use a microwave-safe bowl to melt chocolate chips.
Add a touch of shortening to create a smooth, glossy chocolate that will perfectly enrobe your candy spheres.
Heat in short intervals, stirring between each to prevent burning.
Step 5: Dip And Cover Candies
Carefully dunk each chilled candy sphere into the melted chocolate.
Use a fork to help coat them completely, allowing excess chocolate to drip off.
Place the chocolate-covered candies onto parchment paper.
Step 6: Final Cooling And Serving
Transfer the chocolate-coated candies to the refrigerator.
Let them cool and set completely until the chocolate hardens.
Once firm, these decadent Martha Washington Candies are ready to be devoured and shared with loved ones.
Sweet Candy Making Pointers
Flavorful Martha Washington Candy Switch-Ups
Serve Candy for Old-Fashioned Treat Time
Candy Storage for Martha Washington Perfection
FAQs
Yes, you can replace pecans with walnuts or almonds, use white chocolate for coating, or swap maraschino cherries with dried cranberries for different flavor profiles.
Absolutely! Kids can help roll the candy balls and enjoy dipping them in chocolate. Adult supervision is recommended during chocolate melting and handling hot surfaces.
When stored in an airtight container in the refrigerator, these candies typically remain delicious for 7-10 days. For best taste and texture, keep them chilled.
Print
Martha Washington Candy Recipe
- Total Time: 2 hours 30 minutes
- Yield: 20 1x
Description
Martha Washington candy offers a nostalgic journey through classic American confectionery, blending rich chocolate and sweet coconut for a delightful treat. Sweet memories melt together with each creamy bite, inviting you to savor a timeless dessert that celebrates homemade comfort.
Ingredients
Main Ingredients:
- 14 ounces (397 grams) sweetened shredded coconut
- 3 cups pecans (chopped)
- 10 ounces (283 grams) maraschino cherries (drained and chopped)
Binding and Sweetening Ingredients:
- 4 cups powdered sugar
- 14 ounces (397 grams) sweetened condensed milk
- 1 cup unsalted butter (softened)
- 1 tablespoon vanilla extract
Coating Ingredients:
- 6 cups semi-sweet chocolate chips
- 4 tablespoons shortening
Instructions
- In a spacious mixing bowl, whisk softened butter, vanilla extract, and sweetened condensed milk until achieving a silky, uniform consistency.
- Gradually fold in powdered sugar, ensuring a smooth texture without lumps, then gently incorporate shredded coconut, chopped maraschino cherries, and finely crushed pecans.
- Refrigerate the mixture for 90-120 minutes, allowing ingredients to meld and firm up for easier handling.
- Using clean hands, roll the chilled mixture into bite-sized spheres, approximately 1-inch in diameter, placing them on a clean baking sheet.
- Prepare the chocolate coating by microwaving chocolate chips and shortening in 30-second intervals, stirring between each interval until completely melted and glossy.
- Using a fork or dipping tool, carefully submerge each candy sphere into the warm chocolate, ensuring complete coverage.
- Gently tap the fork to remove excess chocolate, then place coated candies onto a parchment-lined tray.
- Refrigerate the chocolate-covered candies for 15-20 minutes until the chocolate sets completely and becomes firm.
- Store in an airtight container in the refrigerator for up to one week, allowing flavors to develop and maintain optimal texture.
Notes
- Softening butter beforehand ensures smoother, easier blending without lumps.
- Chilling the mixture completely helps maintain shape during chocolate coating and prevents crumbling.
- Use room temperature ingredients for better incorporation and consistent texture.
- For dietary variations, swap regular chocolate with dairy-free or sugar-free alternatives to accommodate different nutritional needs.
- Prep Time: 30 minutes
- Cook Time: 2 hours
- Category: Desserts, Snacks
- Method: Blending
- Cuisine: American
Nutrition
- Serving Size: 20
- Calories: 462
- Sugar: 39 g
- Sodium: 30 mg
- Fat: 32 g
- Saturated Fat: 12 g
- Unsaturated Fat: 18 g
- Trans Fat: 0.5 g
- Carbohydrates: 41 g
- Fiber: 3 g
- Protein: 4 g
- Cholesterol: 30 mg
Nathaniel Brooks
Founder & Recipe Developer
Expertise
Farm-to-table cuisine, Seasonal recipe development, Culinary storytelling
Education
Ivy Tech Community College – Indianapolis, IN
Culinary Arts / Hospitality Administration & Events
Focused on hands-on training in classical and modern culinary techniques.
Nathaniel’s story starts in the foothills of the Appalachian Mountains, where farm stands, backyard gardens, and old family recipes shaped his love for real food. After graduating from Ivy Tech Community College in Indianapolis, he spent years working in farm-to-table kitchens, learning how to turn local, seasonal ingredients into something memorable.
Today, Nathaniel pours that same spirit into every single recipe on Aspiring Culinarian – recipes that feel real, comforting, and connected to the land. When he’s not in the kitchen, you’ll find him foraging wild herbs, chasing sunsets with his camera, or writing about the flavors that shaped his roots.