
The Fluffiest Milky Cheese Donuts Recipe for Sweet Treat Lovers
Sweet, pillowy donuts infused with a milky cheese recipe burst with creamy goodness that melts in your mouth.
These delectable treats combine soft dough and rich dairy flavors into a heavenly bite.
Each golden-brown morsel promises a delightful balance of sweetness and tangy cheese notes.
The recipe transforms simple ingredients into an irresistible dessert that surprises and delights.
Crisp on the outside and tender within, these donuts offer a unique twist on traditional pastries.
Bakers of all skill levels can create this mouthwatering sensation with just a few easy steps.
Prepare to fall in love with a dessert that’s sure to become a new favorite.
Milky Cheese Donuts: Best Baking Practices
Milky Cheese Donuts: Flavor Ideas for Fun
Milky Cheese Donuts: How to Serve Creatively
Milky Cheese Donuts: Donut Storage Tips
FAQs
Activating the yeast ensures it’s alive and working, which helps the donuts rise properly and develop a light, fluffy texture. The frothy mixture shows the yeast is ready to create volume in your dough.
Mozzarella works best because it melts smoothly and creates those delicious stretchy cheese pulls. However, you can experiment with mild, soft cheeses like cream cheese or mild cheddar that melt easily.
Add flour gradually, one tablespoon at a time. Keep kneading until the dough becomes smooth and elastic. Don’t add too much flour at once, as this can make the donuts dense and heavy.
Milky Cheese Donuts: What Sets These Donuts Apart
Milky Cheese Donuts Ingredient Lineup
Main Ingredients:
Flour Base:Liquid Activators:Binding and Enriching Ingredients:Cheese Filling:Frying and Finishing:Milky Cheese Donuts: The Process Unpacked
Step 1: Awaken the Yeast
Combine warm milk, sugar, and active dry yeast in a small bowl.
Gently stir and let the mixture sit for 5-10 minutes until it becomes frothy and bubbly.
This magical moment signals that your yeast is ready to work its delicious magic.
Step 2: Create the Dough Base
In a large mixing bowl, blend flour and salt.
Create a cozy well in the center and pour in the yeast mixture, beaten egg, and melted butter.
Stir everything together until a sticky, promising dough emerges.
Step 3: Transform the Dough
Spread the dough onto a lightly floured surface.
Knead with love for 5-7 minutes until the texture becomes smooth and stretchy.
If the dough feels too clingy, sprinkle a bit more flour, one tablespoon at a time.
Step 4: Allow First Rising
Transfer the dough to a generously greased bowl.
Cover with a clean kitchen towel or plastic wrap.
Let it rest in a warm, quiet spot for about 1 hour, watching it double in size like a delightful dough balloon.
Step 5: Shape the Donut Rounds
Punch down the risen dough to release trapped air.
Roll it out to about 12 inch thickness on a floured surface.
Use a round cutter to create donut shapes.
For traditional donuts, remove the centers with a smaller cutter.
Feel free to keep them whole for surprise fillings.
Step 6: Prepare for Second Rise
Arrange the cut donuts on a parchment-lined baking sheet, giving each one breathing room.
Drape a light towel over them and let them puff up for another 30 minutes.
Step 7: Heat the Cooking Oil
Prepare a deep pot with 2-3 inches of oil.
Warm it to 350F.
No thermometer?
Drop a tiny dough piece into the oil – it should bubble and float up cheerfully.
Step 8: Fry to Golden Perfection
Gently lower 2-3 donuts into the hot oil using a slotted spoon.
Fry each side for 2-3 minutes until they turn a gorgeous golden brown.
Transfer to a paper towel-lined plate to drain excess oil.
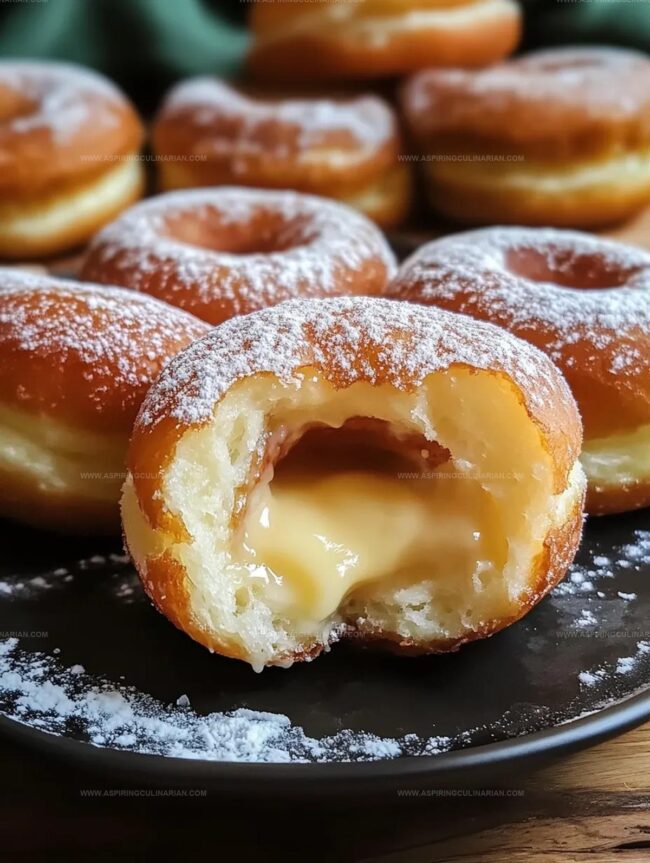
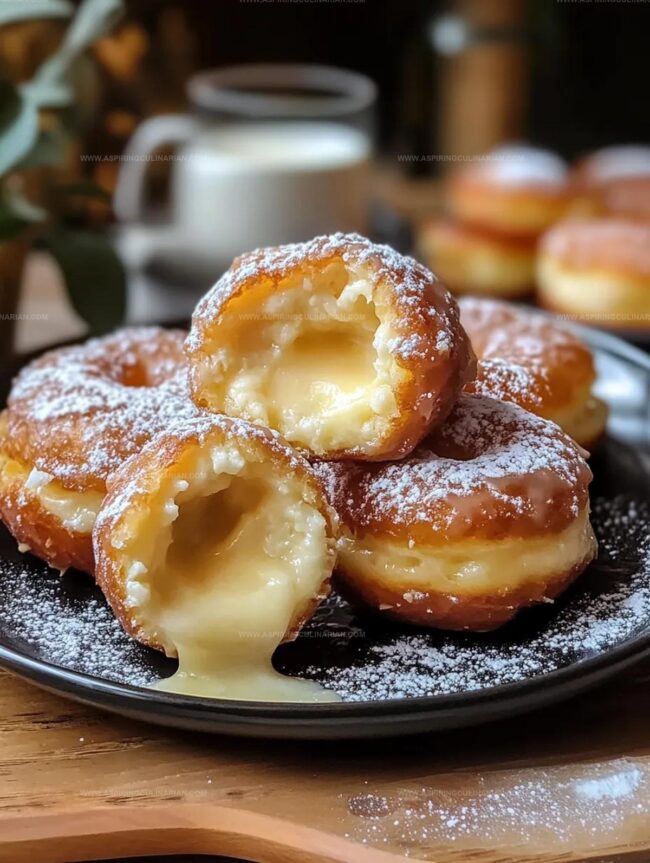
Step 9: Stuff with Cheesy Goodness
While donuts are warm but touchable, create a small side opening.
Fill a piping bag with shredded mozzarella and generously inject cheese into each donut’s center.
The warmth will help melt the cheese into gooey deliciousness.
Step 10: Serve and Celebrate
Optional: Dust with powdered sugar for extra sweetness.
Serve these warm, cheese-filled treasures immediately.
Watch as the stretchy cheese creates irresistible pulls with each delightful bite.
Print
Milky Cheese Donuts Recipe
- Total Time: 30 minutes
- Yield: 12 1x
Description
Milky cheese donuts bring Korean street food magic to your kitchen with pillowy, golden-brown perfection. Crisp exterior and creamy interior promise a delightful culinary adventure you won’t forget.
Ingredients
Donut Dough:
- 2 cups (480 milliliters) all-purpose flour
- 1 large egg
- 1 cup (240 milliliters) whole milk, warm (about 110°F/43°C)
- 4 tablespoons (60 milliliters) unsalted butter, melted
- 2 tablespoons (30 grams) sugar
- 2.25 teaspoons (7 grams) active dry yeast (1 packet)
- 0.5 teaspoon (2.5 grams) salt
Cheese and Finishing:
- 1 cup (240 grams) shredded mozzarella cheese
Oil and Coating:
- Vegetable or canola oil, for frying
- Powdered sugar, for dusting (optional)
Instructions
- Prepare the yeast catalyst by blending warm milk (110F) with sugar and active dry yeast. Allow the mixture to transform and become frothy within 5-10 minutes, signaling yeast activation.
- Combine flour and salt in a spacious mixing vessel. Create a central well and incorporate the yeast mixture, whisked egg, and liquefied butter. Blend until a cohesive, tacky dough emerges.
- Transfer the dough onto a lightly floured workspace. Massage and stretch the dough for 5-7 minutes until achieving a silky, pliable texture. Incrementally introduce additional flour if the consistency remains excessively sticky.
- Nestle the dough into a generously greased container. Drape with a pristine cloth or plastic membrane. Permit rising in a tranquil, draft-free environment for approximately 60 minutes until volume doubles.
- Deflate the risen dough by pressing down. Roll out to roughly 12-inch thickness on a floured surface. Utilize a circular cutter to craft donut shapes, removing centers for traditional rings or maintaining whole forms for filled variations.
- Arrange cut donuts on parchment-lined baking sheet, maintaining spacing. Loosely cover and allow secondary proofing for 30 minutes, enabling slight expansion.
- Prepare frying station by filling a robust pot with 2-3 inches of oil. Heat to precise 350F. Test oil readiness by dropping dough fragment, which should immediately bubble and ascend.
- Gently submerge 2-3 donuts using slotted utensil. Fry each side for 2-3 minutes until achieving golden-bronze coloration. Extract and deposit on paper towel-lined plate to absorb excess oil.
- While donuts remain warm, create a delicate incision along each side. Load piping apparatus with mozzarella cheese. Inject cheese core, leveraging residual warmth to initiate gentle melting.
- Optional: Dust with powdered sugar for aesthetic enhancement. Serve immediately to capitalize on molten cheese and optimal texture, ensuring maximum gustatory pleasure.
Notes
- Ensure milk is precisely warm (110F) to wake up yeast without killing it, creating a perfect fluffy base for donuts.
- Knead until smooth and elastic, adding flour gradually to prevent a dry or overly sticky texture that could ruin donut quality.
- Maintain steady 350F for even, golden-brown donuts without absorbing excess oil or burning the exterior.
- Use freshly shredded mozzarella and fill while donuts are warm to achieve that irresistible melty, stretchy cheese center.
- Prep Time: 20 minutes
- Cook Time: 10 minutes
- Category: Breakfast, Snacks, Desserts
- Method: Frying
- Cuisine: American
Nutrition
- Serving Size: 12
- Calories: 210
- Sugar: 4g
- Sodium: 150mg
- Fat: 9g
- Saturated Fat: 5g
- Unsaturated Fat: 3g
- Trans Fat: 0g
- Carbohydrates: 26g
- Fiber: 1g
- Protein: 6g
- Cholesterol: 30mg
Lena Martinez
Contributing Writer & Culinary Educator
Expertise
Southwestern and Latin American cuisines, Vegetarian and plant-based recipe development, Culinary education and community outreach
Education
Santa Fe Community College, Santa Fe, NM
Certificate in Culinary Arts
Emphasized Southwestern cuisine and sustainable cooking practices
Lena grew up surrounded by the colors, spices, and traditions of the Southwest – flavors that sparked her love for bold, honest cooking. After earning her Culinary Arts certificate at Santa Fe Community College, she made it her mission to teach home cooks how to create flavorful, plant-powered meals without the fuss.
Her recipes are packed with vibrant ingredients, simple steps, and the kind of heart that turns a regular meal into something you’ll want to share. Outside the kitchen, Lena spends her time wandering farmers’ markets, trading family recipes, and helping young chefs find their voice through food.