
Quick & Buttery Mint Kiss Cookies Recipe: Melt-in-Your-Mouth Magic
Sweet and delightful mint kiss cookies dance between rich chocolate and cool mint flavors.
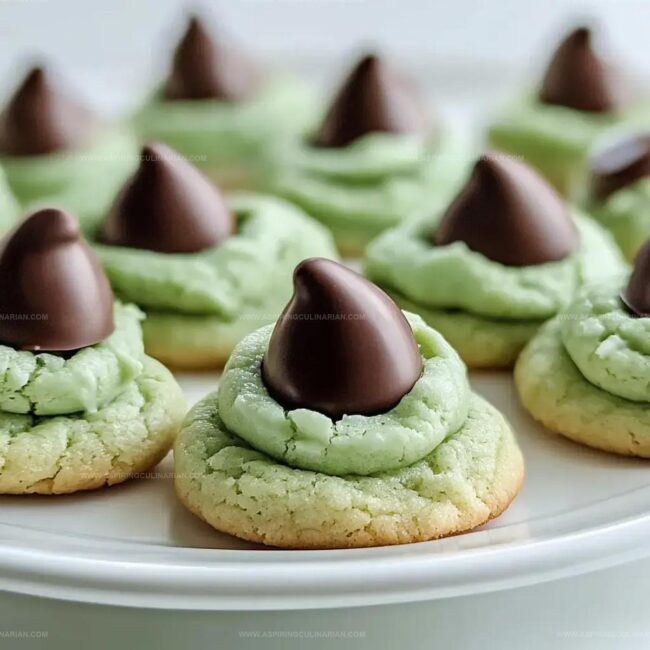
These charming treats blend soft chocolate cookies with smooth mint chocolate kisses in a delectable combination.
chocolate lovers will adore how simple these cookies are to create.
Each bite brings a perfect balance of rich cocoa and refreshing mint essence.
The cookies emerge from the oven with a tempting aroma that fills the kitchen.
Decorated with a perfectly placed mint kiss, they become an irresistible dessert that sparks joy.
Bake a batch and watch them disappear in moments.
What’s Unique About Green Mint Chocolate Cookies

Everything for Green Mint Chocolate Cookie Perfection
Cookie Base:Flavor Enhancers:Finishing Touches:Steps for Baking Green Mint Chocolate Cookies
Step 1: Preheat and Prepare
Warm up your oven to 350°F and grab a baking sheet.
Cover the sheet with parchment paper to prevent sticking and make cleanup a breeze.
Step 2: Create Creamy Base
Grab your mixer and whip together butter and sugar until the mixture becomes light and fluffy.
Next, blend in the egg, egg yolk, and peppermint extract.
This will create a smooth, aromatic foundation for your cookies.
Step 3: Add Vibrant Color
Introduce 6 drops of green food coloring into the mixture.
If you want a more intense green shade, feel free to add a few more drops until you reach your desired color.
Mix thoroughly to ensure even distribution.
Step 4: Develop Cookie Dough
Incorporate the dry ingredients:Mix until all ingredients are well combined and form a cohesive dough.
Be careful not to overmix, as this can make the cookies tough.
Step 5: Form Cookie Shapes
Roll the dough into small, uniform balls about 1 inch in diameter.
Place these balls carefully on the prepared baking sheet, leaving some space between each cookie.
Step 6: Bake to Perfection
Slide the baking sheet into the preheated oven.
Bake for 7-9 minutes, watching carefully.
You want the cookies to be just set but slightly underdone for that soft, chewy texture.
Step 7: Final Touches
Remove the cookies from the oven and let them rest for 2 minutes.
While they’re still warm, gently press a chocolate kiss into the center of each cookie.
Transfer the cookies to a wire rack to cool completely.
Tips for Perfect Mint Chocolate Cookie Texture

Green Mint Chocolate Cookies: Mix and Match Ideas
Serving Suggestions for Mint Cookie Magic
How to Store Green Mint Chocolate Cookies Well
FAQs
The food coloring is added during mixing, allowing you to control the shade of green by adding 6 drops or more until you reach your desired mint-like hue.
Peppermint extract is crucial for the mint flavor, but you could use mint extract as a direct substitute to maintain the recipe’s signature taste profile.
Pressing the chocolate kiss into the warm cookie allows it to slightly melt and adhere perfectly, creating a smooth, integrated topping that looks and tastes delicious.
Print
Mint Kiss Cookies Recipe
- Total Time: 29 minutes
- Yield: 24 1x
Description
Delightful Mint Kiss Cookies bring winter holiday magic straight to your dessert plate. Sweet chocolate mingles with cool peppermint, creating an irresistible treat you’ll crave all season long.
Ingredients
Main Ingredients:
- 2 cups all-purpose flour
- 10 tablespoons (142 grams) butter, room temperature
- 1 cup powdered sugar
Flavor and Color Ingredients:
- 1 whole egg
- 1 egg yolk
- 1 teaspoon peppermint extract
- 6–12 drops green food coloring
Finishing Ingredients:
- 3/4 teaspoon baking powder
- 1/4 teaspoon kosher salt
- 24 chocolate kisses
Instructions
- Preheat the oven to 350°F and cover a baking sheet with parchment paper to ensure even cookie placement and prevent sticking.
- In a mixing bowl, thoroughly blend softened butter and sugar until achieving a light, creamy consistency, then incorporate egg, egg yolk, and peppermint extract for rich flavor development.
- Introduce food coloring, carefully adding drops to create a vibrant green hue, adjusting intensity as desired for visual appeal.
- Gradually fold in flour, baking powder, and salt, stirring until ingredients form a uniform, cohesive dough without overmixing.
- Gently form dough into compact 1-inch spheres, positioning them evenly across the prepared baking sheet with sufficient spacing.
- Slide the cookie sheet into the preheated oven and bake for 7-9 minutes, watching for edges to set while maintaining a slightly soft center.
- Remove cookies from oven and allow a brief 2-minute cooling period, then delicately press a chocolate kiss into the center of each warm cookie before transferring to a wire cooling rack.
Notes
- Choose high-quality peppermint extract for a more intense, authentic mint flavor that elevates the entire cookie experience.
- Try natural food coloring like spinach or matcha powder for a vibrant green hue without artificial additives.
- Chill the dough for 30 minutes before rolling to prevent spreading and create perfectly round, uniform cookies.
- Swap chocolate kisses with dark chocolate chunks or mint-flavored chocolate for a personalized twist on the classic recipe.
- Prep Time: 20 minutes
- Cook Time: 9 minutes
- Category: Desserts, Snacks
- Method: Baking
- Cuisine: American
Nutrition
- Serving Size: 24
- Calories: 150
- Sugar: 10 g
- Sodium: 100 mg
- Fat: 7 g
- Saturated Fat: 4 g
- Unsaturated Fat: 2 g
- Trans Fat: 0 g
- Carbohydrates: 20 g
- Fiber: 0 g
- Protein: 2 g
- Cholesterol: 25 mg
Nathaniel Brooks
Founder & Recipe Developer
Expertise
Farm-to-table cuisine, Seasonal recipe development, Culinary storytelling
Education
Ivy Tech Community College – Indianapolis, IN
Culinary Arts / Hospitality Administration & Events
Focused on hands-on training in classical and modern culinary techniques.
Nathaniel’s story starts in the foothills of the Appalachian Mountains, where farm stands, backyard gardens, and old family recipes shaped his love for real food. After graduating from Ivy Tech Community College in Indianapolis, he spent years working in farm-to-table kitchens, learning how to turn local, seasonal ingredients into something memorable.
Today, Nathaniel pours that same spirit into every single recipe on Aspiring Culinarian – recipes that feel real, comforting, and connected to the land. When he’s not in the kitchen, you’ll find him foraging wild herbs, chasing sunsets with his camera, or writing about the flavors that shaped his roots.