
The Best Oreo Cheesecake Bites Recipe That Everyone Loves
Crafting delectable oreo cheesecake bites combines creamy indulgence with playful chocolate cookie crunch.
Sweet layers meld together in a magical dessert experience.
Minimal ingredients and simple steps make this treat accessible for kitchen novices.
Each compact bite delivers rich, decadent flavors that dance across your palate.
Minimal effort yields maximum satisfaction with this crowd-pleasing confection.
Chocolate cookie crumbs create a delightful textural contrast against smooth, velvety filling.
You’ll want to savor every single morsel of these irresistible mini desserts.
Deep Fried Cookie Treats: The Fun Factor
What’s in Deep Fried Cookie Treats
Main Ingredients:Liquid and Flavor Ingredients:Frying and Garnish Ingredients:How to Make Deep Fried Cookie Treats
Step 1: Whip Up Creamy Filling
Grab your mixing bowl and combine softened cream cheese, granulated sugar, and pure vanilla extract.
Blend until smooth and velvety.
Pop the mixture into the refrigerator to chill and set for about 15 minutes, allowing the flavors to meld together.
Step 2: Prepare Soft Dough Bases
Take your refrigerated biscuit dough and gently flatten each piece using your fingertips or a rolling pin.
Aim for a thin, even surface that will easily wrap around the delicious filling.
Step 3: Create Oreo Pockets
Place a whole Oreo cookie in the center of each flattened dough circle.
Top the Oreo with a generous dollop of the chilled cream cheese mixture.
Step 4: Seal the Treats
Carefully fold the edges of the dough around the Oreo and filling, pinching and sealing the sides completely.
Ensure no filling can escape during frying.
Step 5: Heat Cooking Oil
In a deep fryer or heavy-bottomed pot, warm vegetable or canola oil to 350 degrees Fahrenheit.
Use a cooking thermometer to confirm the precise temperature.
Step 6: Fry to Golden Perfection
Gently lower the prepared bites into the hot oil.
Fry each batch for 2-3 minutes, turning halfway through to achieve an even, golden-brown exterior.
Work in small batches to maintain oil temperature.
Step 7: Craft Decadent Glaze
Combine powdered sugar, milk, and vanilla extract in a bowl.
Whisk until smooth and drizzling consistency is reached.
Step 8: Add Final Flourish
Remove fried Oreo bites and let excess oil drain.
Drizzle with the sweet glaze and sprinkle crushed Oreo cookies on top for extra crunch and visual appeal.
Deep Fried Cookie Know-How
Wild Twists for Cookie Treats
Serving Up Deep Fried Cookie Joy
Deep Fried Cookie Treats: Storage Tips
FAQs
You’ll need cream cheese, sugar, and vanilla extract. Mix these together and chill for 15 minutes before using.
Yes, you can experiment with different sandwich cookies like chocolate-filled or peanut butter cookies for variety.
Make sure to seal the edges of the biscuit dough completely and press firmly to create a tight seal around the filling.
Use a cooking thermometer to ensure the oil is exactly 350F. If you don’t have one, drop a small piece of bread into the oil – it should sizzle and brown quickly but not burn.
Print
Oreo Cheesecake Bites Recipe
- Total Time: 23 minutes
- Yield: 12 1x
Description
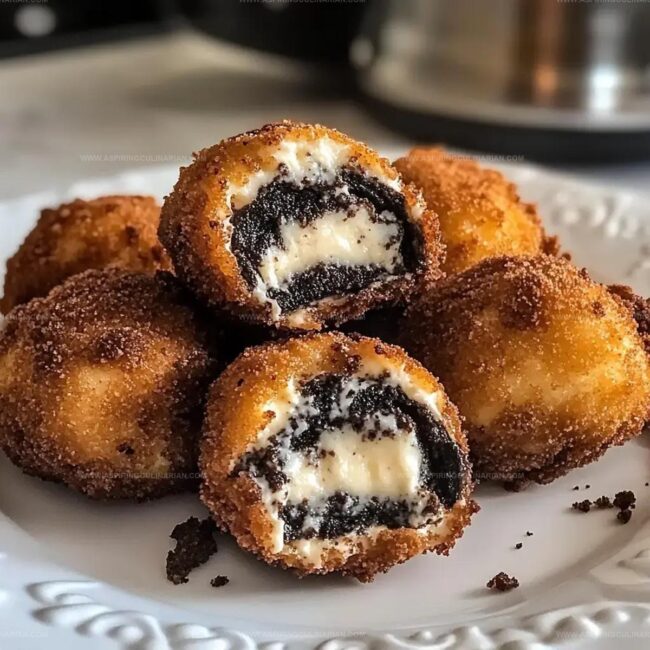
Indulgent Oreo Cheesecake Bites deliver a delightful explosion of creamy cheesecake and crunchy chocolate cookie goodness. Chocolate lovers will savor each rich, velvety morsel that promises pure dessert bliss.
Ingredients
Main Ingredients:
- 1 package Oreos
- 1 package biscuit dough
- 8 ounces (226 grams) cream cheese
Coating and Filling:
- 1 1/4 cups (150 grams) powdered sugar
- 1 cup (100 grams) crushed Oreos
Liquid and Flavoring:
- 2–3 tablespoons (30–45 milliliters) milk
- 1 1/2 teaspoons (7.5 milliliters) vanilla
- Oil for frying
Instructions
- Blend cream cheese with sugar and vanilla extract until smooth, then refrigerate for 15 minutes to firm up the filling.
- Gently flatten each biscuit dough piece using gentle pressure to create a thin, even surface.
- Position an Oreo cookie in the center of each flattened dough circle, topping it with a dollop of chilled cream cheese mixture.
- Carefully fold and pinch the dough edges, completely encasing the Oreo and filling to create a sealed pocket.
- Preheat vegetable oil in a deep fryer or heavy-bottomed pot to precisely 350°F, using a digital thermometer for accuracy.
- Carefully lower the sealed dough pockets into the hot oil, frying for 2-3 minutes until golden brown, turning once midway to ensure even cooking.
- Whisk powdered sugar with milk and vanilla extract until a smooth, pourable glaze forms, adjusting consistency as needed.
- Transfer fried treats to a wire rack, then generously drizzle with prepared glaze and sprinkle crushed Oreo cookies on top for added texture and visual appeal.
Notes
- Chill the cream cheese mixture thoroughly to ensure a thick, manageable filling that won’t leak during frying.
- Use room temperature biscuit dough for easier wrapping and better sealing around the Oreo and cream cheese filling.
- Maintain consistent oil temperature to prevent soggy or overly greasy treats; use a candy thermometer for precision.
- For a gluten-free version, swap regular biscuits with gluten-free crescent roll dough or a similar alternative.
- Prep Time: 20 minutes
- Cook Time: 3 minutes
- Category: Desserts, Snacks
- Method: Frying
- Cuisine: American
Nutrition
- Serving Size: 12
- Calories: 350
- Sugar: 25 g
- Sodium: 220 mg
- Fat: 22 g
- Saturated Fat: 10 g
- Unsaturated Fat: 9 g
- Trans Fat: 0.5 g
- Carbohydrates: 35 g
- Fiber: 1 g
- Protein: 4 g
- Cholesterol: 40 mg
Nathaniel Brooks
Founder & Recipe Developer
Expertise
Farm-to-table cuisine, Seasonal recipe development, Culinary storytelling
Education
Ivy Tech Community College – Indianapolis, IN
Culinary Arts / Hospitality Administration & Events
Focused on hands-on training in classical and modern culinary techniques.
Nathaniel’s story starts in the foothills of the Appalachian Mountains, where farm stands, backyard gardens, and old family recipes shaped his love for real food. After graduating from Ivy Tech Community College in Indianapolis, he spent years working in farm-to-table kitchens, learning how to turn local, seasonal ingredients into something memorable.
Today, Nathaniel pours that same spirit into every single recipe on Aspiring Culinarian – recipes that feel real, comforting, and connected to the land. When he’s not in the kitchen, you’ll find him foraging wild herbs, chasing sunsets with his camera, or writing about the flavors that shaped his roots.