
Fluffy Peanut Butter Roll Cake Recipe: A Sweet Spiral Treat
Crafting a delectable peanut butter roll cake brings pure joy to any dessert lover’s kitchen.
Sweet memories of childhood treats dance through this delightful recipe.
Soft, pillowy layers promise an incredible taste experience waiting to unfold.
Creamy peanut butter filling whispers comfort with every single bite.
Delicate cake rolls create a stunning visual that impresses without effort.
Bakers of all skill levels can master this irresistible dessert with confidence.
You’ll want to slice into this heavenly creation and savor each delicious moment.
Chocolate Peanut Butter Roll: Crowd Pleasers
The Good Stuff in Every Peanut Butter Slice
Cake Base Ingredients:Wet Ingredients:Filling and Topping Ingredients:Garnish and Preparation Ingredients:Chocolate-PB Roll: Let’s Get Rolling
Step 1: Warm Up The Oven
Preheat the oven to a perfect 350°F (175°C), creating an ideal baking environment for your delightful dessert.
Step 2: Prepare Your Baking Canvas
Line a spacious 10×15 inch jelly roll pan with parchment paper, ensuring smooth cake removal and easy cleanup.
Step 3: Create The Dry Foundation
Sift together your dry ingredients with precision:Ensure a lump-free mixture for a smooth cake texture.
Step 4: Whip Up Fluffy Base
Vigorously beat eggs and sugar for approximately 5 minutes until the mixture becomes pale and incredibly light and airy.
Step 5: Blend Liquid Magic
Gently incorporate milk and vanilla extract into the egg mixture, creating a silky smooth base.
Step 6: Fold Ingredients Together
Carefully fold the dry ingredients into the wet mixture, maintaining the delicate airiness of the batter.
Step 7: Bake To Perfection
Spread the batter evenly in the prepared pan and bake for 10-12 minutes until the cake springs back when touched.
Step 8: Initial Rolling Technique
Immediately transfer the warm cake onto a towel generously dusted with powdered sugar, then carefully roll the cake with the towel and allow it to cool completely.
Step 9: Craft The Creamy Filling
Prepare the luscious filling by blending:Mix until smooth and spreadable.
Step 10: Create The Final Masterpiece
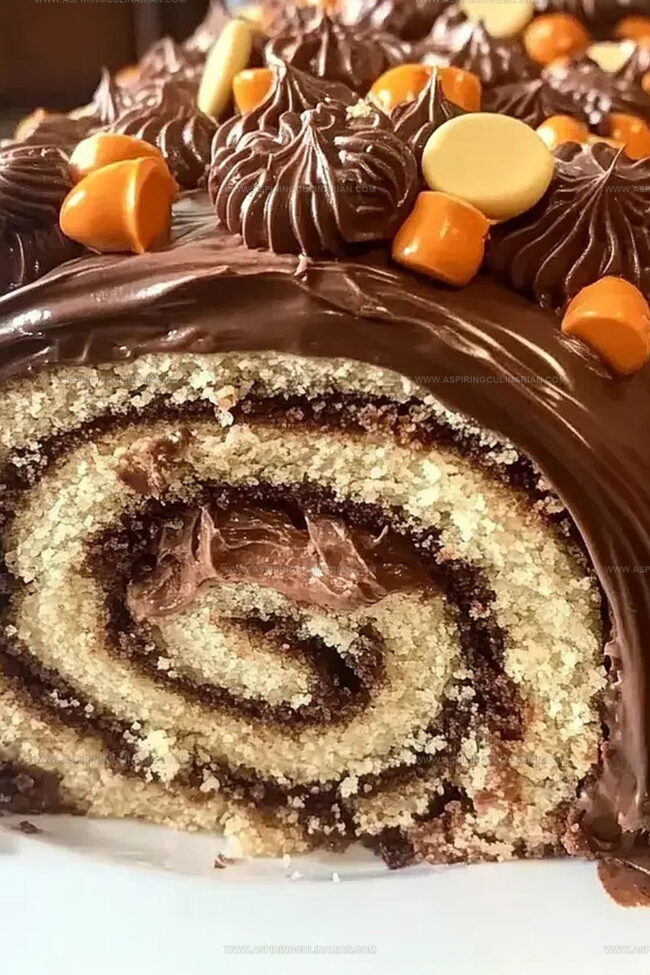
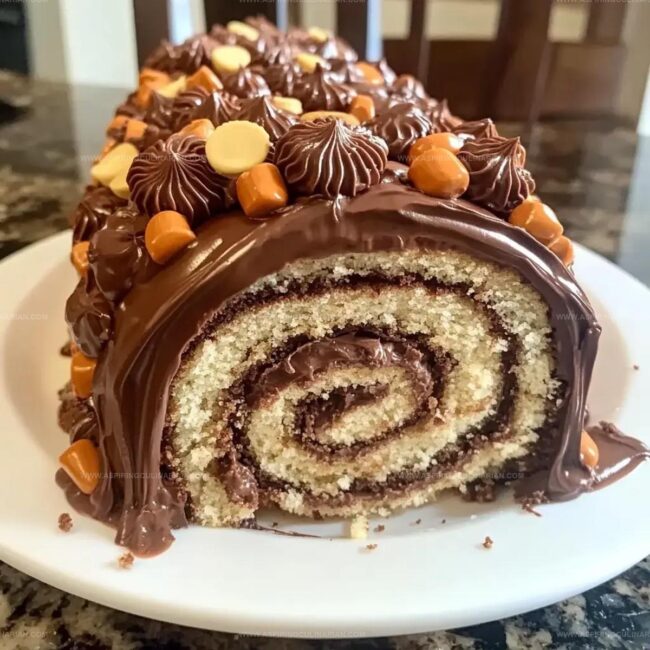
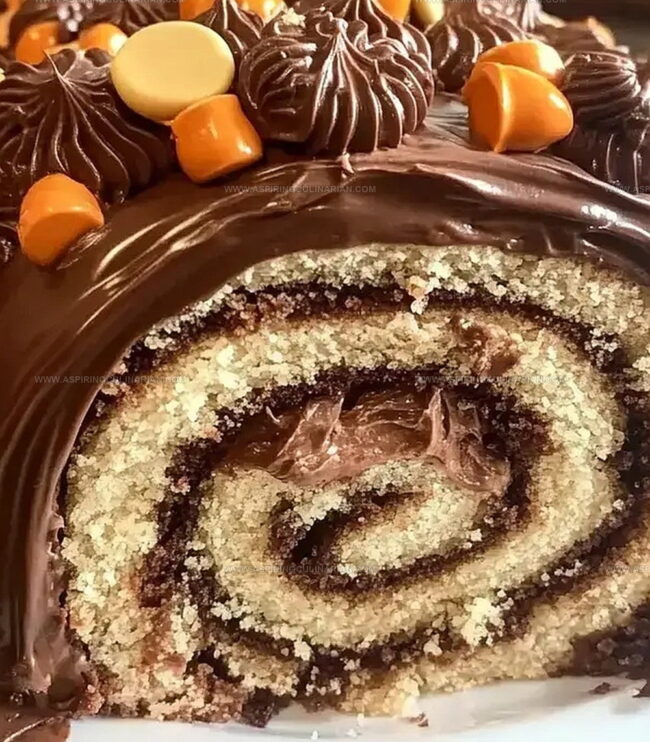
Gently unroll the cooled cake, spread the peanut butter filling evenly, sprinkle chopped Reese’s cups for extra crunch, then re-roll the cake firmly.
Step 11: Add Luxurious Finishing Touches
Top the roll with rich chocolate ganache and garnish with colorful Reese’s Pieces for a stunning presentation.
Secrets for a Perfect Peanut Butter Roll
Tasty Variations for Choco-PB Lovers
How to Plate Chocolate Peanut Butter Rolls
Save It for Later: Chocolate-PB Storage Wisdom
FAQs
This chocolate peanut butter roll combines rich chocolate cake with creamy peanut butter filling and Reese’s candy, creating a decadent dessert that’s both visually impressive and deliciously indulgent.
While it looks complicated, the recipe is actually straightforward. The key is following steps carefully, especially when rolling the cake and handling it while warm to prevent cracking.
Yes, you can substitute regular flour with a gluten-free all-purpose flour blend. Just ensure the blend contains xanthan gum for better texture and structure.
Print
Peanut Butter Roll Cake Recipe
- Total Time: 32 minutes
- Yield: 8 1x
Description
Silky smooth peanut butter roll cake delights dessert enthusiasts with its rich, creamy layers of indulgence. Compact spirals of nutty sweetness promise a luxurious experience that satisfies deep chocolate and peanut butter cravings completely.
Ingredients
Main Ingredients:
- 4 large eggs
- 1 cup all-purpose flour
- 1 cup granulated sugar
- 1 cup creamy peanut butter
- 1 cup chocolate ganache or frosting
Chocolate and Flavor Ingredients:
- 1/4 cup cocoa powder
- 1/4 cup milk
- 1 teaspoon vanilla extract
- 1 teaspoon baking powder
- 1/4 teaspoon salt
- 1/2 cup powdered sugar
- 1/4 cup heavy cream
Garnish and Topping Ingredients:
- 1/2 cup mini Reese’s Peanut Butter Cups, chopped
- Reese’s Pieces for garnish
Instructions
- Preheat the oven to 350°F (175°C) and prepare a 10×15 inch jelly roll pan by lining it with parchment paper.
- Sift together flour, cocoa powder, baking powder, and salt in a separate bowl to ensure smooth, lump-free dry ingredients.
- Using an electric mixer, whip eggs and sugar for 5 minutes until the mixture becomes pale and forms a thick, ribbony texture.
- Gently incorporate milk and vanilla extract into the egg mixture, stirring until just combined.
- Carefully fold the sifted dry ingredients into the wet mixture, maintaining the airiness of the batter.
- Spread the batter evenly into the prepared pan, creating a thin, consistent layer.
- Bake for 10-12 minutes until the cake springs back when lightly touched and edges begin to pull away from the pan.
- Immediately after baking, dust a clean kitchen towel with powdered sugar and carefully invert the hot cake onto the towel.
- Roll the cake with the towel while still warm, allowing it to cool completely in this rolled shape to prevent cracking.
- Prepare the filling by blending peanut butter, powdered sugar, and cream until smooth and spreadable.
- Carefully unroll the cooled cake and spread the peanut butter filling evenly across the surface.
- Sprinkle chopped Reese’s cups over the filling for added texture and flavor.
- Tightly re-roll the cake, pressing gently to secure the filling.
- Drizzle with chocolate ganache and garnish with Reese’s Pieces for a decorative finish.
Notes
- Prep Like a Pro Roll the cake while it’s warm to prevent cracking and ensure a smooth, flexible texture.
- Moisture Magic Dust the towel with powdered sugar to prevent sticking and add a subtle sweetness during the rolling process.
- Filling Finesse Chill the peanut butter filling briefly to make spreading easier and maintain a clean, even layer.
- Chocolate Hack Warm the ganache slightly to create a glossy, drip-like finish that looks professionally made.
- Prep Time: 20 minutes
- Cook Time: 12 minutes
- Category: Desserts, Snacks
- Method: Baking
- Cuisine: American
Nutrition
- Serving Size: 8
- Calories: 324 kcal
- Sugar: 25 g
- Sodium: 180 mg
- Fat: 22 g
- Saturated Fat: 7 g
- Unsaturated Fat: 13 g
- Trans Fat: 0.2 g
- Carbohydrates: 27 g
- Fiber: 3 g
- Protein: 9 g
- Cholesterol: 70 mg
Nathaniel Brooks
Founder & Recipe Developer
Expertise
Farm-to-table cuisine, Seasonal recipe development, Culinary storytelling
Education
Ivy Tech Community College – Indianapolis, IN
Culinary Arts / Hospitality Administration & Events
Focused on hands-on training in classical and modern culinary techniques.
Nathaniel’s story starts in the foothills of the Appalachian Mountains, where farm stands, backyard gardens, and old family recipes shaped his love for real food. After graduating from Ivy Tech Community College in Indianapolis, he spent years working in farm-to-table kitchens, learning how to turn local, seasonal ingredients into something memorable.
Today, Nathaniel pours that same spirit into every single recipe on Aspiring Culinarian – recipes that feel real, comforting, and connected to the land. When he’s not in the kitchen, you’ll find him foraging wild herbs, chasing sunsets with his camera, or writing about the flavors that shaped his roots.