
Homemade Pumpkin Whoopie Pies with Creamy Filling Recipe
Autumn brings magical moments when classic pumpkin whoopie pies with their irresistible creamy filling become pure comfort.
Seasonal baking transforms ordinary afternoons into delightful celebrations of warmth and sweetness.
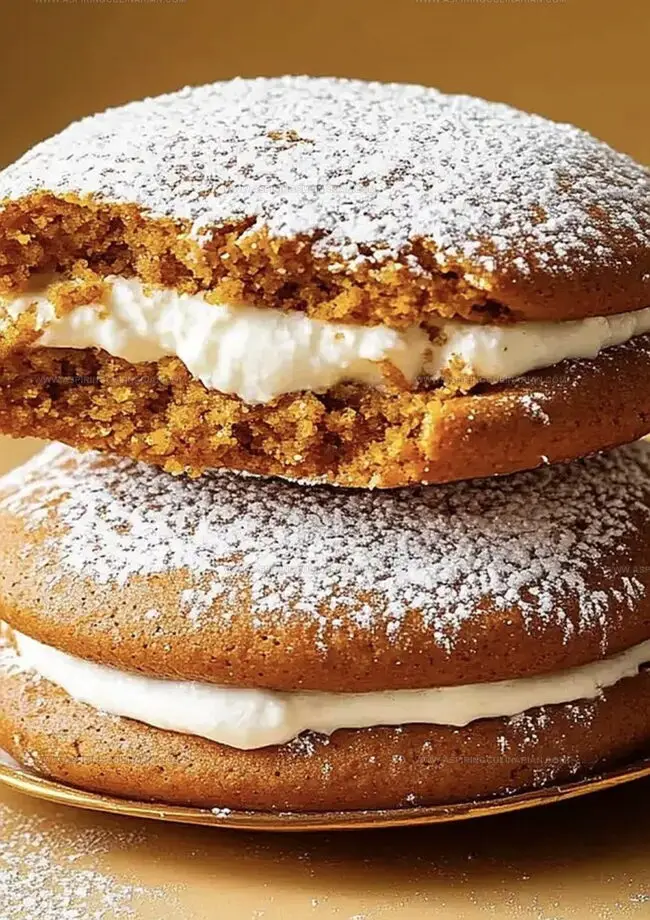
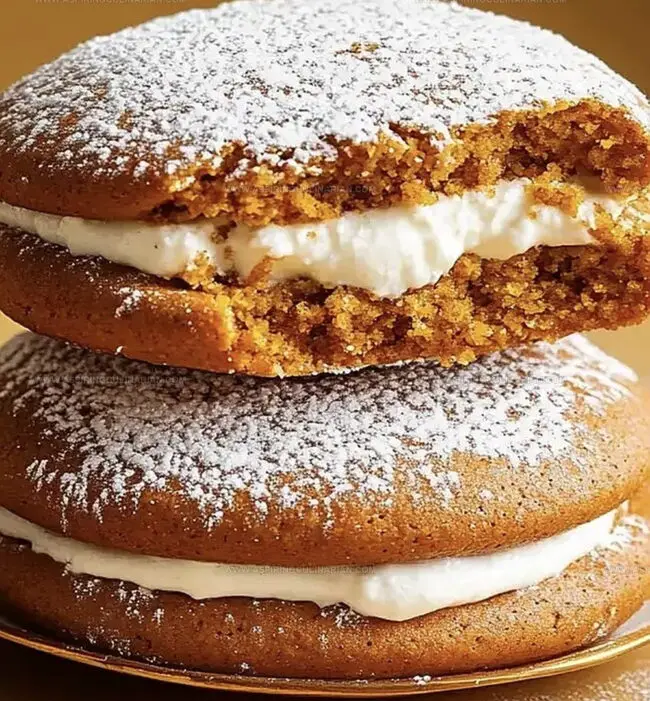
Soft, spiced cake-like cookies sandwich a luxurious cream cheese center that melts in your mouth.
Each bite promises a perfect balance of rich pumpkin and smooth, tangy filling.
Generations of bakers have cherished this nostalgic treat that connects us to cherished memories.
Whipping up these delectable sandwiches requires simple ingredients and minimal effort.
Let’s create something special that will make everyone smile and ask for seconds.
Pumpkin Whoopie Pies Why They Shine
Pumpkin Whoopie Pies What You Need
Dry Ingredients:Wet Ingredients:Filling Ingredients:Pumpkin Whoopie Pies Step By Step
Step 1: Fire Up the Oven
Crank the oven to a toasty 350F (177C).
Grab your baking sheets and dress them in parchment paper, creating a perfect non-stick surface for your whoopie pie adventure.
Step 2: Craft the Dry Magic
Grab a mixing bowl and unleash your inner wizard.
Whisk together:Let these ingredients dance and mingle until they’re perfectly blended.
Step 3: Whip Up the Wet Symphony
In another bowl, beat the sugars and oil into a harmonious mixture.
Pour in the pumpkin, crack in the egg, and splash some vanilla extract.
Stir until everything looks smooth and inviting.
Step 4: Create Cookie Batter Fusion
Gently fold the dry ingredients into the wet mixture.
Stir with love until everything combines into a luscious batter that hints at the deliciousness to come.
Step 5: Dollop and Spread
Using a spoon, drop little mounds of batter onto the prepared baking sheets.
Give each dollop some breathing room, spacing them about 2 inches apart.
Step 6: Bake to Perfection
Slide the sheets into the oven and let the magic happen.
Bake for 10-12 minutes until the cookies look set and slightly golden.
Rescue them and let them cool on wire racks.
Step 7: Whip Up Dreamy Filling
Beat the filling ingredients until they transform into a cloud-like, creamy delight:Blend until silky smooth and irresistible.
Step 8: Create Whoopie Pie Sandwiches
Take a cooled cookie, spread a generous layer of filling on its flat side.
Crown it with another cookie, pressing gently to create the perfect whoopie pie sandwich.
Pumpkin Whoopie Pies Top Tips
Pumpkin Whoopie Pies Fun Variations
Pumpkin Whoopie Pies How To Serve
Pumpkin Whoopie Pies Storage Advice
FAQs
Not at all! This recipe is beginner-friendly and requires basic baking skills. The steps are straightforward, and you can easily mix ingredients and assemble the whoopie pies with minimal baking experience.
Yes, you can use fresh pumpkin puree. Just make sure to strain excess moisture and use the same measurement as canned pumpkin to maintain the right consistency in the recipe.
Look for firm edges and a set center. They should be slightly springy when touched and have a light golden color around the edges. Avoid overbaking to keep them soft and moist.
Print
Pumpkin Whoopie Pies Creamy Filling Recipe
- Total Time: 32 minutes
- Yield: 12 1x
Description
Seasonal bliss meets classic dessert in these pumpkin whoopie pies, where spiced cake sandwiches mingle with luscious cream cheese filling. Comforting autumn flavors dance between pillowy cake rounds, inviting you to savor each delightful bite.
Ingredients
Wet Ingredients:
- 1 1/2 cups canned pumpkin puree
- 1/2 cup canola oil
- 1 large egg
- 1 teaspoon vanilla extract
- 1/4 cup unsalted butter, softened
- 1/4 cup cream cheese, softened
Dry Ingredients:
- 1 1/2 cups all-purpose flour
- 1/2 cup packed brown sugar
- 1/2 cup granulated sugar
- 1/2 teaspoon baking powder
- 1/2 teaspoon baking soda
- 1/4 teaspoon salt
Spices and Flavoring:
- 1 teaspoon ground cinnamon
- 1/2 teaspoon ground ginger
- 1/4 teaspoon ground nutmeg
- 1/4 teaspoon ground cloves
- 1 1/2 cups powdered sugar
- 1/2 teaspoon vanilla extract
Instructions
- Prepare the baking environment by heating the oven to 350F (177C) and lining two baking sheets with parchment paper for optimal cookie performance.
- Create a fragrant dry mixture by whisking flour, baking powder, baking soda, and warm spices like cinnamon, ginger, nutmeg, and cloves with a pinch of salt in a medium bowl.
- In a separate large bowl, blend brown and granulated sugars with oil until well incorporated, then introduce pumpkin puree, egg, and vanilla extract, mixing until the liquid becomes uniform.
- Gently fold the dry ingredient mixture into the wet ingredients, stirring carefully to create a smooth, consistent pumpkin batter without overmixing.
- Portion the batter onto prepared baking sheets using a spoon, ensuring generous 2-inch intervals between each dollop to allow proper spreading during baking.
- Bake the pumpkin cookies for 10-12 minutes, watching for firm edges and a set center. Remove from oven and transfer to wire cooling racks to stabilize their texture.
- Craft the creamy filling by whipping butter, cream cheese, powdered sugar, and vanilla extract until the mixture reaches a silky, spreadable consistency.
- Construct the whoopie pies by generously spreading the filling on the flat side of one cookie, then gently pressing a second cookie on top to create a delightful sandwich.
Notes
- Swap pumpkin puree for homemade roasted pumpkin for deeper, richer flavor and more authentic taste.
- Chill batter for 30 minutes before baking to prevent spreading and create more uniform, rounded whoopie pies.
- Use room temperature ingredients to ensure smoother mixing and better texture in both cookies and filling.
- replace wheat flour with gluten-free blend, use coconut oil instead of vegetable oil, and swap dairy cream cheese with vegan alternatives for inclusive dessert options.
- Prep Time: 20 minutes
- Cook Time: 12 minutes
- Category: Desserts, Snacks
- Method: Baking
- Cuisine: American
Nutrition
- Serving Size: 12
- Calories: 230 kcal
- Sugar: 22 g
- Sodium: 120 mg
- Fat: 10 g
- Saturated Fat: 3 g
- Unsaturated Fat: 7 g
- Trans Fat: 0 g
- Carbohydrates: 34 g
- Fiber: 2 g
- Protein: 2 g
- Cholesterol: 20 mg
Nathaniel Brooks
Founder & Recipe Developer
Expertise
Farm-to-table cuisine, Seasonal recipe development, Culinary storytelling
Education
Ivy Tech Community College – Indianapolis, IN
Culinary Arts / Hospitality Administration & Events
Focused on hands-on training in classical and modern culinary techniques.
Nathaniel’s story starts in the foothills of the Appalachian Mountains, where farm stands, backyard gardens, and old family recipes shaped his love for real food. After graduating from Ivy Tech Community College in Indianapolis, he spent years working in farm-to-table kitchens, learning how to turn local, seasonal ingredients into something memorable.
Today, Nathaniel pours that same spirit into every single recipe on Aspiring Culinarian – recipes that feel real, comforting, and connected to the land. When he’s not in the kitchen, you’ll find him foraging wild herbs, chasing sunsets with his camera, or writing about the flavors that shaped his roots.