Spooky Spiderweb Brownies: A Haunting Halloween Recipe
Crafting spiderweb brownies can turn an ordinary Halloween dessert into a delightfully creepy centerpiece that sparks conversation.
Dark chocolate creates a rich, decadent base for this festive treat.
Intricate web designs emerge with simple white frosting techniques that look complicated but remain easy to execute.
Careful piping transforms ordinary squares into spine-tingling sweets perfect for seasonal gatherings.
Bold contrast between dark chocolate and white webbing catches every guest’s eye instantly.
Kids and adults alike will marvel at the dramatic presentation that seems like magic.
You can become the Halloween party hero with these wickedly impressive brownies that taste as amazing as they look.
Spiderweb Brownies: Ghoulishly Good Treats
Brownie Ingredient List for Webby Fun
Main Ingredients:Dry Ingredients:Topping and Decoration:Bake Up Spiderweb Brownies
Step 1: Fire Up the Oven
Crank your oven to a toasty 350F (175C).
Grab your trusty 8×8-inch baking pan and give it a generous coating of grease to prevent any sticky situations.
Step 2: Butter Bliss
Zap the butter in the microwave until it transforms into a silky liquid.
Whisk in the sugar, eggs, and vanilla extract until the mixture looks smooth and dreamy.
Step 3: Chocolate Magic
Dive into your dry ingredients:Stir everything together until it forms a rich, dark batter that looks like edible chocolate magic.
Step 4: Pan Perfection
Pour the batter into your prepared pan, using a spatula to spread it evenly like a chocolate blanket.
Step 5: Baking Brilliance
Slide the pan into the oven and bake for 20-25 minutes.
Check doneness by inserting a toothpick – it should come out with just a few moist crumbs.
Let the brownies cool completely.
Step 6: Chocolate Transformation
Melt white chocolate chips with a splash of vegetable oil in the microwave.
Stir every 15 seconds to avoid burning and create a smooth, glossy mixture.
Step 7: Piping Preparation
Transfer the melted white chocolate into a piping bag or a plastic bag with a tiny corner snipped off.
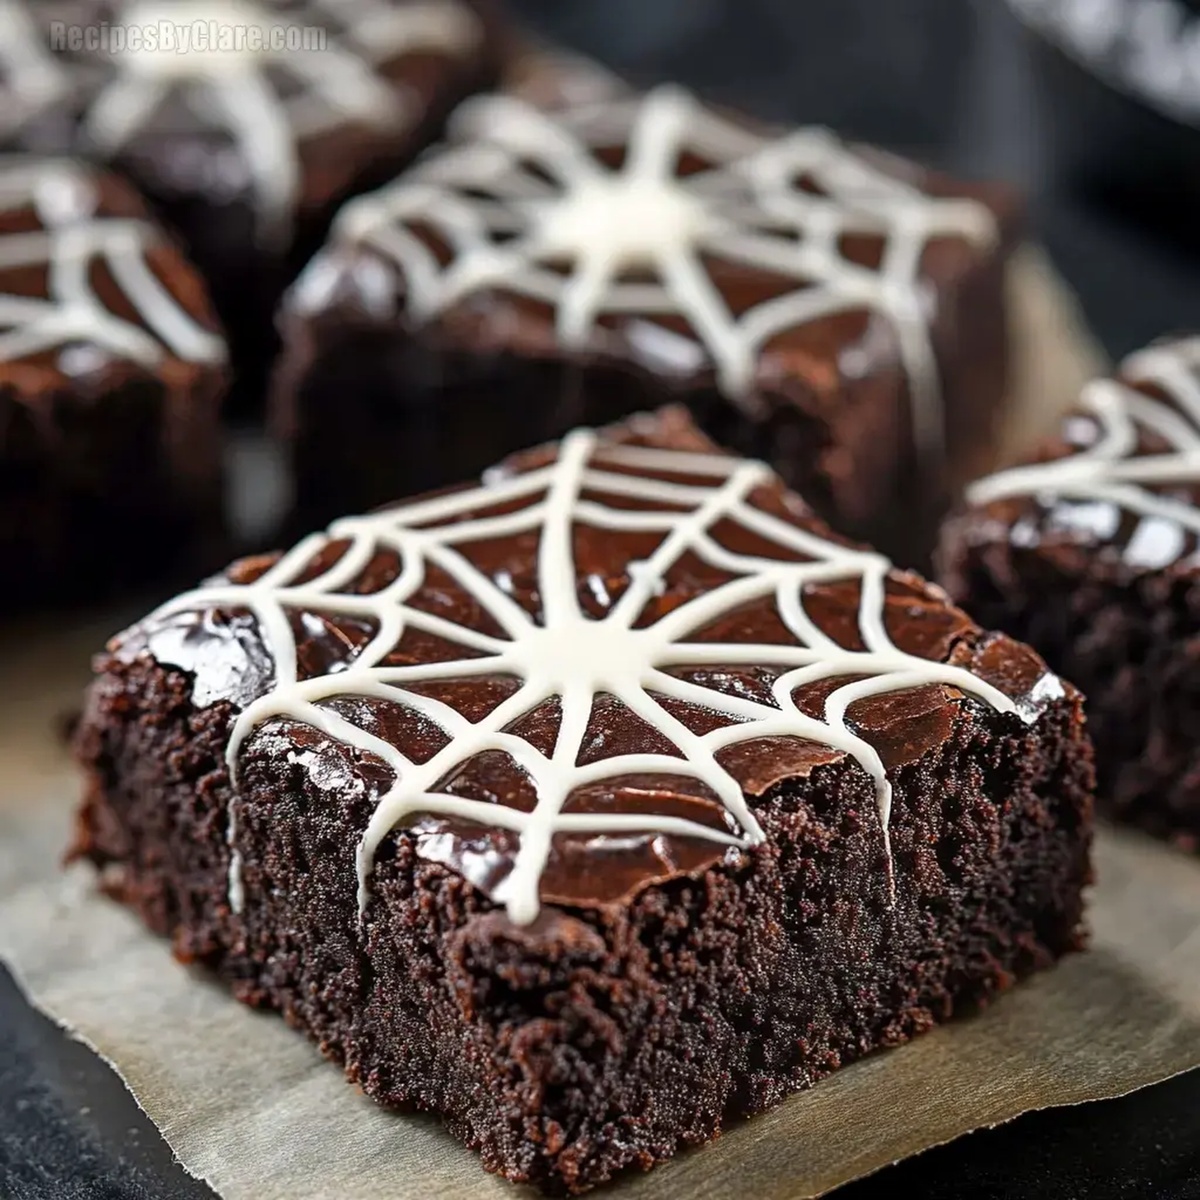
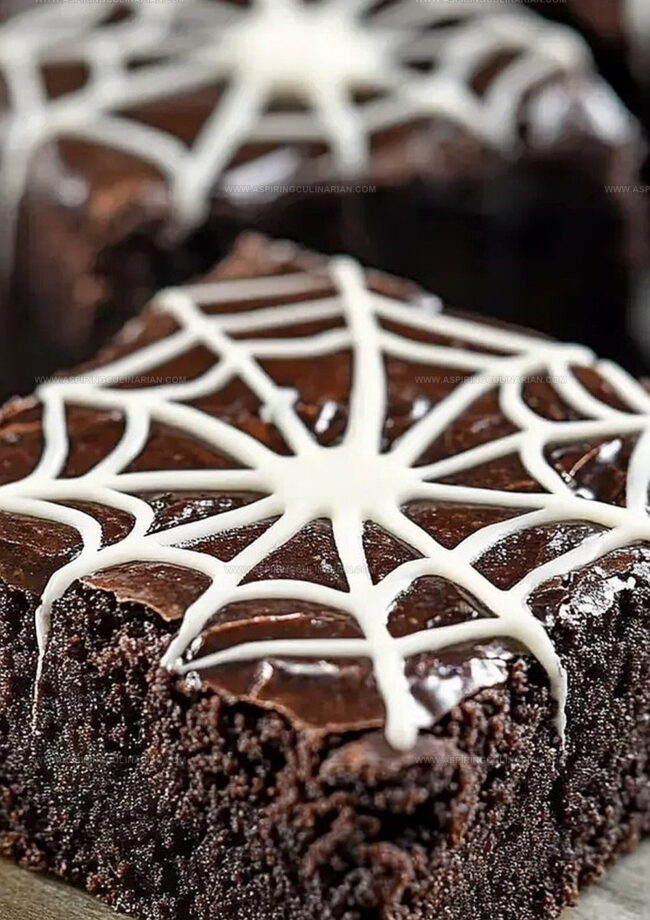
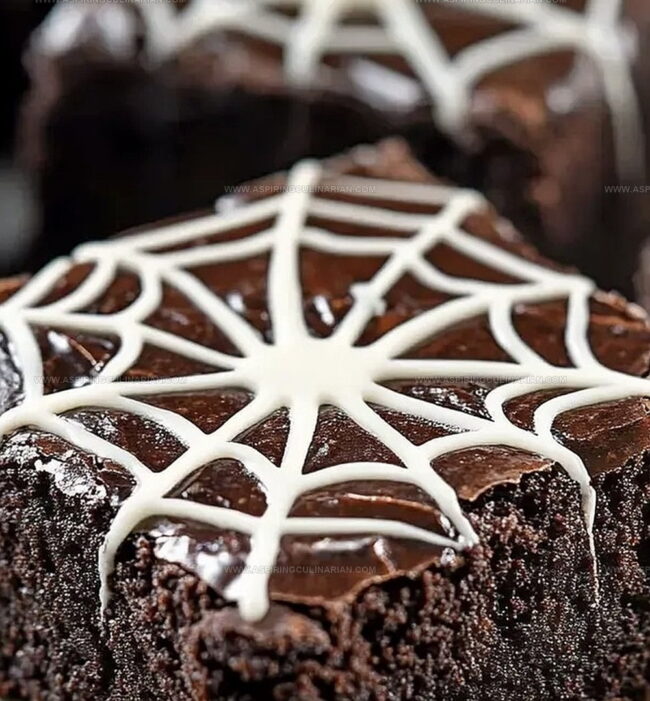
Step 8: Spiderweb Spectacular
Start from the center of the brownies and pipe a mesmerizing spiral.
Then, grab a toothpick and drag lines from the center outwards, creating a spine-tingling spiderweb design.
Step 9: Final Fright
Allow the topping to set completely before slicing your brownies into terrifyingly delicious squares.
Tips for Perfect Halloween Brownies
Brownie Variations for Spooky Swirls
Serve Brownies with Webby Flair
Spooky Serving Sensations: Halloween Brownie Edition
Store Brownies for Ghoulish Nights
FAQs
Yes, you can substitute milk chocolate, but the classic Halloween look works best with white chocolate against the dark brownie background.
Practice your piping technique on parchment paper first. Start from the center and create concentric circles, then use a toothpick to draw straight lines from the center outwards for the web effect.
Absolutely! Kids can help mix ingredients, spread batter, and especially enjoy creating the spiderweb design. Just supervise them during the oven and melting chocolate steps.
Print
Spiderweb Brownies Halloween Recipe
- Total Time: 45 minutes
- Yield: 12 1x
Description
Haunting Spiderweb Brownies weave delightful Halloween magic across chocolate-rich surfaces. Dark chocolate swirls and delicate web designs invite sweet-toothed guests to indulge in this spine-tingling seasonal treat.
Ingredients
Main Ingredients:
- 1 cup granulated sugar
- 2 large eggs
- 1/2 cup unsalted butter, melted
- 1/3 cup unsweetened cocoa powder
- 1/2 cup all-purpose flour
Baking Enhancers:
- 1/4 teaspoon baking powder
- 1/4 teaspoon salt
- 1 teaspoon vanilla extract
Decoration Ingredients:
- 1/4 cup white chocolate chips
- 1 teaspoon vegetable oil
Instructions
- Preheat the oven to 350°F (175°C) and thoroughly coat an 8×8-inch baking pan with non-stick spray or butter.
- Melt butter in a microwave-safe bowl, then vigorously whisk in sugar until the mixture becomes light and fluffy.
- Incorporate eggs and vanilla extract, stirring until the mixture is completely smooth and well-integrated.
- Sift cocoa powder, flour, baking powder, and salt directly into the wet ingredients, folding gently until a uniform batter forms without overmixing.
- Transfer the batter to the prepared pan, using a spatula to distribute evenly and create a level surface.
- Bake for 22-27 minutes, checking doneness by inserting a toothpick that should emerge with a few moist crumbs. Remove from oven and allow to cool completely at room temperature.
- Melt white chocolate chips with vegetable oil in short microwave intervals, stirring between each 15-second burst to prevent scorching.
- Transfer melted white chocolate to a piping bag or zip-lock bag with a tiny corner snipped off for precision.
- Create the spiderweb design by piping a tight spiral from the brownie’s center, then delicately drag a toothpick from the center outwards to form interconnected web lines.
- Allow the white chocolate design to set for 10-15 minutes before slicing into square portions.
Notes
- Swap cocoa powder with gluten-free flour blend for celiac-friendly brownies that maintain rich chocolate texture.
- Reduce sugar by using ripe mashed bananas or unsweetened applesauce to create healthier, naturally sweetened version.
- Create clean web lines by ensuring white chocolate is perfectly smooth and using a steady hand when piping spiral design.
- Refrigerate brownies for 15 minutes before decorating to help chocolate topping set faster and create sharper spiderweb patterns.
- Prep Time: 20 minutes
- Cook Time: 25 minutes
- Category: Desserts, Snacks
- Method: Baking
- Cuisine: American
Nutrition
- Serving Size: 12
- Calories: 184 kcal
- Sugar: 15 g
- Sodium: 61 mg
- Fat: 10 g
- Saturated Fat: 5 g
- Unsaturated Fat: 4 g
- Trans Fat: 0 g
- Carbohydrates: 22 g
- Fiber: 2 g
- Protein: 2 g
- Cholesterol: 31 mg
Nathaniel Brooks
Founder & Recipe Developer
Expertise
Farm-to-table cuisine, Seasonal recipe development, Culinary storytelling
Education
Ivy Tech Community College – Indianapolis, IN
Culinary Arts / Hospitality Administration & Events
Focused on hands-on training in classical and modern culinary techniques.
Nathaniel’s story starts in the foothills of the Appalachian Mountains, where farm stands, backyard gardens, and old family recipes shaped his love for real food. After graduating from Ivy Tech Community College in Indianapolis, he spent years working in farm-to-table kitchens, learning how to turn local, seasonal ingredients into something memorable.
Today, Nathaniel pours that same spirit into every single recipe on Aspiring Culinarian – recipes that feel real, comforting, and connected to the land. When he’s not in the kitchen, you’ll find him foraging wild herbs, chasing sunsets with his camera, or writing about the flavors that shaped his roots.