
Irresistible Strawberry Crunch Cheesecake Cones Recipe
Crisp summer afternoons spark magic when a strawberry crunch cheesecake cone appears on your plate.
Sweet memories blend perfectly with this playful dessert.
Creamy textures invite unexpected delights into every delectable bite.
Layers of fresh strawberries complement rich cream cheese in surprising ways.
Casual gatherings suddenly feel more special with these elegant treats.
Kids and adults alike will appreciate the clever combination of crunchy cone and smooth filling.
Prepare to fall in love with a dessert that promises pure joy.
Strawberry Crunch Cheesecake Cones Standout Flavors to Savor
What You’ll Need for Cheesecake Crunch Cones
Main Ingredients:
Cheesecake Filling:Crunch Topping:Assembly Ingredients:Putting Together Strawberry Crunch Cheesecake Cones
Step 1: Whip The Creamy Base
In a spacious mixing bowl, whip the heavy cream until it forms stiff, glossy peaks that hold their shape beautifully.
Set this fluffy cloud aside.
Grab another bowl and beat the softened cream cheese until silky smooth.
Sprinkle in powdered sugar and a splash of vanilla extract, blending until the mixture becomes light and dreamy.
Gently fold the whipped cream into the cream cheese mixture, creating a luxurious, airy filling that will make your taste buds dance.
Step 2: Create Crunchy Strawberry Topping
Transform your freeze-dried strawberries and Golden Oreos into a fine, delicate powder using a food processor or by crushing them with a rolling pin.
The key is to create a uniform, sandy texture.
Drizzle melted butter over the crumb mixture and mix thoroughly, ensuring every crumb is coated and will stick perfectly to your cheesecake cones.
Step 3: Build Delectable Cheesecake Cones
Transfer the creamy cheesecake filling into a piping bag or a zip-lock bag with a corner snipped off.
This will help you elegantly fill each ice cream cone to the brim with the luscious mixture.
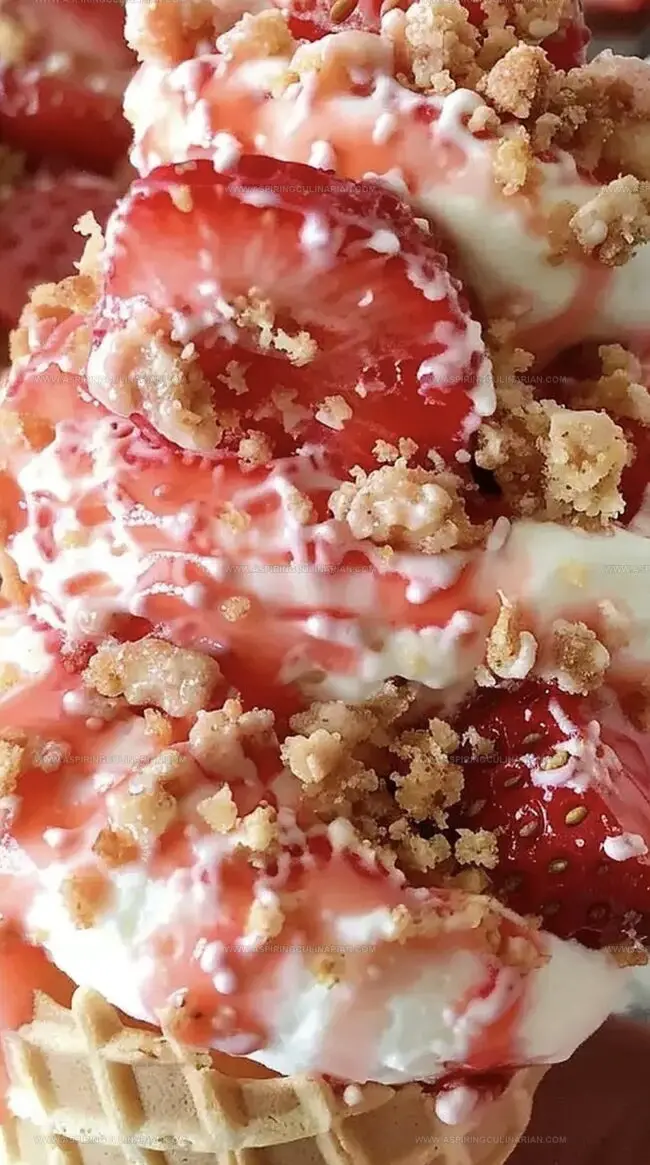
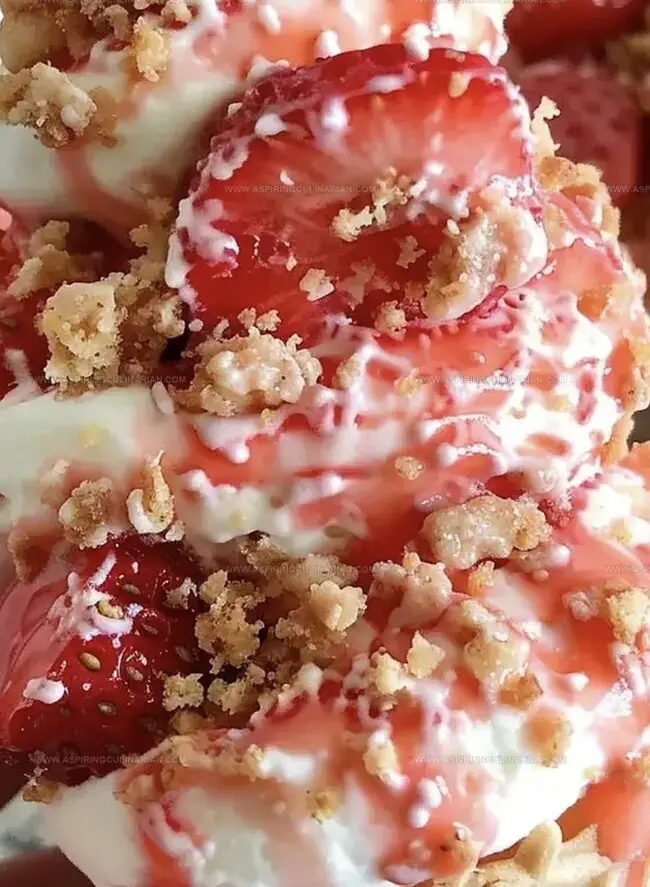
Once filled, carefully dip the cones into the strawberry crunch topping, gently pressing to ensure the crumbs adhere completely.
For an extra touch of elegance, crown your cones with fresh, vibrant strawberries if you’re feeling fancy.
Pro Tips for Best Crunch and Creaminess
Swaps and Ideas for Cheesecake Crunch Cones
Suggestions for Serving Cheesecake Crunch Cones
How to Keep Cheesecake Cones Fresh
FAQs
Freeze-dried strawberries provide an intense strawberry flavor and crispy texture that regular fresh strawberries cannot achieve. They create a concentrated, sweet crunch that elevates the overall taste of the dessert.
Golden Oreos work best, but you can substitute with graham crackers or vanilla wafers. The key is using a light-colored, vanilla-flavored cookie that complements the strawberry flavor without overpowering it.
Fill the cone just before serving and ensure the cheesecake filling is thick and stable. Avoid leaving the filled cones sitting for too long, as moisture from the filling can quickly soften the cone.
Print
Strawberry Crunch Cheesecake Cones Recipe
- Total Time: 50 minutes
- Yield: 10 1x
Description
Creamy strawberry crunch cheesecake cones deliver a delightful dessert experience that blends classic cheesecake with playful cone textures. Sweet berries and crisp crumbles create a perfect summer treat you’ll savor with pure delicious delight.
Ingredients
Base Ingredients:
- 8 ounces (226 grams) cream cheese, softened
- 1 cup (240 milliliters) heavy cream
- 1/2 cup (60 grams) powdered sugar
- 1 teaspoon vanilla extract
Crunch Topping Ingredients:
- 1 cup (30 grams) freeze-dried strawberries, crushed
- 1 cup (100 grams) Golden Oreos, crushed
- 1/4 cup (57 grams) melted butter
Serving Ingredients:
- 8–10 ice cream cones
- Fresh strawberries (optional, for garnish)
Instructions
- Whip the heavy cream to stiff, glossy peaks and reserve. In a separate mixing vessel, transform the cream cheese into a silky smooth texture using an electric mixer.
- Incorporate powdered sugar and vanilla extract into the cream cheese, blending until harmonious. Gently fold the whipped cream into the cream cheese mixture, creating a luxurious, airy filling.
- Pulverize freeze-dried strawberries and Golden Oreos into delicate, uniform crumbs using a food processor or rolling pin. Integrate melted butter with the crumb mixture, ensuring complete and even coating.
- Transfer the cheesecake filling into a piping apparatus or resealable plastic bag with a corner trimmed. Carefully pipe the filling into each ice cream cone, reaching the brim with precision.
- Delicately immerse the filled cones into the strawberry crunch topping, applying gentle pressure to ensure the crumbs adhere completely. Optional: Embellish with fresh, vibrant strawberry slices for a decorative touch.
- Refrigerate the prepared cones for 30 minutes to allow the filling to set and the flavors to meld, creating a perfectly chilled dessert experience.
Notes
- Chill cream cheese to room temperature for smoother mixing and easier blending with whipped cream.
- Use fresh, high-quality freeze-dried strawberries for intense flavor and vibrant color in the crunch topping.
- Opt for sturdy waffle cones to prevent crumbling and provide a crisp base for the creamy filling.
- Refrigerate assembled cones for at least 30 minutes before serving to help set the filling and enhance flavor melding.
- Prep Time: 20 minutes
- Cook Time: 30 minutes
- Category: Desserts, Snacks
- Method: None
- Cuisine: American
Nutrition
- Serving Size: 10
- Calories: 6 kcal
- Sugar: 0.4 g
- Sodium: 1 mg
- Fat: 0.4 g
- Saturated Fat: 0.2 g
- Unsaturated Fat: 0.2 g
- Trans Fat: 0 g
- Carbohydrates: 0.7 g
- Fiber: 0.05 g
- Protein: 0.1 g
- Cholesterol: 1 mg
Nathaniel Brooks
Founder & Recipe Developer
Expertise
Farm-to-table cuisine, Seasonal recipe development, Culinary storytelling
Education
Ivy Tech Community College – Indianapolis, IN
Culinary Arts / Hospitality Administration & Events
Focused on hands-on training in classical and modern culinary techniques.
Nathaniel’s story starts in the foothills of the Appalachian Mountains, where farm stands, backyard gardens, and old family recipes shaped his love for real food. After graduating from Ivy Tech Community College in Indianapolis, he spent years working in farm-to-table kitchens, learning how to turn local, seasonal ingredients into something memorable.
Today, Nathaniel pours that same spirit into every single recipe on Aspiring Culinarian – recipes that feel real, comforting, and connected to the land. When he’s not in the kitchen, you’ll find him foraging wild herbs, chasing sunsets with his camera, or writing about the flavors that shaped his roots.